Validate GSTIN/UIN and HSN/SAC Online in TallyPrime
The information related to a Party’s GSTIN/UIN is a vital part of transactions recorded for the Party. On the other hand, HSN/SAC details are important to identify items, goods, or services in a transaction, as applicable. Furthermore, if your business has a turnover exceeding Rs. 5 Crore in the previous financial year, then you need to furnish 4, 6, or 8 digit HSN codes for Stock Items as per new mandate under Notification 78/2020 issued by the GST authority. Additionally, you need to provide accurate descript for Stock Items in the Invoice. So, it is mandatory to enter the correct information related to GSTIN/UIN and HSN/SAC code in transactions. The entry of the authentic information in the transaction will ensure seamlessness in filing returns and claiming Input Tax Credit, if applicable. To ensure that the information in transactions is authentic, you must validate GSTIN/UIN and HSN/SAC.
TallyPrime Release 2.0 onwards, you can validate GSTIN/UIN and HSN/SAC information online from within TallyPrime. Furthermore, TallyPrime also facilitates quick online validation of GSTIN/UIN information for multiple parties and HSN/SAC information for multiple Stock Items in bulk.
Prerequisites for Online Validation of GSTIN/UIN and HSN/SAC Information in TallyPrime
There are three pre-requisites for online validation of GSTIN or HSN Code and related information in TallyPrime.
- GST should be enabled in the Company in TallyPrime.
- e-Invoicing or e-Way Bill or both the features should be enabled in TallyPrime.
To know how to enable e-Invoicing in TallyPrime, click here.
And to know how to enable e-Way Bill in TallyPrime, click here. - You need authentic e-Invoice or e-Way Bill API login credentials that you must have generated using Tally as GSP on the e-Invoice or e-Way Bill portal, respectively.
This is because, to validate GSTIN and HSN online in TallyPrime, you will need to be logged in using the e-Invoice or e-Way Bill credentials in TallyPrime so that the product can exchange the GSTIN/UIN or HSN/SAC information with the portal.
In TallyPrime, once you log in with your credentials, you will not need to log in for the next six hours, provided you do not shut your system or computer.
The e-Invoice Login screen in TallyPrime appears as shown below.
The e-Way Bill Login screen in TallyPrime appears as shown below.
To know how to generate credentials for e-Invoicing using Tally as GSTP, click here.
And to know how to generate credentials for e-Way Bill using Tally as GSP, click here.
Online GSTIN/UIN Validation in TallyPrime
As mentioned earlier, entry of incorrect or invalid GSTIN/UIN information can lead to problems in filing returns or claiming Input Tax Credit (ITC). Furthermore, it may also cause obstacles in generating e-Invoices and e-Way Bills. So, you will need to validate the information. Moreover, there can be many other scenarios in which you will want to validate the GSTIN and UIN information of a party with whom you are doing business.
In this section:
- Reasons to validate GSTIN/UIN Info online in TallyPrime
- Online GSTIN validation in TallyPrime for single party
- Online GSTIN validation in TallyPrime for multiple parties in bulk
Reasons to validate GSTIN/UIN Info online in TallyPrime
You will need to validate UIN or GSTIN for various reasons.
Authenticity of GSTIN/UIN information
GSTIN validation will help you validate the information like the name of the company and mailing address of a Party entered in a Party ledger.
Verify GSTIN on hand-written invoice
When you receive a hand-written invoice from a vendor, you will want to validate the information provided by the party, thereby avoiding the consequences of incorrect information in the Invoice.
Avoid business with fraudulent vendors
GSTIN validation also helps in avoiding business with deceptive vendors who might be using fake GSTIN.
Status of GSTIN
You will get to know if the status of a GSTIN is active or inactive.
Status of e-Way Bill
Through GSTIN validation in TallyPrime, you will also get to know if the Party is blocked from performing e-Way Bill activities.
Identify manual errors in GSTIN information
It may be possible that there were some manual mistakes committed while entering GST number and other information related to GSTIN/UIN in the Party ledger. When you validate GSTIN/UIN Info for such Parties, the information will not be found as the portal will not be able to retrieve data. Thereafter, you can enter the correct GST number of the Party in the ledger so that you can validate other GSTIN/UIN info using TallyPrime.
TallyPrime facilitates quick online validation of GSTIN and UIN related information. You can validate either for single party and also for multiple parties in bulk in TallyPrime.
Online GSTIN validation in TallyPrime for single party
Whenever you do business with a new party, you can validate the GSTIN/UIN information provided by the party. It is recommended to validate GSTIN information while creating or right after creating a party ledger. It ensures that the information entered in the Party ledger is authentic, and you can then make corrections immediately if needed.
However, you may want to verify the information for a specific party at any point in time. In such cases, you can validate GSTIN online for a party from the Party ledger.
But before that, ensure that the pre-requisites for online GSTIN validation in TallyPrime are fulfilled.
Thereafter, follow the steps given below for GSTIN validation from the Party ledger.
- Press Alt+G (Go To) > Alter Master > Ledger > type or select the Party, and press Enter.
Alternatively, Gateway of Tally > Alter > Ledger > type or select the Party, and press Enter.
The Ledger Alteration screen appears. - Press Alt+L (Get GSTIN/UIN Info).
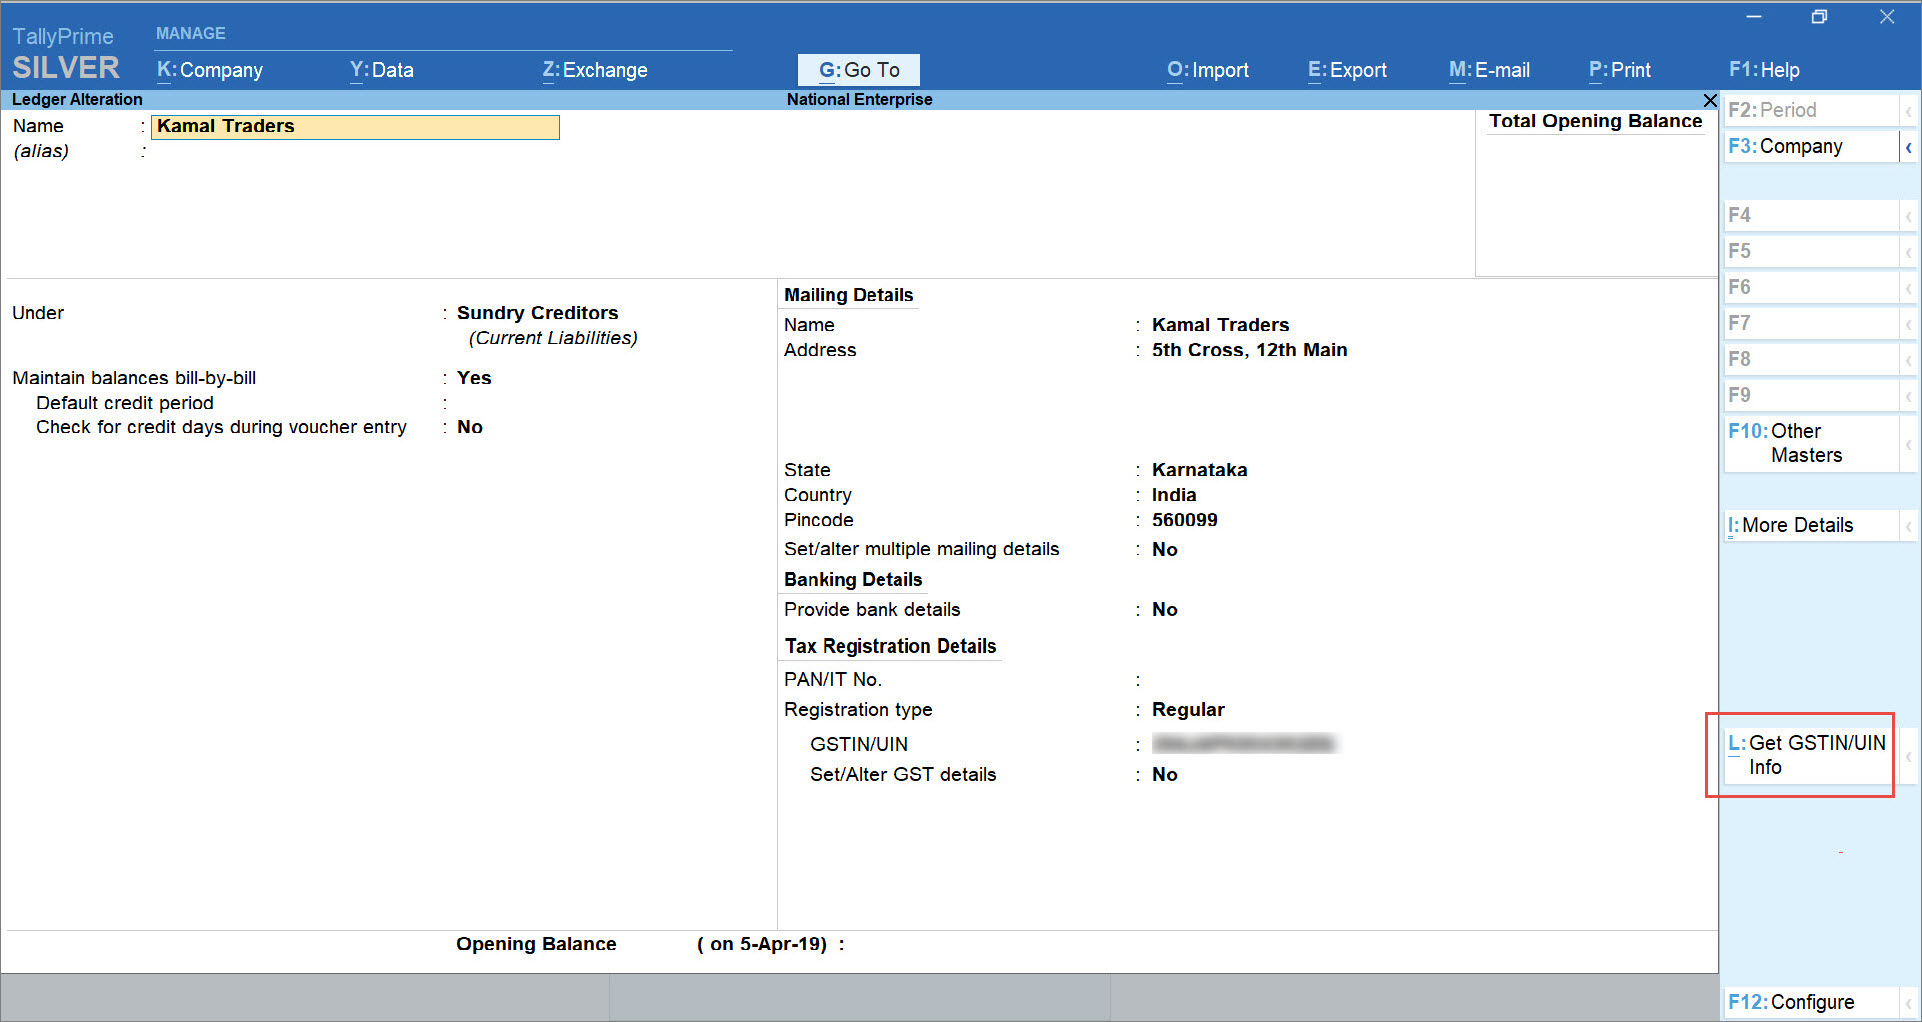
A confirmation screen appears. - Press Y (Yes) to accept.
The e-Invoice Login or e-Way Bill Login screen appears, based on the feature that is enabled. If both the features are enabled in the Company, then the e-Invoice Login screen appears. - Enter your Username and Password, and press Enter.

TallyPrime exchanges information with the portal.
The screen Get GSTIN/UIN Info for the GST number of the party appears as shown below.
Note: If the GST number entered in the party ledger is wrong or invalid, then the NIC portal will not retrieve the data for the GSTIN. On the As per Portal side, Could not retrieve data will be displayed. You will need to enter the correct GST number and you then can validate other details.
The information fetched from the portal to TallyPrime is detailed under the column As per Portal. You can verify the information such as Mailing Name and Address entered in the party ledger and make corrections if needed.
Furthermore, the screen also provides information related to Registration Type and Status.
You can take a print or want to export the Get GSTIN/UIN Info screen, if needed.
Online GSTIN validation in TallyPrime for multiple parties in bulk
There may be multiple Party ledgers in TallyPrime for which GSTIN validation is pending. In such a case, you can validate GSTIN and UIN information for multiple parties in bulk.
Before that, ensure that the pre-requisites for online GSTIN validation in TallyPrime are fulfilled.
Thereafter, follow the steps given below for online GSTIN validation of multiple parties in bulk.
- Press Alt+G (Go To) > type or select Update Party GSTIN and press Enter.
Alternatively, Gateway of Tally > Display More Reports > Statutory Reports > GST Reports > Update Party GSTIN.
A sub-screen for Group and Ledger selection appears. - Type or select the Name of Group from the List of Groups and press Enter.
Similarly, type or select the Name of Ledger from the List of Ledgers and press Enter.
For example – Under List of Groups, you can select Sundry Creditors and All Items under Name of Ledger, and then press Enter.
The Update Party GSTIN/UIN report appears.
Note: You can select All Items under Name of Group. As a result, the report will display all the ledgers created under each group.
- Press Alt+L (Get GSTIN/UIN Info).
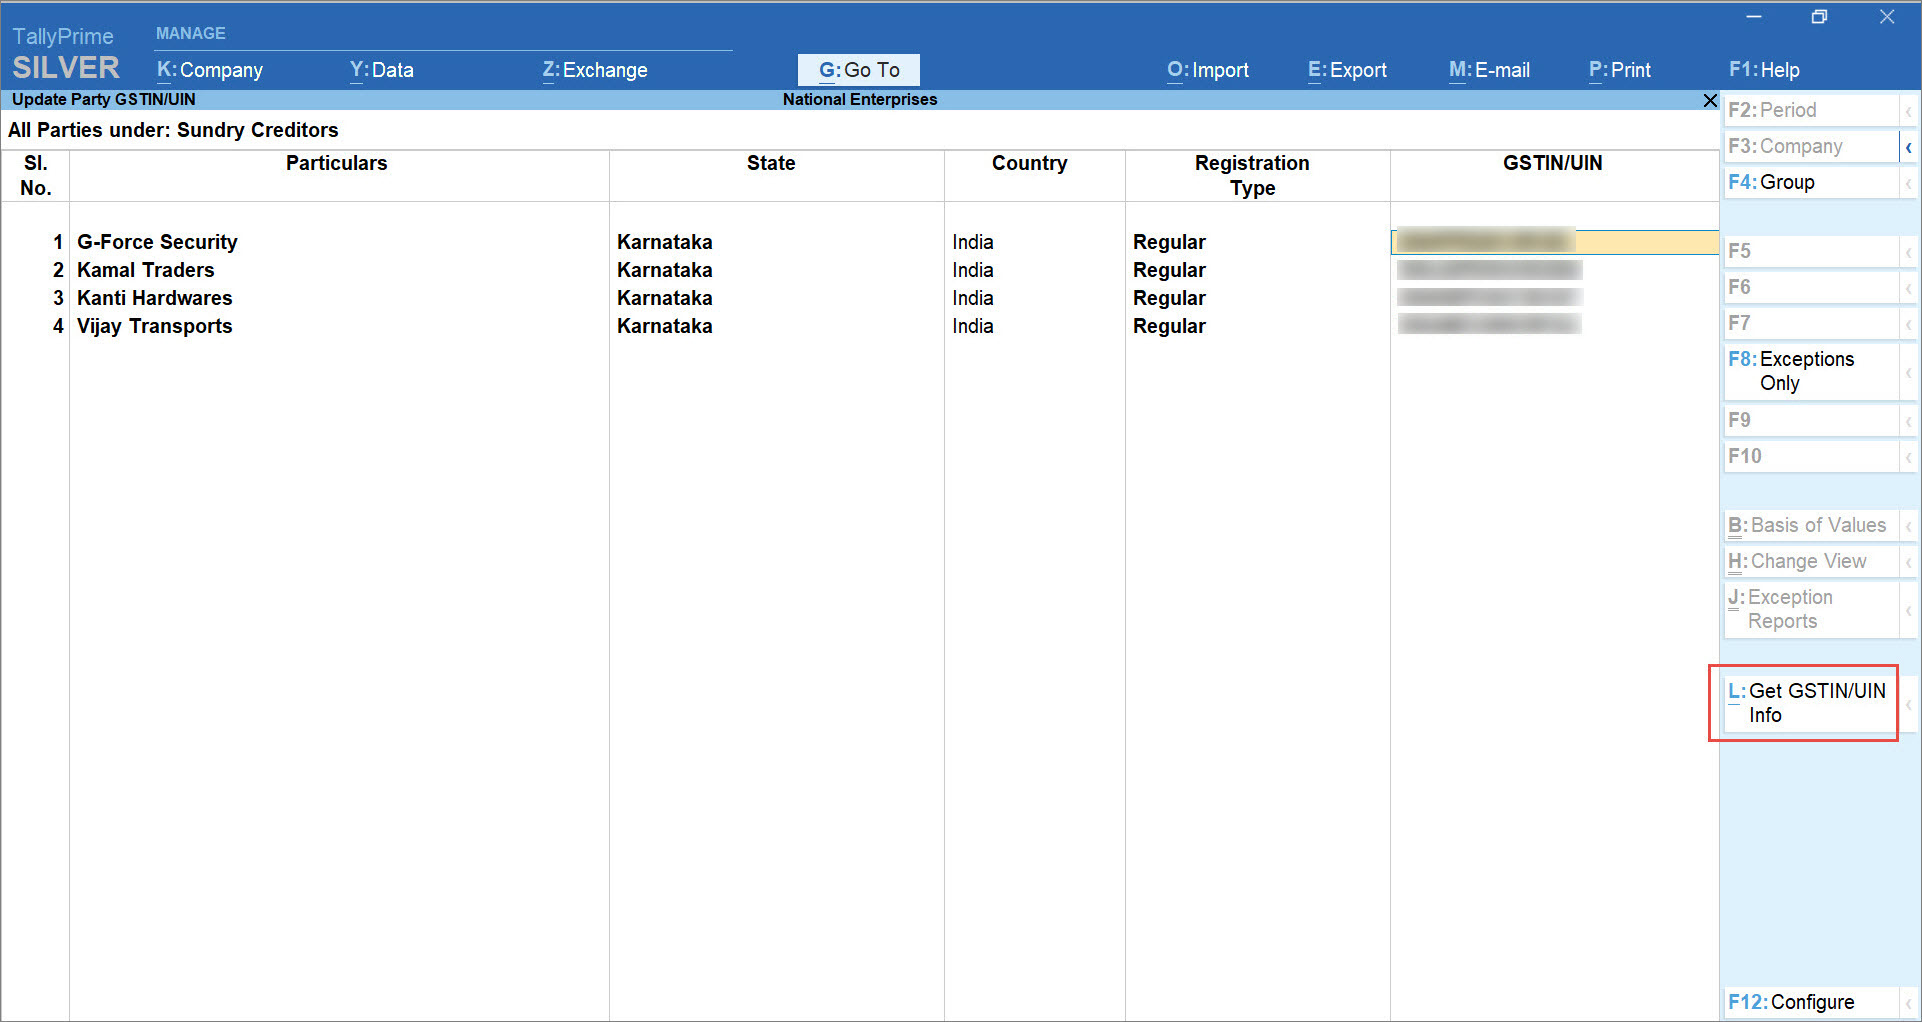
Note: On the above screen, if you do not see all the ledgers for the selected Group, then press F8 (All Ledgers).
- Press A (All GSTINs/UINs).
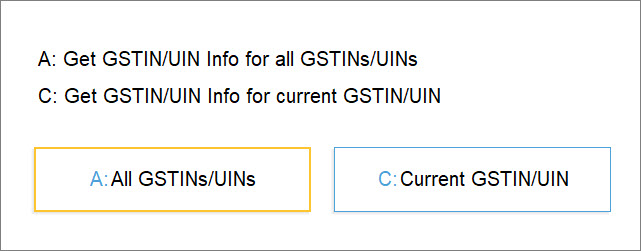
If you press C (Current GSTIN/UIN), then the GSTIN/UIN Info will be validated for the party that is selected in the Update Party GSTIN/UIN report.
The e-Invoice Login or e-Way Bill Login screen appears, based on the feature that is enabled. If both the features are enabled in the Company, then the e-Invoice Login screen appears.
Note: If there are one or more Parties for whom GST number is not entered in the Party ledger or the GST number entered in the Party ledger has less than 15 characters, then a confirmation screen appears. You can press Y to accept or make corrections in the Party ledger before initiating the exchange.
- Send for Exchange.
- Enter your Username and Password, and press Enter.

TallyPrime exchanges information with the portal after which it will display Exchange Summary.
Note: If there are Parties with an invalid GSTIN, then the portal will reject the request and would be marked as Information Not Found. You can enter the correct GSTIN number of the Party and then use the Get GSTIN/UIN Info option again. - Press Any key to continue.
In the Update Party GSTIN/UIN report, a column gets added as shown below.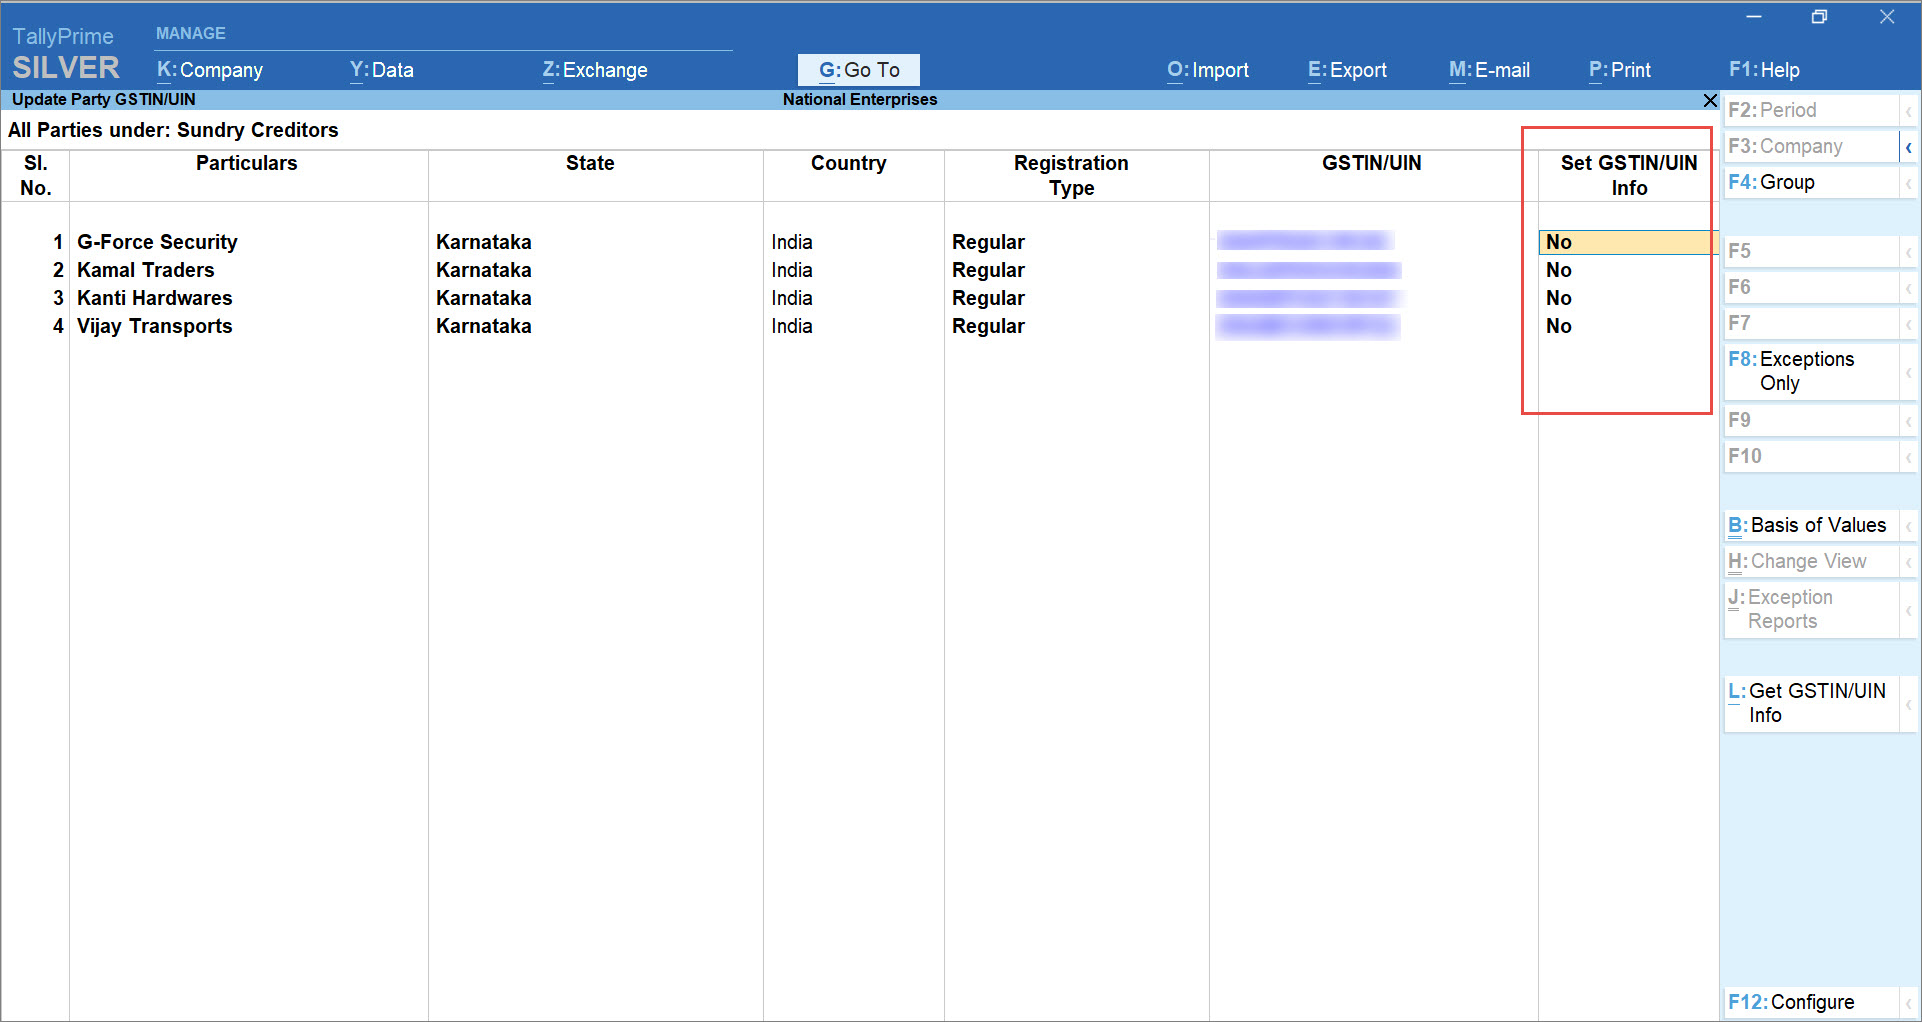
Note: If a Party's GSTIN is inactive or is blocked from carrying out regular e-Way Bill activities, then the GSTIN/UIN and Set GSTIN/UIN Info for the Party will be displayed in red text.
- Press Ctrl+B (Basis of Values) to view Parties based on Status of GSTIN, if needed.
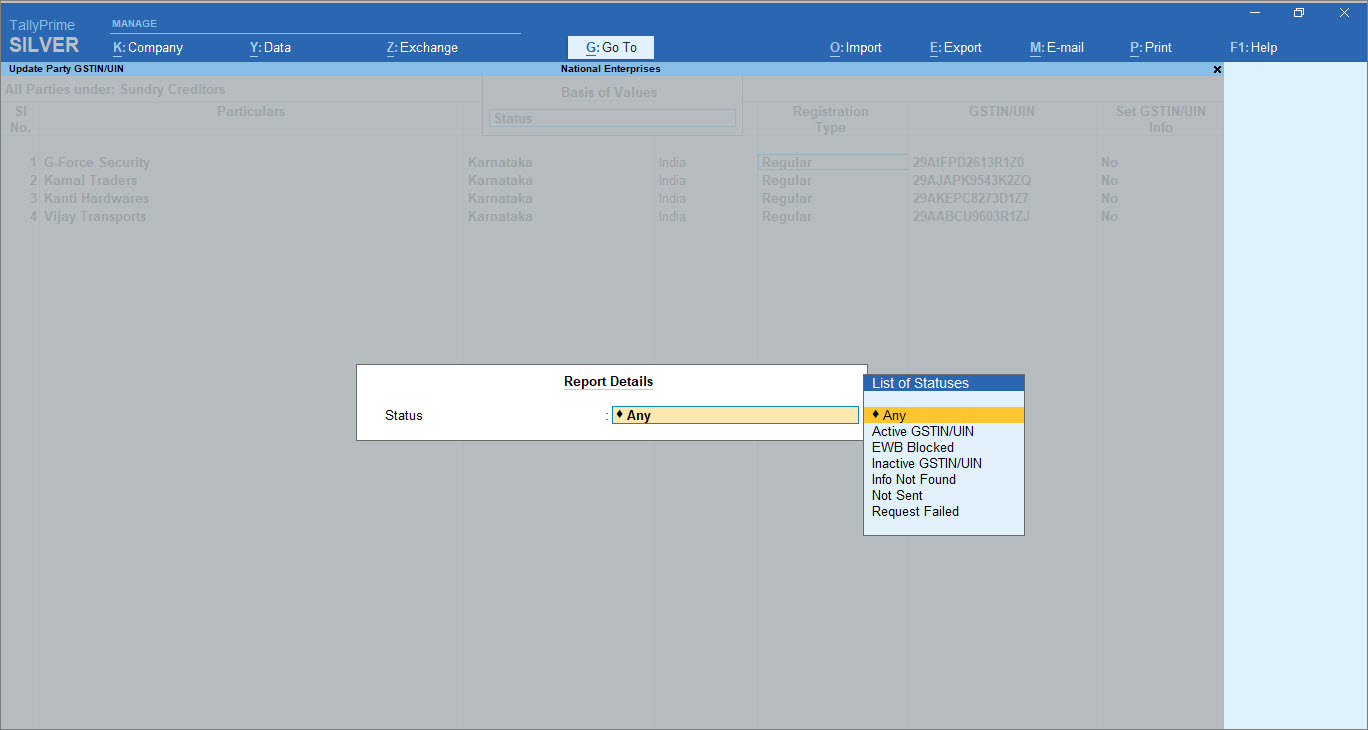
- Enter your Username and Password, and press Enter.
- Enable Set GSTIN/UIN Info for a Party and press Enter.
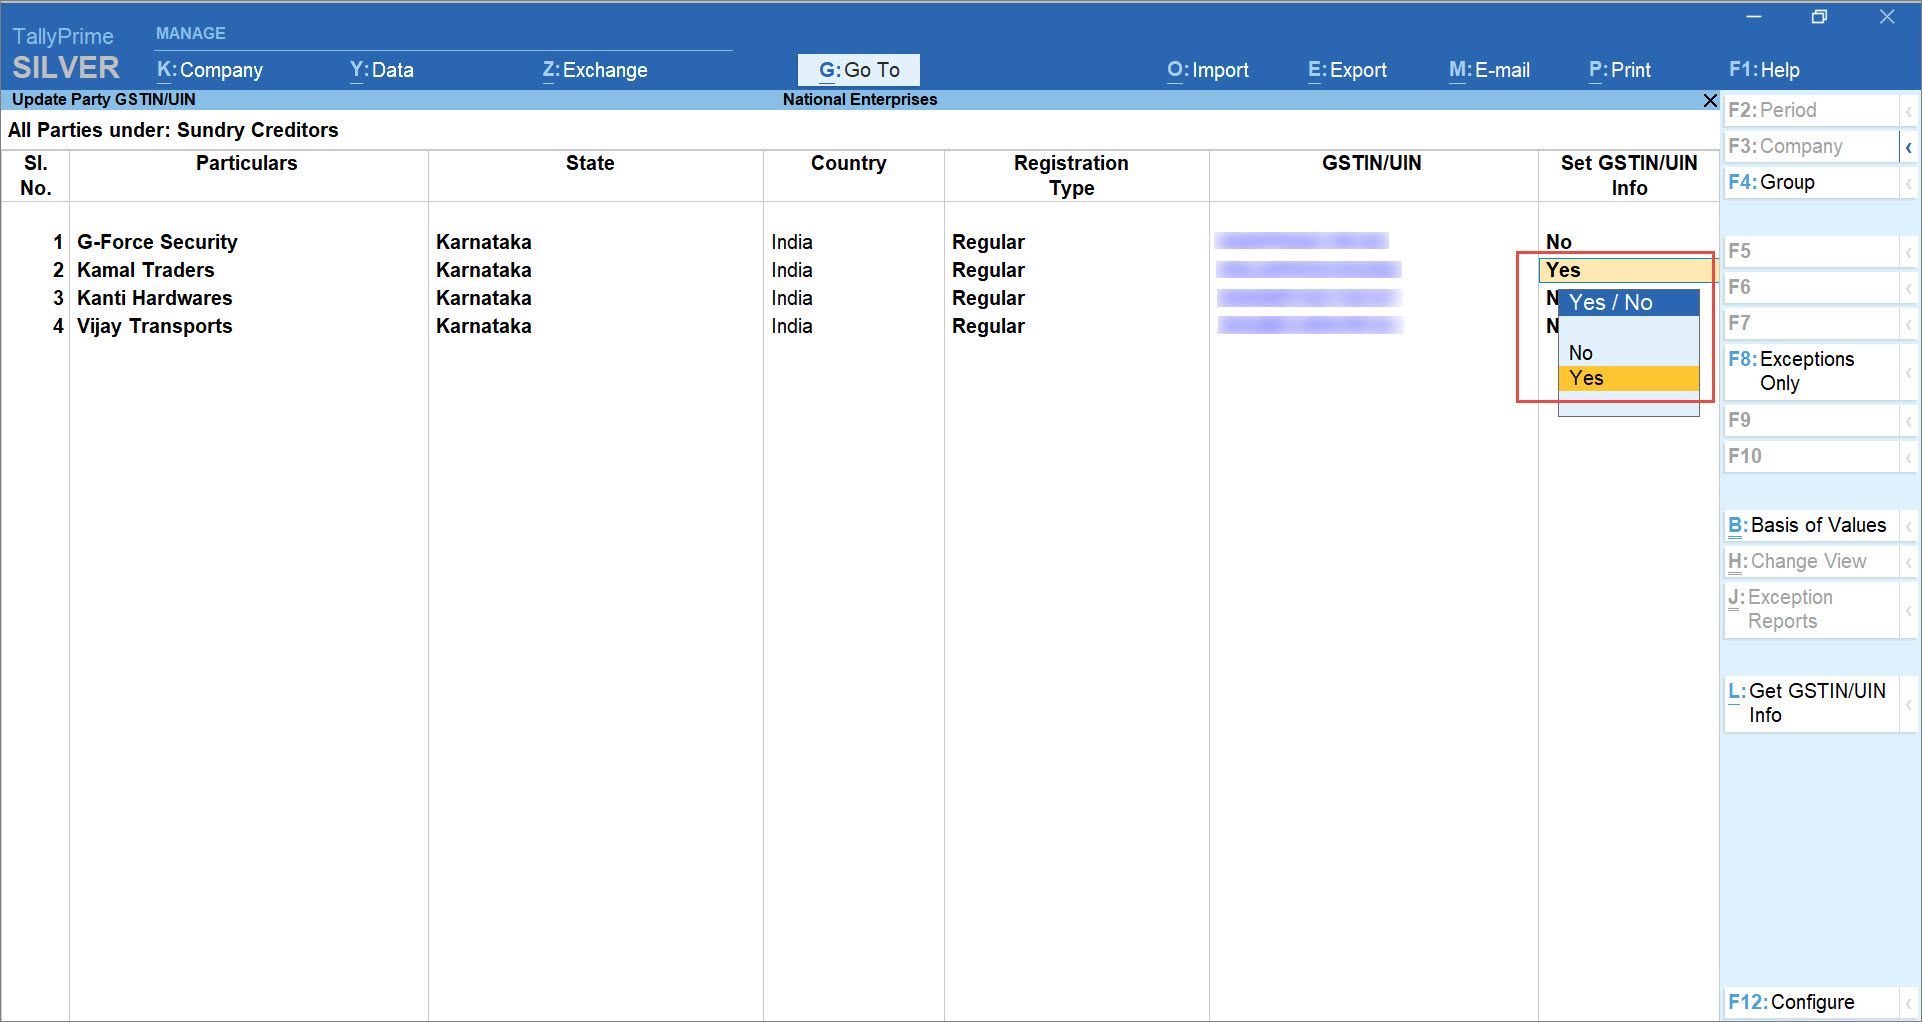
The screen Get GSTIN/UIN Info for the GST number of the party appears as shown below.
You can compare the GSTIN/UIN information fetched from the portal with that in your books. Additionally, you can update the information under the As per Books column, if needed. - Press Ctrl+A to save.
Thereafter, the changes will be updated in the Update Party GSTIN/UIN report.
Online HSN/SAC Validation in TallyPrime
The information related to HSN is important to identify the items or goods being sold or purchased.
In this section:
- Reasons to validate HSN/SAC information for Stock Items
- Online HSN/SAC validation in TallyPrime for single Stock Item or Stock Group
- Validate HSN/SAC information online in TallyPrime at the Stock Item level
- Online validation of HSN/SAC information in TallyPrime at the stock group level
- Validate HSN/SAC information online in TallyPrime at the Company level
- Online HSN/SAC validation in TallyPrime for multiple Stock Items and Stock Groups
Reasons to validate HSN/SAC information for Stock Items
You will want to use TallyPrime’s online process to validate HSN Code and HSN/SAC details in your Stock Item masters for the following reasons.
Convenience in verifying HSN/SAC information for Stock Items
HSN Codes contains 21 sections under which there are 99 chapters. Moreover, there are 1,244 headings and 5,224 subheadings. So, if you have entered HSN Code in a Stock Item and want to update with other information such as description, then you can quickly verify in TallyPrime and then update.
Statutory compliance
If your business has a turnover exceeding Rs. 5 Crore in the previous financial year, then you will need to furnish the HSN details in the Invoice. Validating HSN/SAC details ensures that you do not face any obstacles in filing returns. You can also verify the details in the Sales Invoice provided by your vendor so that you can claim the ITC seamlessly, if applicable to the transaction.
TallyPrime Release 2.0 onwards, you have the facility for online validation of HSN/SAC details for single Stock Items and multiple Stock Items in bulk.
Online HSN/SAC validation in TallyPrime for single Stock Item or Stock Group
Before recording a transaction involving new Stock Items or Stock groups, you will need to validate the HSN/SAC information entered in the transaction to ensure its authenticity. It is recommended to validate HSN/SAC information right after creating a Stock Item or Stock Group in TallyPrime. It will ensure that the information entered in the Stock Item master is correct, and you can make corrections if needed. However, it may be possible that you had already created a Stock Item or Stock Group, and there is a need to validate the HSN/SAC information later. Furthermore, you may want to revalidate the information at any point in time.
In such cases, you can validate the HSN/SAC information online at the Stock Item or Stock Group level, as applicable. Furthermore, you can also do so at the Company level.
Validate HSN/SAC information online in TallyPrime at the Stock Item level
Before validating HSN/SAC information, ensure that the pre-requisites for online HSN validation in TallyPrime are fulfilled.
Thereafter, follow the steps given below for HSN/SAC validation at the Stock Item level.
- Press Alt+G (Go To) > Alter Master > Stock Item > type or select the Stock Item and press Enter.
Alternatively, Gateway of Tally > Alter > Stock Item > type or select the Stock Item and press Enter.
The Stock Item Alteration screen appears. - Under Statutory Details, set Set/Alter GST Details to Yes and press Enter.
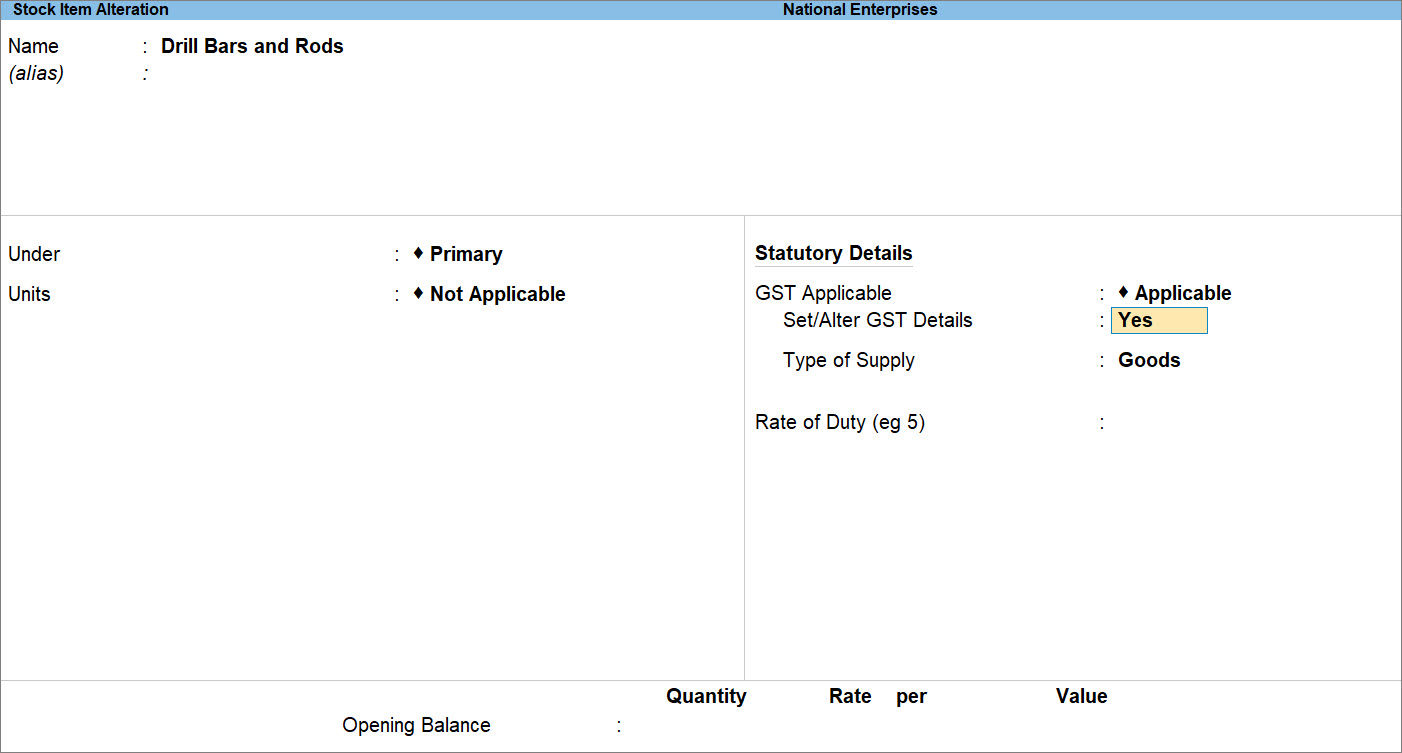
The GST Details for Stock Item screen appears. - Press F12 (Configure) > set Allow HSN/SAC details to Yes > press Ctrl+A to save.
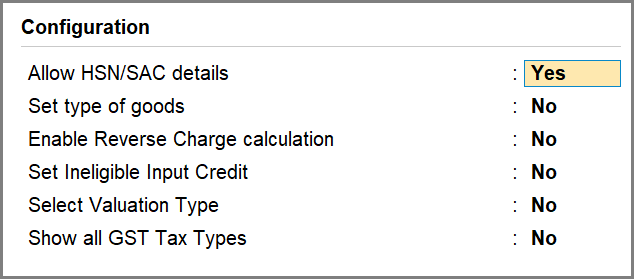
Henceforth, you will always see the HSN/SAC Details in the GST Details for Stock Item screen in all the Stock Item masters.
Note: If you had already set Allow HSN/SAC details to Yes, then you will not need to perform this step.
- Press Alt+B (Get HSN/SAC Info).
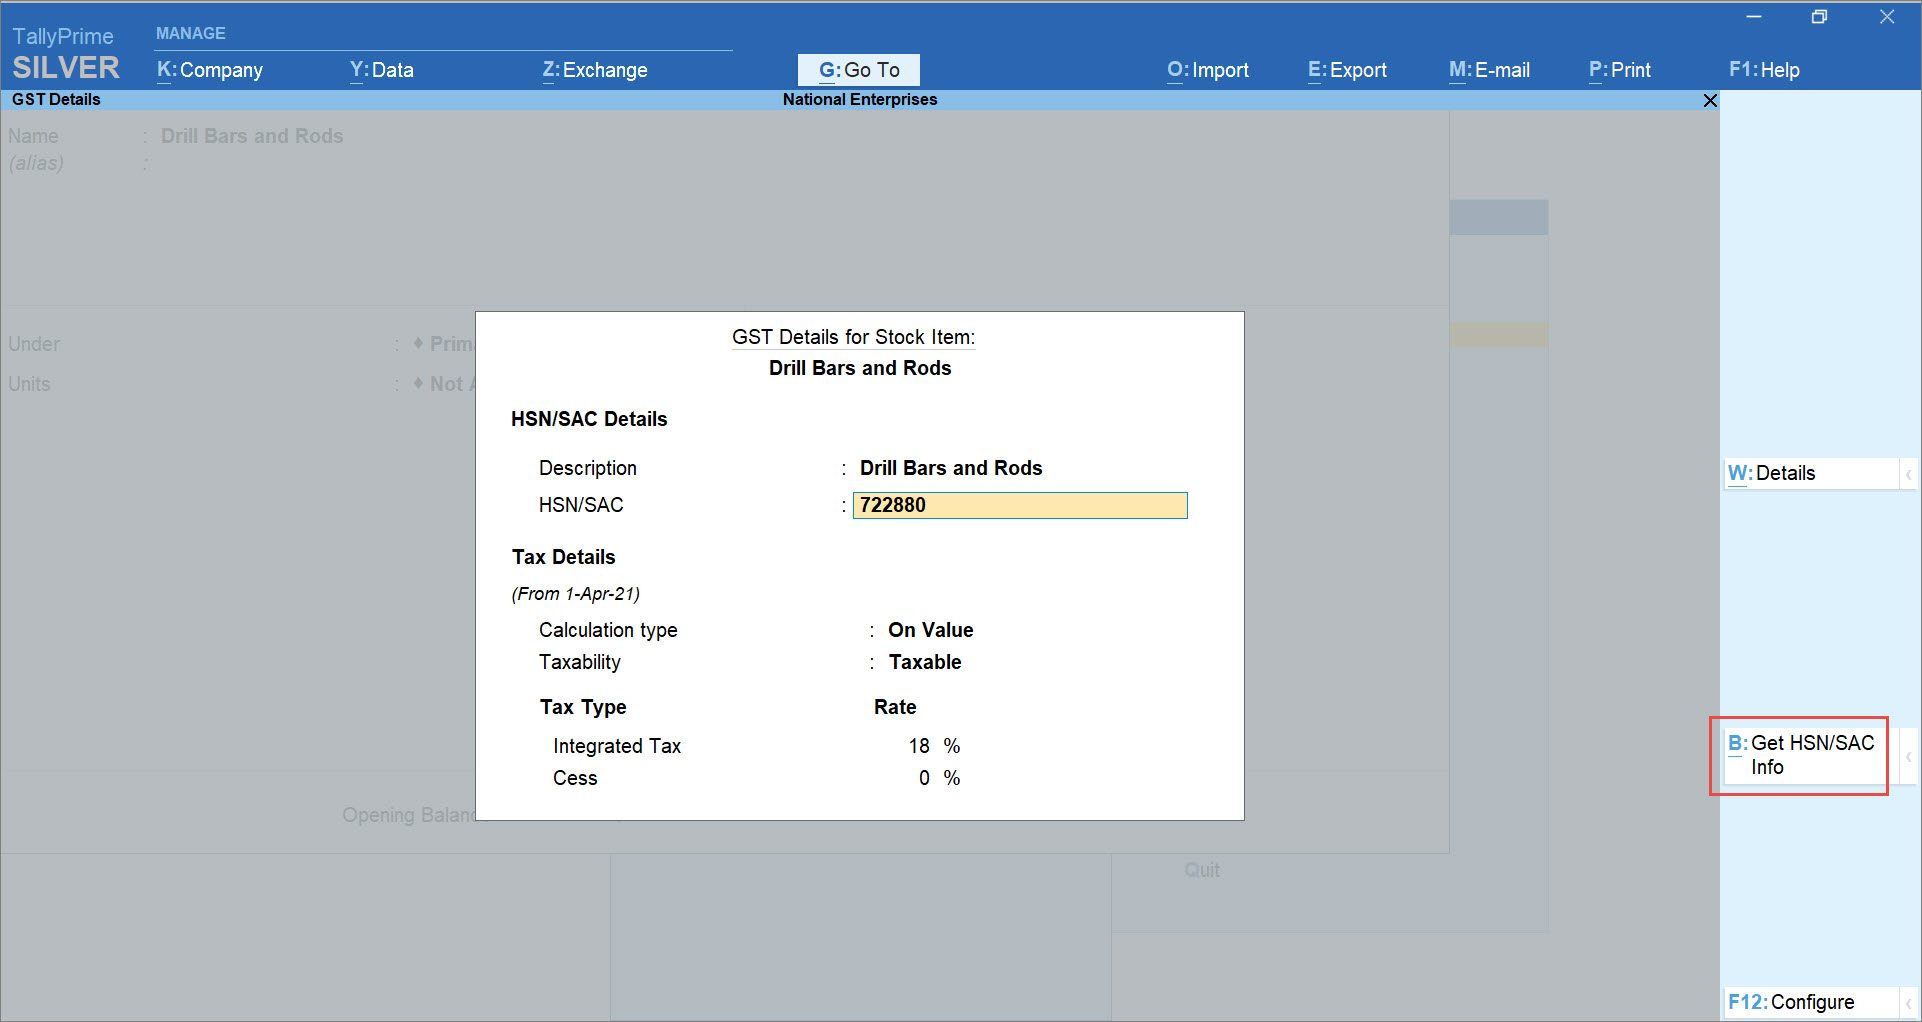
A confirmation screen appears. - Press Y to accept.
The e-Invoice Login or e-Way Bill Login screen appears, based on the feature that is enabled. If both the features are enabled in the Company, then the e-Invoice Login screen appears. - Enter your Username and Password, and press Enter.

TallyPrime exchanges information with the e-Invoice portal.
The Get HSN/SAC Info Summary screen appears as shown below.
Note: If the HSN Code entered in the Stock Item is incorrect, then the portal will reject the request for HSN/SAC validation with the Reason of Rejection as Invalid HSN Code. You can enter the correct HSN code for the Stock Item and then validate other HSN/SAC information for the same.
You can take a print or export Get HSN/SAC Info Summary, if needed.
Online validation of HSN/SAC information in TallyPrime at the stock group level
If you have provided HSN/SAC information for Stock Items under a Stock Group, then you can validate the HSN/SAC information at the Stock Group level.
Open the Stock Group in the alteration mode and follow the steps provided for validating HSN/SAC information online in TallyPrime at the Stock Item level.
To open the Stock Group in alteration mode, follow the path given below.
Press Alt+G (Go To) > Alter Master > Stock Group > type or select the Stock Group and press Enter.
Alternatively, Gateway of Tally > Alter > Stock Group > type or select the Stock Group and press Enter.
The Stock Group Alteration screen appears.
Thereafter, you can validate the HSN and SAC information for the Stock Group.
Validate HSN/SAC information online in TallyPrime at the Company level
It may be possible that your business involves buying or selling of only one Stock Item or items under a single Stock Group. For example, you are a trader of bars and rods, and therefore, you must have created only one Stock Item or Stock Group for different bars and rods in your TallyPrime Company data.
In such cases, you can validate the HSN/SAC information at the Company level.
Follow the steps provided for validating HSN/SAC Information online in TallyPrime at the Stock Item level with the following changes.
- Navigate to the GST Details of the Company.
- Press F11 (Features).
- Press Enter on Enable Goods and Services Tax (GST).
The GST Details screen appears.
- Under Additional Features, enable Set/Alter GST rate details.
The GST Details for Company screen appears.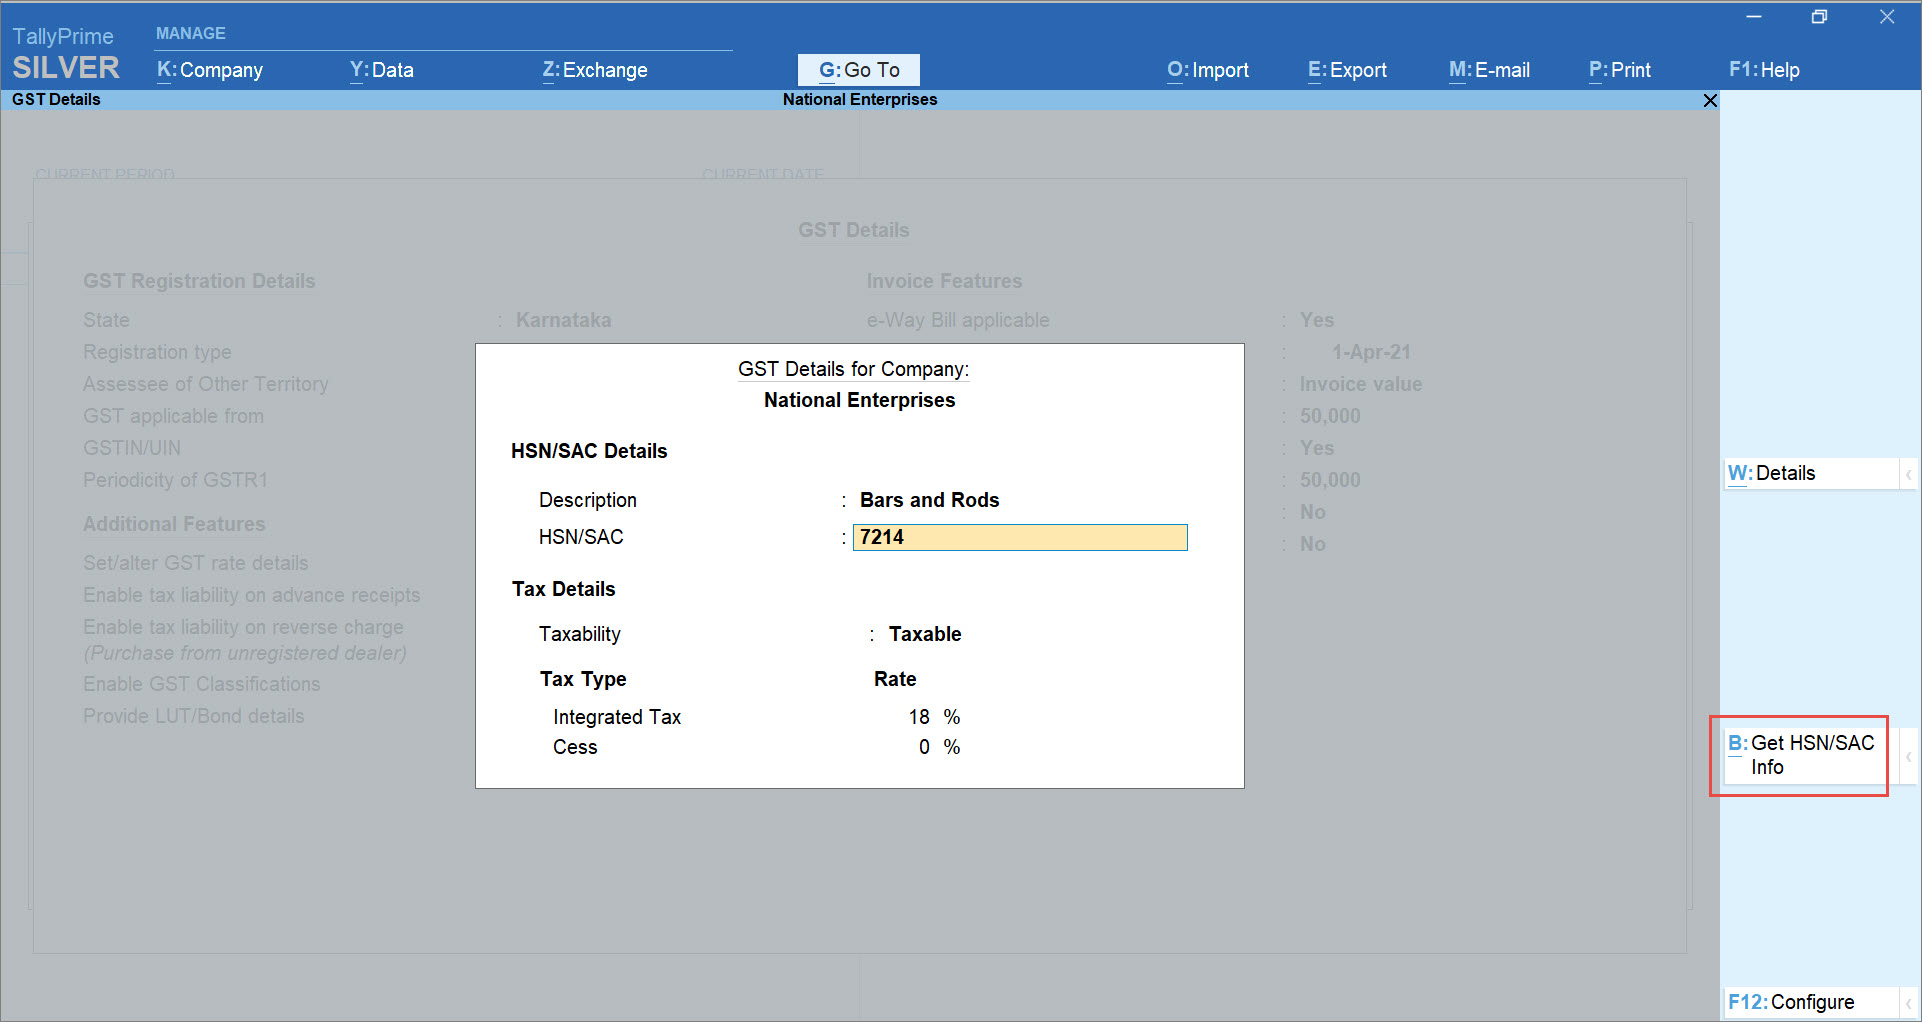
- Validate the HSN and SAC information for the Stock Item using Get HSN/SAC Info.
Note: You can also validate HSN or SAC information from the Sales or purchase ledger level if you have configured the HSN/SAC details in the ledgers.
Online HSN/SAC validation in TallyPrime for multiple Stock Items and Stock Groups
You may want to validate HSN/SAC information for multiple Stock Items and Stock Groups at one shot. The facility for the same is provided in the GST Rate Setup report.
Before validating HSN and SAC information for multiple Stock Items and Stock Groups, ensure that the pre-requisites for online HSN validation in TallyPrime are fulfilled.
Thereafter, follow the steps given below.
- Press Alt+G (Go To) > type or select GST Rate Setup and press Enter.
Alternatively, Gateway of Tally > Display More Reports > Statutory Reports > GST Reports > GST Rate Setup.
The GST Rate Setup report appears. - Select the Stock Items and Stock Group using spacebar.
- Press Alt+B (Get HSN/SAC Info).
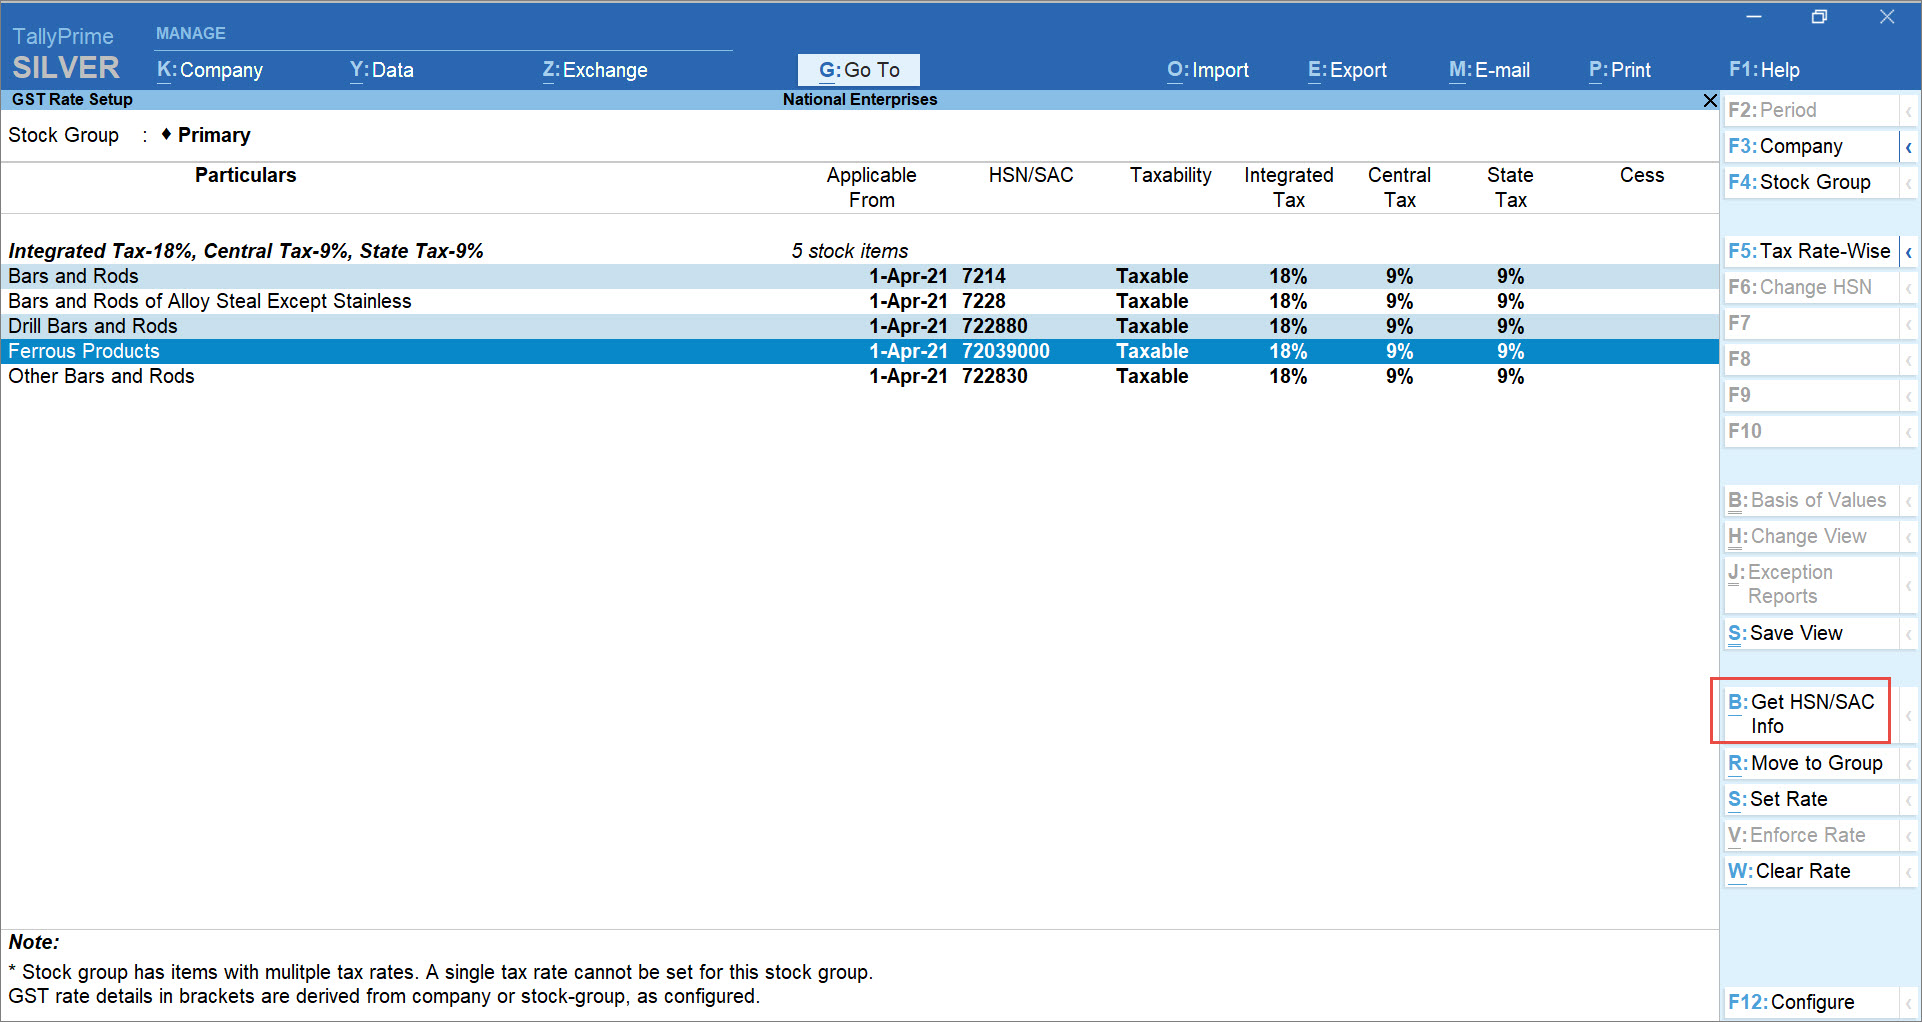
A confirmation screen appears. - Press Y to accept.
The e-Invoice Login or e-Way Bill Login screen appears, based on the feature that is enabled. If both the features are enabled in the Company, then the e-Invoice Login screen appears. - Enter your Username and Password, and press Enter.

TallyPrime then exchanges information with the portal.
The Get HSN/SAC Info Summary screen appears as shown below in which you can see the number of Stock Items and Stock Groups for which the validation is successful.
- Select a Stock Item and press Enter. As a result, you will be able to view complete Description of the Stock Item.
Pressing Alt+F5 will enable you to view complete Description of all the Stock Items in the Get HSN/SAC Info Summary as shown below.

Note: If the HSN Code entered in one or more Stock Items is incorrect, then the portal will reject the request for HSN/SAC validation for those specific Stock Items with the Reason of Rejection as Invalid HSN Code. You can enter the correct HSN code for the items and validate for other HSN/SAC details.
In the Get HSN/SAC Info Summary screen, the information fetched from the portal to TallyPrime is in blue fonts. Moreover, you can verify the Description entered in the Stock Items and make corrections, if needed.
Moreover, if the description was already provided in some of the selected Stock Item masters, but HSN Code was missing, then you can update the HSN Code in those masters as per the code fetched from the portal.
You can take a print or export Get HSN/SAC Info Summary, if needed.
To conclude, TallyPrime provides you with simple processes to validate GSTIN and HSN. This also enables you to update entries in your Company data so that the authentic information reflects in the Invoices.