e-Invoicing in TallyPrime
e-Invoicing is a system that allows the Invoice Registration Portal (IRP) to authenticate B2B invoices electronically. Accordingly, TallyPrime is here to provide a smooth e-invoicing experience for you and your business. Once your e-invoice is ready, the details should be reflected in GSTR-1.
The GST Council, in its 39th meeting, has decided to implement a system of e-invoicing, which will be applicable to businesses having a turnover of more than 500 crores, effective from 1st October 2020, and to businesses having a turnover of more than 100 crores, effective from January 1, 2021. Accordingly, TallyPrime’s e-invoice solution can be used by taxpayers, tax consultants, and other eligible entities. The experience is simple and is based on regular invoicing activity that does not require any special expertise.
For example, if you use TallyPrime, then you only have to record your sales transactions as usual, and your e-invoice requirement will be covered in the same flow! Important details, such as IRN, Ack No., QR code, and e-Way Bill no., will be updated in the vouchers automatically, and you can proceed to print them. Moreover, TallyPrime will ensure that both your business accounts and compliance requirements are suitably addressed.
TallyPrime also provides you with the flexibility to generate e-invoice in bulk for multiple invoices. If you do not want to generate the e-invoice while recording the transaction, then you can select one or more transactions from the e-Invoice report and generate the respective IRN, at your convenience.
We understand how valuable your data is for you and your business, and we have provided various measures in TallyPrime to safeguard your data. All the requests for online e-invoicing will pass through Tally GSP (TIPL), which has been awarded ISO 27001:2013 certificate for its stringent security policies. The best part is that you will not need any additional software or plugins to enjoy the benefits of e-invoicing in TallyPrime.
One-Time Simple Setup
Getting started with e-invoicing is easy! You only have to create your e-invoice profile in IRP and then enable e-invoicing in TallyPrime.
In this section
- Create e-Invoice Profile in IRP
- Enable e-Invoicing in TallyPrime
- Update ISO Currency Code (For Exporters)
Create e-Invoice Profile on IRP
To get started with e-invoicing, you have to first register your business on IRP and then create an API user profile by selecting Tally India Pvt Ltd as your GSP.
Register on IRP
- Open the IRP home page, and click Registration > Portal Login.

- Enter the GSTIN of your business in the following e-Invoice Registration Form, followed by the CAPTCHA code, and click Go.

- Enter the business details, as required, and click Send OTP to verify the details.
- Enter the code received on your registered mobile number, and click Verify OTP.
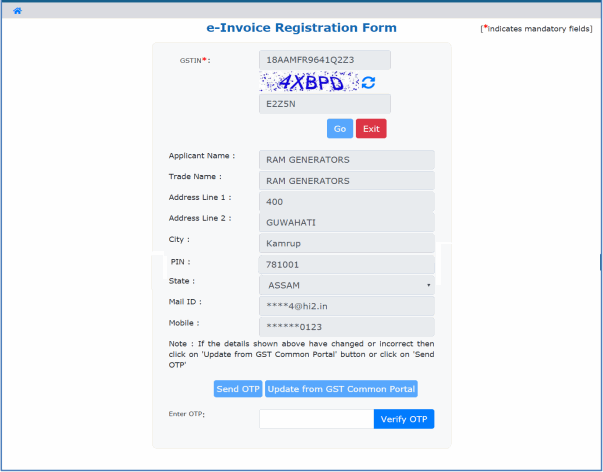
After verifying the OTP, you will be asked to enter a username and password to create your login credentials. Confirm and save the details.
Create API User Profile
- Open the IRP home page, and click Login.

- Log in with the username and password created earlier.
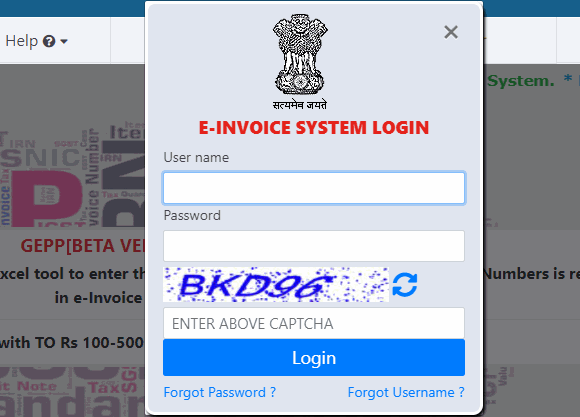
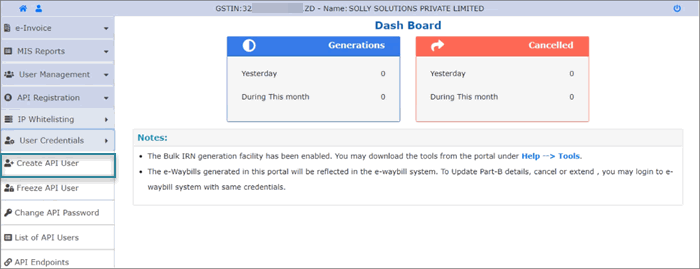
- Click API Registration > User Credentials > Create API User.
- Select Through GSP in the following API Registration screen:

- Select Tally (India) Private Ltd in the Select your GSP field.
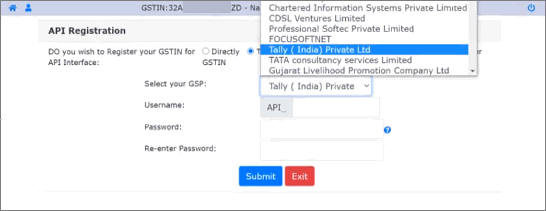
- Specify the API username and password, and click Submit to save the details. A user profile will be created with Tally (India) Private Ltd as the GSP.
Note: The API user credential is different from the IRP credential.
Enable e-Invoicing in TallyPrime
To enjoy the benefits of e-invoicing in TallyPrime, you have to enable the e-invoicing facility in your company features.
- Press F11 and set Enable Goods and Services (GST) to Yes. The Company GST Details screen opens.
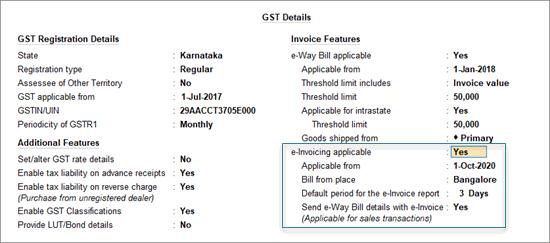
- Set the option e-Invoicing applicable to Yes. The related options for e-invoicing will now be visible:
- Applicable from – Set the date from which your transactions will be applicable for e-invoicing.
- Bill from place – Specify the location where your supplies are billed from. Depending on your business operation, this can be either the same or different from the location where your supplies are shipped from.
- Default period for the e-Invoice report – Set the period for which the e-Invoice report will display the transactions. This will be set to 3 days by default, as per department regulations, which state that e-invoices must be generated within 72 hours of billing. However, TallyPrime will allow you to set a period between 1 and 31 days, as per your business requirement.
- Send e-Way Bill details with e-Invoice – TallyPrime provides you with the option to generate your e-Way Bill along with your e-invoice. If it would be beneficial for your business to send these details together, then you can enable this option.
- Accept the screen. As always, you can press Ctrl+A to save the details.
Update ISO Currency Code (For Exporters)
If your business deals in exports, then you have to update the ISO currency codes for all your foreign currencies. The currency code is required by the department to identify the currency and the corresponding rate of exchange.
- Gateway of Tally > Alter > Currency > press Enter.
Alternatively, press Alt+G (Go To) > Alter Master > Currency > press Enter. - Select the foreign currency (for example, US Dollar ($)). You can also create a currency here, if required.
- Select the Formal name and press Alt+H to open the List of Currency.
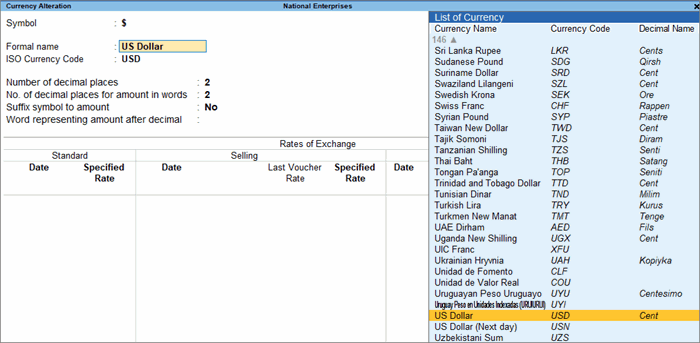
- Select the relevant Currency Code from the list. The ISO Currency Code field will be updated accordingly.
- Update other details, as required, and accept the screen. As always, you can press Ctrl+A to save the details.
Online e-Invoicing
TallyPrime provides you with an online e-invoicing solution that fits right into your regular invoicing process. e-Invoicing in TallyPrime isn’t restricted to only a particular voucher type. Apart from regular sales invoice, TallyPrime also supports e-invoicing for POS, debit notes, and credit notes. What’s more, even receipts and journal vouchers are supported for e-invoicing when they are used for sales.
No matter how you record your supplies in TallyPrime, you can easily generate an IRN while saving your invoice and print the QR code and other details. Later, if you want to update the details of your transaction, then you can easily cancel the current IRN and get a fresh IRN for your updated invoice. This will ensure that the details in your e-invoice are up-to-date.
TallyPrime also provides you with the flexibility to generate multiple e-invoices at the same time. If you do not want to generate the e-invoice while recording the transaction, then you can do it later from the e-Invoice report. You can select one or more transactions from the sections in the report and generate the respective IRN for your e-invoices.
Moreover, you also have the choice of generating the e-Way Bill along with your e-invoice, or even generate the e-Way Bill without the e-invoice, if required.
In this section
Prerequisites for a Smooth e-Invoicing Experience
On the e-Invoice System
- Register your business on IRP.
- Create an API user by selecting Tally (India) Pvt Ltd as the GSP. Enter this API user credentials in TallyPrime, whenever prompted.
In TallyPrime
- Add TallyPrime to the exceptions list of your firewall and anti-virus software.
- Verify the masters:
- Enter the correct HSN/SAC details in the ledgers and stock item masters.
- Enter the correct rates for HSN/SAC.
- Select the correct Type of Supply (Goods/Services) in the masters.
- Verify the party masters:
- Enter the correct address and pincode of the party.
- Enter a valid GSTIN for the regular/composite party.
- Ensure that your invoice numbers do not start with ‘0’. Invoice numbers starting with ‘0’ are rejected by IRP. Also, ensure that you do not start your invoice numbers with the special characters ‘/’ (forward slash) or ‘-‘ (hyphen) although these characters are allowed as part of invoice numbers.
- Enter all the mandatory e-invoice details in the transaction.
- Apply security control to safeguard your data. If you have multiple users, and you want to allow only selected users to upload invoices to IRP, then you should configure the user profiles accordingly. You can create users and provide them with the relevant rights.
Generate IRN and Print QR Code
You can easily generate an IRN while saving your invoice and also print the QR code and other details. If you want to generate your e-Way Bill details along with your e-invoice, then set the option Send e-Way Bill details with e-Invoice to Yes in your company (F11) features.
Record a GST Sales transaction, as usual.
- Specify the required voucher details, such as the Party A/c name, Sales ledger, Name of Item, GST ledger, and so on.
- Set the option Provide e-Invoice details to Yes. The e-Invoice Details screen appears.
- Specify the Bill to place and Ship to place, if this is your first e-invoice for the party. These details will be carried forward in subsequent transactions.
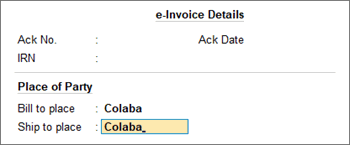
- Press Ctrl+A to save the details and return to the voucher.
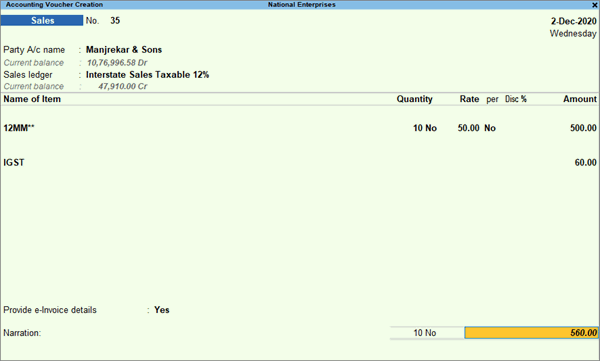
- Specify the Bill to place and Ship to place, if this is your first e-invoice for the party. These details will be carried forward in subsequent transactions.
- Accept the screen. As always, you can press Ctrl+A to save the voucher.
The following message will appear, prompting you to generate the invoice: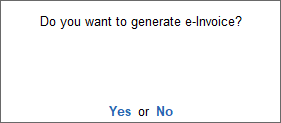
- Press Enter to continue.
- Specify the e-Invoice Login details in the following screen, and press Enter to continue.
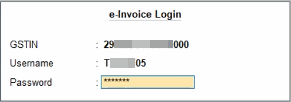
You can track the status of the upload in the following screen: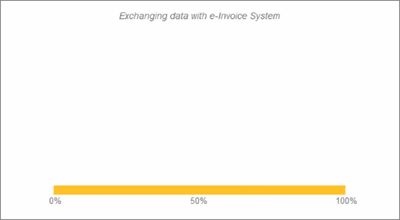
Once the invoice is uploaded to IRP, the IRN details will be updated in the voucher, and the following success message will appear: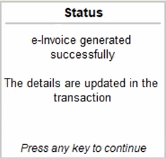
Now you can proceed to print the invoice.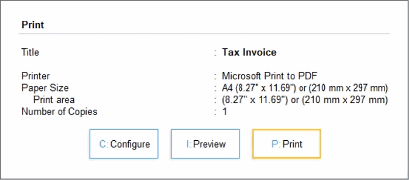
The e-invoice with the IRN and QR Code will appear as shown below: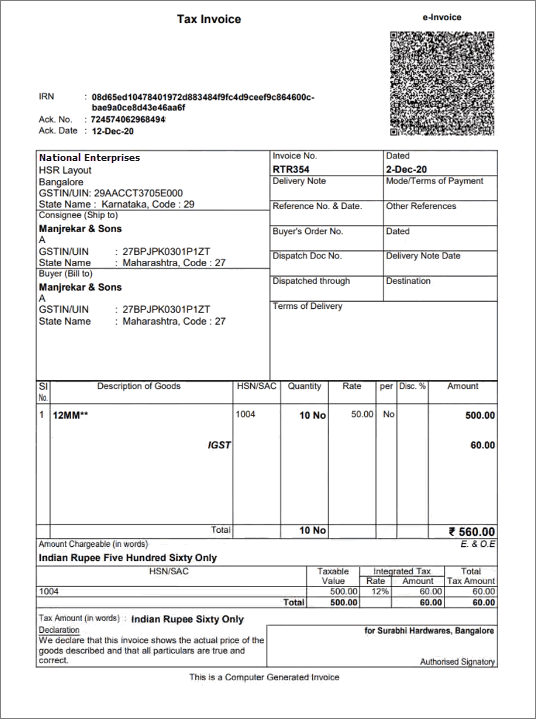
Mandatory Details for Generating e-Way Bill with e-Invoice
Certain details, such as transporter information or accurate distance between pincodes, are mandatory for generating the e-Way Bill along with e-invoice.
Ensure that you specify these details in the Transporter Details section of the Statutory Details screen, while recording the invoice.
- Check the distance between the pincodes entered for Dispatch From and Ship To., and specify the Distance (in KM) accordingly.
- If the Mode of transport is Road, then Vehicle Number, Vehicle Type, and Date are mandatory.
- If the Mode of transport is Other than Road (Ship/Air/Rail), then Doc/Lading/RR/AirWay No. and Date are mandatory.

Generate Bulk IRN
If you do not want to generate the e-invoice while recording the transaction, then you can do it later from the Exchange menu. You can select one or more transactions and generate the respective IRN for your e-invoices.
- Press Alt+Z > Send for e-Invoicing.
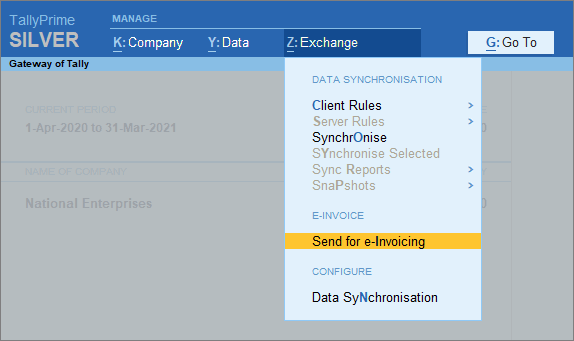
The Send for e-Invoicing screen appears. You can view the transactions that are pending for generation and cancellation. - Select the required transactions and press S (Send) to send the details. If you press S without selecting any transaction, then all the transactions will be sent
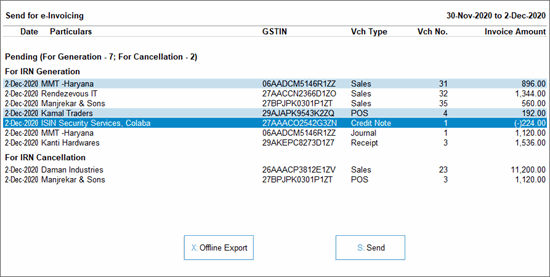
The following confirmation screen will appear, with the number of transactions lined up for IRN generation and cancellation.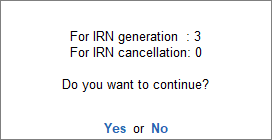
- Press Enter to continue.
- Specify the e-Invoice Login details in the following screen, and press Enter to continue.
You can track the status of the upload in the following screen:
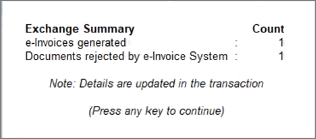
- Once the transactions are uploaded to IRP, the IRN details will be updated in the voucher, and the following Exchange Summary will appear:
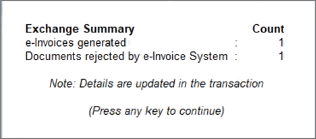
You will get an idea of how many e-invoices were generated or rejected by the e-Invoice System, or if any transactions could not be uploaded due to any technical difficulties.
For more details, you can go the e-Invoice report.
Cancel IRN
There may be situations where the IRN is generated for a particular voucher, but you might have to cancel it. For example, this can happen when there is a change in the rate of an item, or if the party has cancelled the order. In such cases, you may want to cancel the invoice. As per department regulations, invoice cancellation has to be done within 24 hours of IRN generation.
- Gateway of Tally > Display More Reports > GST Reports > e-Invoice > press Enter.
Alternatively, Alt+G (Go To) > type or select e-Invoice > press Enter.
- Drill down from the IRN generated from e-Invoice system section.
- Select the voucher for which e-invoice needs to be cancelled.

- Press Alt+R (Cancel IRN). The following screen will appear:

- Press O (Update Cancellation). The e-Invoice Cancellation Details screen will appear.
- Select the Reason for cancellation and enter the Remarks.

- Accept the screen. As always, you can press Ctrl+A to save the details.
The voucher will move to the For IRN Cancellation section under Pending.
Note: Press W (Mark as Cancelled) when the e-invoice is cancelled through some other medium on IRP, and you want to update the status in TallyPrime. When you mark the IRN as cancelled, then this invoice will appear in the Marked as IRN cancelled section under IRN Cancelled, instead of the For IRN Cancellation section under Pending.
Now, you can send the e-Invoice for cancellation from the Exchange menu.
- Press Alt+Z > Send for e-Invoicing.
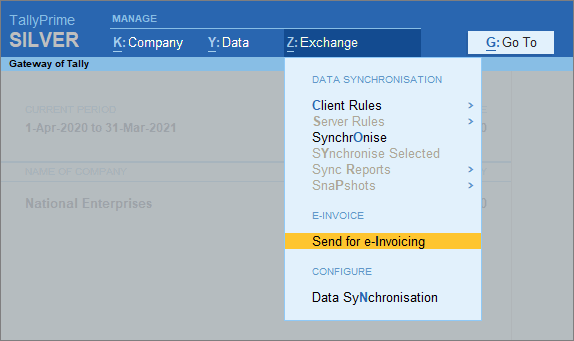
The Send for e-Invoicing screen appears. You can view the transactions that are pending for generation and cancellation. - Select the required transaction and press S (Send) to send the details. If you press S without selecting any transaction, then all the transactions will be sent.
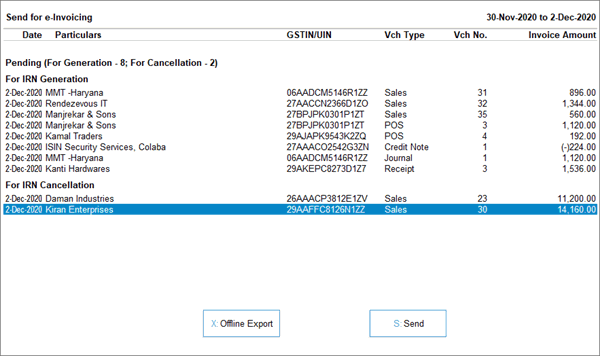
The following confirmation screen will appear, with the number of transactions lined up for IRN generation and cancellation.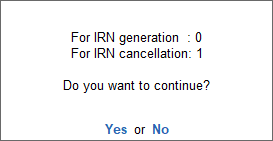
- Press Enter to continue.
- Specify the e-Invoice Login details in the following screen, and press Enter to continue.

You can track the status of the upload in the following screen:
The Exchange Summary will appear after the cancellation is completed. You can see the e-Invoices that are cancelled.
The voucher will move to the IRN cancelled from e-Invoice system section in the e-Invoice report. Even after cancellation, the information like QR code and IRN details will be retained in the voucher for your reference in TallyPrime. You can also view the remarks you had entered while cancellation using More Details.
Get IRN Information
Sometimes, you may have generated or cancelled the IRN for vouchers in the offline mode using TallyPrime or some other software (or directly on IRP), and you may want to import the IRN information for those vouchers in TallyPrime. You can do so using the Get IRN Info facility, which will import the latest IRN, Ack. No., and Ack. Date along with the QR Code from the e-Invoice system to the vouchers.
The facility is provided in the relevant sections of the e-Invoice report, such as Pending, Exported, or Rejected by e-Invoice System, where you can fetch the latest IRN information and update the vouchers.
- From the e-Invoice report, drill down from the relevant section.

In this example, you can see the Pending for IRN generation screen.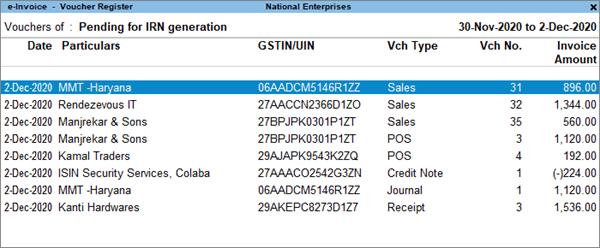
- Select the voucher and press Alt+L (Get IRN Info). The following screen appears:

- Press Enter to proceed.
- Specify the e-Invoice Login details in the following screen, and press Enter to continue.

You can track the status of the upload in the following screen:
TallyPrime will fetch the latest IRN information from the e-Invoice System. The voucher will be updated and moved to the IRN Generated section.
Offline e-Invoicing (JSON Export)
TallyPrime also allows you to carry out e-invoicing in the offline mode, in case you do not have continuous access to internet, or if don’t want to send your invoice details directly to the portal. In such cases you can export the details for your e-invoice in the JSON format and then upload it on IRP at your convenience. TallyPrime creates the offline files in the prescribed format and size limit. If the data size is more than 2MB, the information is split into multiple files, each of which will be less than 2 MB.
In this section
Generate IRN and Print QR Code
Offline Export
- Press Alt+Z > Send for e-Invoicing.

The Send for e-Invoicing screen appears. You can view the transactions that are pending for generation and cancellation. - Select the required transactions and press X (Offline Export) to export the details. If you press X without selecting any transaction, then all the transactions will be exported.

The following confirmation screen will appear, with the number of transactions lined up for IRN generation and cancellation.
- Press Enter to continue. The Export screen will appear.
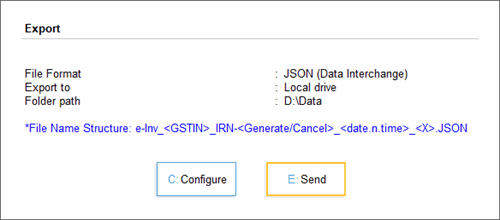
- Press C (Configure), if you want to change the details, such as the Folder path where JSON files will be exported.
- Press E (Send) to export the JSON files.
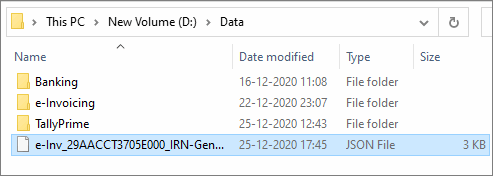
The JSON files will be saved in the specified folder: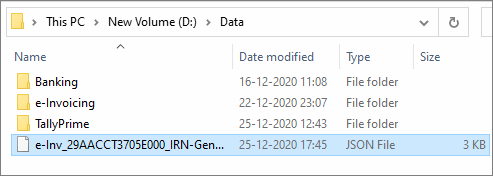
Bulk Upload on IRP
After exporting the JSON files, you can upload them on IRP and generate IRN information for the selected vouchers.
- Open the IRP home page, and click Login.

- Log in with your username and password.

- Click e-Invoice > Bulk Upload.

The Invoice Bulk Upload screen will appear. - Browse the JSON file and click Upload.

You can view the details of the uploaded invoice, along with the Ack No., Ack Date, and IRN.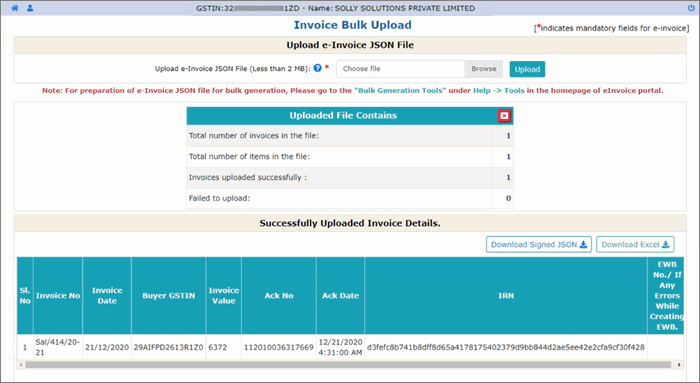
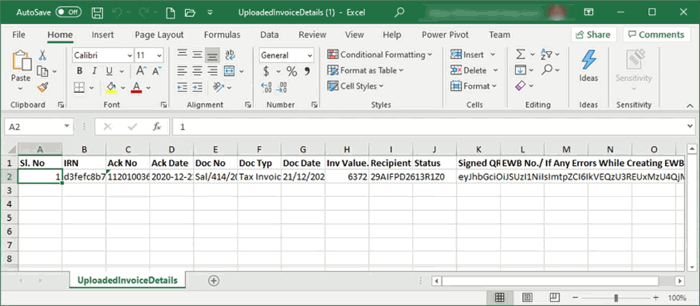
- Click the Download Excel button. An MS Excel file will open, where you can see the IRN information for the vouchers.
Update Details in TallyPrime and Print QR Code
e-Invoice details, such as IRN, Ack No., and Ack Date, have to be updated in the respective voucher in the e-Invoice report.
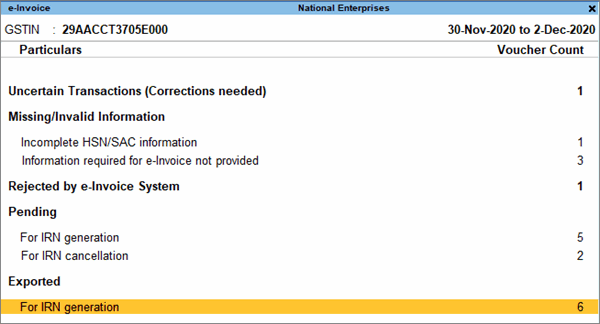
- From the e-Invoice report, drill down from the relevant section: For IRN generation under Exported.
-
Select the relevant voucher and press Alt+S (Manually Update IRN Info).

The Update IRN Info screen will appear:
-
Enter IRN, Ack. No., and Ack. Date. You can copy this information from the MS Excel sheet and paste it in the relevant fields.
-
Accept the screen. As always, you can press Ctrl+A to save the details.
The IRN info will be updated in the voucher. However, in this method, the QR Code will not be printed in the voucher.
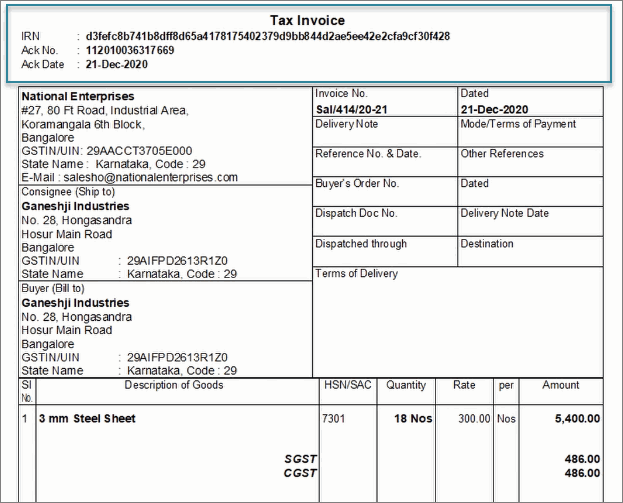
If you want the QR Code to be printed, then select the voucher and press Alt+L (Get IRN Info). This can be done only when you have an active internet connection.
A confirmation screen appears:
-
Press Enter to continue.
- Specify the e-Invoice Login details in the following screen, and press Enter to continue.

You can view the status of the upload in the Exchange Summary:
The details will be downloaded and updated in the voucher. Now you can print the e-Invoice details such as IRN, Ack. No., and Ack. Date, along with the QR Code.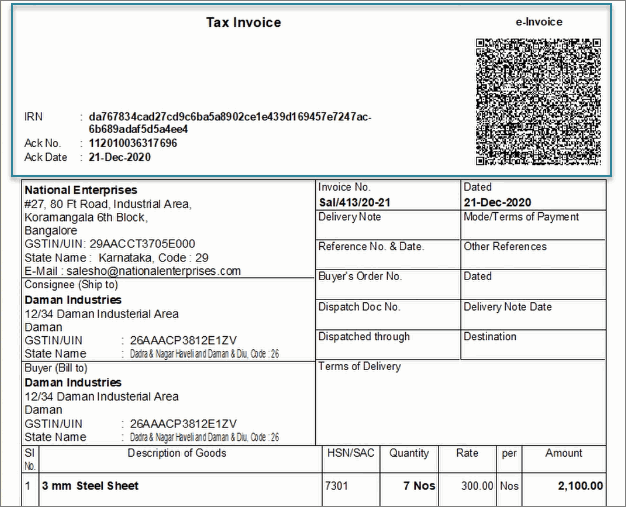
Cancel IRN
Offline Export
You can cancel the voucher in the offline mode by uploading the JSON file on IRP.
- Press Alt+Z > Send for e-Invoicing.

The Send for e-Invoicing screen appears. You can view the transactions that are pending for generation and cancellation. - Select the required transactions and press X (Offline Export) to export the details. If you press X without selecting any transaction, then all the transactions will be exported.

The following confirmation screen will appear, with the number of transactions lined up for IRN generation and cancellation.
- Press Enter to continue. The Export screen will appear.

- Press C, if you want to change the details, such as the Folder path where JSON files will be exported.
- Press E to export the JSON files. The JSON file will be created for the voucher to be cancelled:
Bulk IRN Cancel
After exporting the JSON files, you can upload them on IRP and generate IRN information for the selected vouchers.
- Open the IRP home page, and click Login.

- Log in with your username and password.

- Click e-Invoice > Bulk IRN Cancel.

- Browse the JSON file and click Upload.

The e-Invoice will be cancelled, and you can view the details such as IRN, Cancel Reason, Cancel Date, and Status.
- Click the Download Result Excel button. An MS Excel file will open, where you can see the IRN information for the vouchers.
Now when you open the e-Invoice report in TallyPrime, you can find the voucher in the For IRN Cancellation section under Exported.
-
Select the voucher and press Alt+L (Get IRN Info). The following screen appears:

- Press Enter to proceed.
- Specify the e-Invoice Login details in the following screen, and press Enter to continue.

You can view the status of the upload in the Exchange Summary:
TallyPrime will fetch the latest IRN information from the e-Invoice System. The voucher will be updated and moved to the IRN Generated section.
View e-Invoice Report
The e-Invoice report is a one-stop shop for your e-invoicing needs in TallyPrime. You can view the e-invoice status of your transactions, and take the next step accordingly. You can perform e-invoicing operations such as IRN generation and cancellation of one or many transactions. The e-Invoice report also allows you to view the transactions where the details are incomplete or incorrect, and update the required information. You can also open the the e-invoice portal directly from the report, if required, by pressing Alt+V (Open e-Invoice Portal).
- Gateway of Tally > Display More Reports > GST Reports > e-Invoice > press Enter.
Alternatively, Alt+G (Go To) > type or select e-Invoice > press Enter.
You can see the following sections depending on the status of your GST sales transactions.
- IRN Register
The IRN Register is a single location where you can check the e-invoice status and other details of your transactions. If required, you can also remove IRN information from certain vouchers by pressing Alt+V (Remove IRN Info). - Uncertain Transactions (Corrections needed)
This section lists the transactions where there is mismatch or incomplete information at the voucher, ledger, or stock item level. You can drill down from the transactions and resolve the uncertainties. You can also accept the transactions as is, or recompute the values, if needed. - Missing/Invalid Information
This section lists the transactions that have missing or invalid Information, which needs to be corrected before the IRN can be generated. The sub-sections include the transactions where HSN/SAC details are not provided, and the transactions where the information required for e-invoicing is not provided. Once you resolve these transactions, they will appear under Pending > For IRN Generation. - Rejected by e-Invoice System
This section lists the transactions where IRN generation/cancellation requests were rejected by IRP. The rejection can happen due to reasons such as duplicate IRN, invalid HSN code, and so on. You can drill down to the transaction and update it with the relevant details. After the transaction has been updated, press Alt+R (Mark as Resolved) to resolve the transaction. After being resolved, the transaction will appear under Pending > For IRN Generation. - Pending
This section lists the transactions that are ready for IRN generation/cancellation, as they have no uncertain or missing information. You can proceed to the Exchange menu (Alt+Z (Exchange) > Send for e-Invoicing), and send the transactions to IRP for e-invoicing. - Exported
After the transactions are successfully sent to IRP for IRN generation/cancellation, they will appear in the Exported section. - Voucher Information Mismatch with QR Code
This section lists the transactions that were modified, either accidentally or deliberately, after the IRN was generated. This includes modifications in details such as voucher number, HSN, amount, and so on. You can drill down from this section, and press Alt+F1 for more details. You can see the invoice in two lines. The first line represents the transaction as per your books, while the second line represents the same transaction as per IRP. You can either update the transaction, as required, or cancel the IRN. - IRN Generated
This section lists the transactions where the IRN is generated from IRP, or manually updated in the offline mode using TallyPrime or other software. You can further update IRN information for the required transaction by pressing Alt+S (Manually Update IRN Info). - IRN Cancelled
This section lists all the transactions where the IRN is cancelled from IRP, or manually marked as cancelled in the offline mode in TallyPrime or other software. - User-Excluded Transactions
This section lists the transactions that you have chosen to exclude from the e-invoicing process. However, if you want to include certain transactions from this list for e-invoicing, then you can select the transactions and press Alt+H (Include).
Security Levels for e-Invoicing
You can provide additional security for e-Invoicing by creating users with special rights, and authorizing them for specific operations. If you want any users to not use e-Invoicing feature or access the report, you can use the Security Control feature to set up the required security levels.
- Press Alt+K (Company) > User Roles.
- Select the security level (for example, Data Entry) from the List of Security Levels, and press Enter.
- Under Disallow/Allow the following Facilities, select the Type of Access for e-Invoicing.
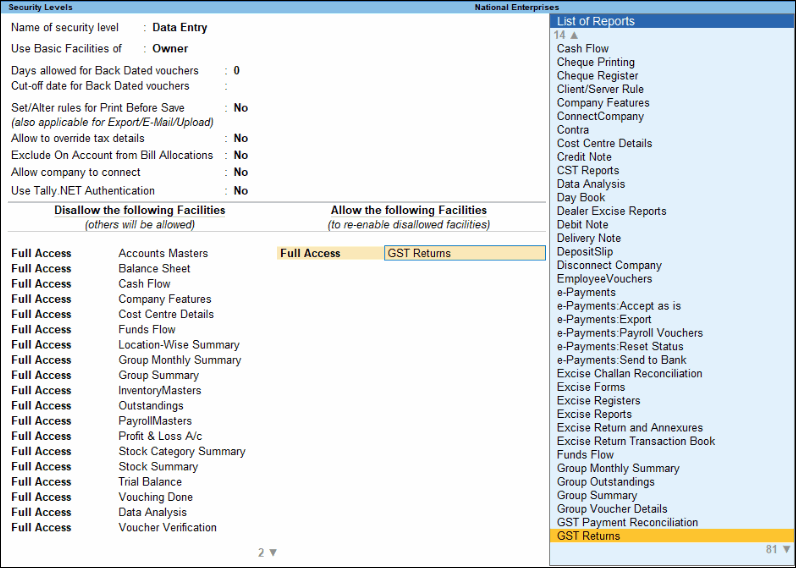
- Accept the security settings. As always, you can press Ctrl+A to save the screen.
Based on the specified security level and access, you can control the use of e-Invoicing in TallyPrime.