Data Exchange Between Branches | Synchronisation & Snapshot Exchange
When your business has multiple branches, you will need to share business data like payments and receipts, stock details from branches/warehouses, and so on. This data sharing can be between different branches, or between the head office and branches/warehouses. You can use data synchronisation to share and update data between two or more locations, including head office and branches/warehouses. At both locations, you must have the same release of TallyPrime. However, you need not maintain continuous internet connectivity to do synchronisation.
Data distribution and consolidation: You can use synchronisation to distribute the item catalogue or party ledgers created at the head office or a branch/warehouse to all branches. The transactions recorded at all branches or warehouses can be consolidated at the head office, or a designated branch. In effect, you can avoid duplication of data entry efforts, and minimise errors. In case you alter or delete transactions, you can share such vouchers too.
The data that you can share between TallyPrime in two locations include masters and transactions. You can configure your TallyPrime to control the direction in which this data sharing should take place. For this, TallyPrime follows a client-server model. You can designate one location as the client and the other as the server. However, TallyPrime can behave as both the client and the server at the same time. This will help to set up data distribution and consolidation at the same location. For example, you can create all masters at the head office and share with the branches. You can also consolidate transaction data from all the branches at the head office.
Security: The process of synchronisation is secure, as the data is transmitted in an encrypted XML format over HTTP. TallyPrime uses the Modified DES algorithm, which is proprietary in nature, for data encryption. After synchronisation, the data is not stored anywhere. You can decide which TallyPrime user can perform synchronisation and related tasks.
Rules for Synchronisation: You can designate any one TallyPrime as a server and another as a client. At the client, define the Client Rules for masters and transactions, according to which the data will be sent or received. The same Client Rule can be activated at the server location as a Server Rule based on which TallyPrime can accept or reject the data. Direction of the data flow in any Client Rule can be as follows.
|
Client Rule |
Transactions |
Masters |
|
Send only |
|
|
|
Receive only |
|
|
|
Both (send & receive) |
|
No |
Completeness of data transmission: TallyPrime can ensure that all the masters used in a transaction are shared along with the transaction. This includes Ledgers, Groups, Stock Items, Units of Measures, Currencies, and so on. After the first instance of synchronisation, if any transaction is altered or deleted, the changes are updated in the subsequent synchronisations.
To ensure that data synchronisation between two locations is carried out completely, you need to enable the same features in F11 for both the companies. When the accounting or inventory masters are altered, a new master gets created at the other end on synchronising the data.
Modes of Sync.: Synchronisation can be done in three modes:
- Online: The client and the server companies need to be online at the same time, and connected through Tally.NET Server. The sync rule and data are immediately transferred to the connected company.
- IP: The client and the server companies need to be online at the same time, and connected through a private network. To synchronise in a private network, use the static IP address and the port number on which TallyPrime is running.
- On-demand: The client and the server companies need not be online at the same time. Data is synchronised using Tally.NET Server. The Tally.NET Server stores the sync rule and data until it is accepted by the receiving company. Hence, you can initiate a synchronisation at anytime without worrying about the other company being online. The data on Tally.NET Server is deleted after the receiving party takes it or after seven days, whichever is earlier. After seven days, a new synchronisation request has to be sent.
Note: To synchronise using Tally.NET Server, a valid license and an active TSS are required.
Exchange of bulk data: When you open a new branch, or set up synchronisation for the first time, there is a need to exchange large data. The snapshot exchange feature enables fast data exchange. You need to use a private network for snapshot exchange.
Set up for Synchronisation: Specify the role of your company in synchronisation, create sync. rule on the client, and activate the sync. rule on the server. If you are using Tally.NET Server for synchronisation, you need to configure the TSS feature. For online synchronisation, keep the company connected.
Get Started with Synchronisation
Let’s understand the synchronisation feature with a business scenario. Consider a company National Enterprises which is headquartered at Bangalore, with a branch office in Mangalore. The data between the two companies needs to be synced to arrive at the final accounts. Let’s call the server company as National Enterprises HO and the client company as National Enterprises BO.
- Specify the role of your company
- Connect Server Company to Tally.NET Server for Synchronisation
- Define Synchronisation Rules
- Synchronise data
Specify the Role of Your Company
You can configure your TallyPrime company to be a client, server, or both, for synchronising the data.
- Press Alt+Z (Exchange) > Data Synchronisation > Client/Server Configuration.
- Configure your company as Client, Server, or Both (Client & Server).
- Specify the required Port (for example: 9000). These details will be displayed in F1 (Help) > About > Connectivity and Tally Gateway Server.
- Save the configuration. Restart TallyPrime to apply the changes.
Note: The above step is carried out at both the client and server.
Connect Client and Server Company to the Tally.NET Server for Synchronisation
You need to connect the company data on the server system to the the Tally.NET server for synchronisation.
- Gateway of Tally > press F4 (Connect Cmp).
- The company gets connected to the Tally.NET Server if there is only one company loaded, otherwise Tally will prompt you to choose the company that needs to be connected to Tally.NET Server. On successfully connecting to Tally.NET Server, press F1 (Help) > Troubleshooting > Event Log.

Define and Activate Synchronisation Rules
There are two steps to set up synchronisation rules, one at the client and the other at the server.
Create Client Rules
Synchronisation rule for the client company defines your data synchronisation preferences. The client rule sets options for synchronising masters and transactions with the server.
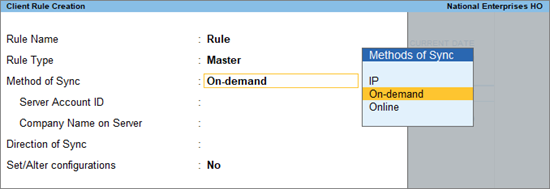
- Create Client Rule for Master.
- Press Alt+Z (Exchange) > Client Rules > Create.
- Enter the Rule Name.
- Rule Type – Master.
- Method of Sync
On-demand: You need not connect to the client and server at the same time.
Online: You have to connect the company to the Tally.NET server.
IP: You need to connect both the server and client companies through a private network.- In Server Account ID, enter your Tally.NET Server account ID.
- In Company name on server, enter the company name on the server. You can find the company name by pressing Alt+K (Company) > Online Access > Contact Details report.
- Select Direction of sync as Receive Data to receive masters from the server company. Select Send Data to send masters to the server company.
- Save the configuration.
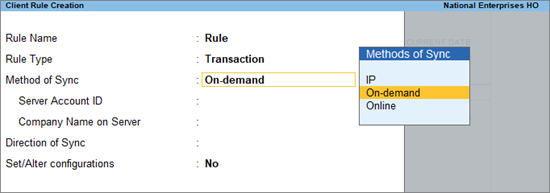
Similarly, create the Client Rule for Transaction.
Synchronise Client and Server
- Send Client Rule to the server.
After defining the rules at the client end, do a synchronisation at the client to send these rules to the server. You need to synchronise at the server end to receive the rules.
Press F1 (Help) > Troubleshooting > Event Log, for details of the synchronisation.
If you are using On-demand synchronisation, the rules will be stored at the Tally.NET server until the server executes synchronisation.
Activate Server Rules
After receiving the client rules at the server end, these rules need to be activated.
- Activate Server Rule for Master.
 Select the rule from the List of Rules. The Rule Type tells you if the rule you are selecting is a master or a transaction.
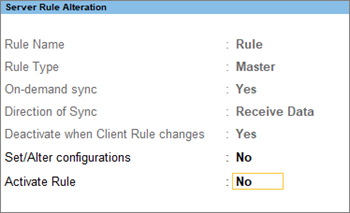
The Server Rule Alteration screen appears.- Activate rule – Yes.
Similarly, activate Client Rule for Transaction. - Deactivate when client rule changes – Yes, to auto-deactivate the rule when client rule is modified. This enables you to check and activate the required rule. Set Activate rule to Yes.
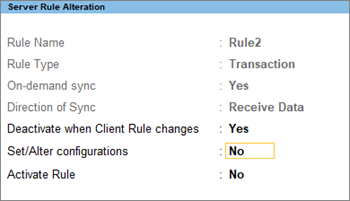
Server Rule is activated. You can execute data synchronisation when needed.
- Activate rule – Yes.
Synchronise Data
After setting up the Client Rules and Server Rules, you can now synchronise the data.
- Press Alt+Z (Exchange) > Synchronise, to synchronise data for all the rules created.
- Select Synchronise Selected to synchronise data for a selected rule. For example, you can use selectively synchronise in case you want to receive masters, without sending transaction details to the server or vice-versa.
After data synchronisation is completed, press F1 (Help) > Troubleshooting > Event Log.
Control Data Exchange/Synchronisation
- Who will use synchronisation features
- Share masters between branches
- Consolidate business transactions
- Connect your company for online synchronisation
Manage Users
You can decide which users can do different tasks related to synchronisation.
- Synchronisation – You can allow or disallow a user to perform data synchronisation from the client or server company.
- View Synchronisation Reports – You can allow or disallow a user to view synchronisation reports.
- Manage Synchronisation Rule – You can allow or disallow a user to create/alter/delete the client or server rules at the client or server company.
To allow selective rights to users, you need to specify their rights using security level while creating users. For more information on adding/removing the tasks to the required security level, see Manage Users.
Share masters between branches
You can create masters at the head office, warehouse or any branch, and share with other branches. For this, at the client side, you need to define the masters that it will receive and send. Then, send these rules to the server, so that the server can validate the data before accepting.
- Receive master data from the server
- Send master data to the server
- Receive master data from the client
- Send master data to the client
Identify the master data to receive from the server
At the client, define the type of masters that the client will receive from the server.
- Press Alt+Z (Exchange) > Client Rules > Create or Alter.
- In the Client Rule Creation/Alteration screen,
- Rule Type – Master.
- Direction of sync – Receive Data.
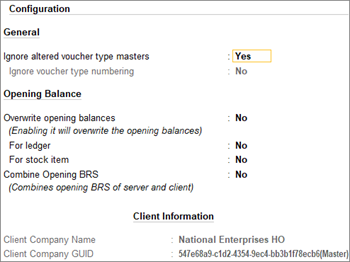
- Set/alter advanced configurations – Yes.
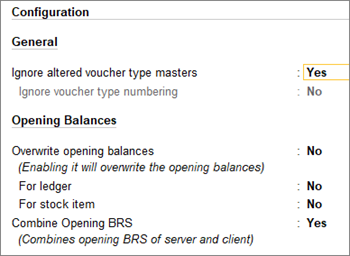
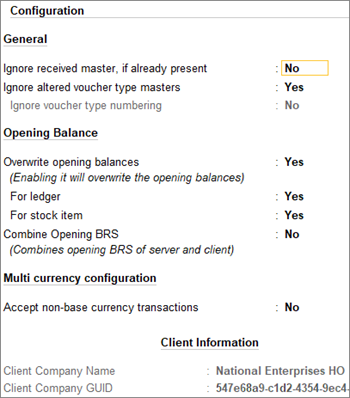
- Ignore altered voucher type masters – Yes, to reject the changes in voucher types made at the server company.
- Ignore voucher type numbering – No, to accept the voucher numbering and related configurations. You can alter this only if Ignore altered voucher type masters is set to No.
- Overwrite opening balances – No, to retain the values available at the client.
- For ledger – No, to retain the ledger opening balances at the client.
- For stock item – No, to retain the opening balances at the client for stock items.
- Combine opening BRS – No, to retain the values available at the client.
- Save the configurations.
Identify the master data to send to the server
At the client, define the type of masters that the client will send to the server.
- Press Alt+Z (Exchange) > Client Rules > Create or Alter.
- In the Client Rule Creation/Alteration screen,
- Rule Type – Master.
- Direction of sync – Send Data.
- Set/alter advanced configurations – Yes.
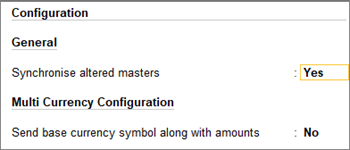
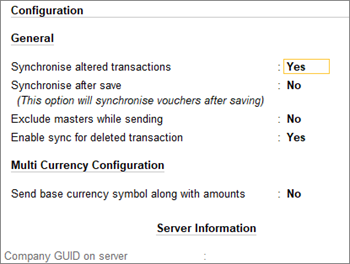
- Synchronise altered masters – Yes, for the server to update changes made to the masters at the client, after the previous synchronisation.
- Send base currency symbol along with amounts – Yes, to send the base currency symbol at the client to the server company.
- Save the configurations.
Identify the master data to receive from the client
At the server, define the type of masters that the server will receive from the client.
- Press Alt+Z (Exchange) > Server Rules > Alter.
- Select the rule to alter.
- In the Server Rule Alteration for Master screen,
- Save the configurations.
Identify the master data to send to the client
At the server, define the type of masters that the server will send to the client.
- Press Alt+Z (Exchange) > Server Rules > Alter.
- Select the rule to alter.
- In the Server Rule Alteration for Master screen,
- Direction of sync – Send Data.
- Set/alter advanced configurations – Yes.
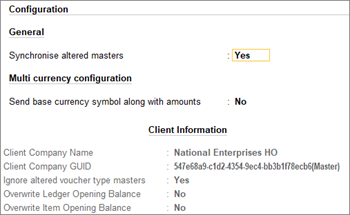
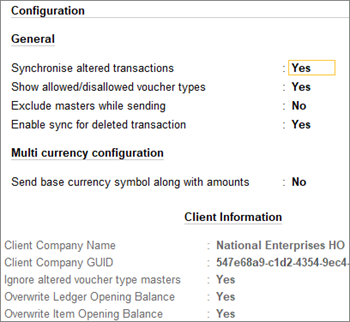
- Synchronise altered masters – Yes, to send masters altered since the last synchronisation.
- Send base currency symbol along with amounts – Yes, to send the base currency symbol to the client.
The Client Information contains details of the client rule.
- Save the configurations.
Consolidate business transactions
Based on your business needs, you can specify the transaction data to be exchanged.
- Receive transaction data from the server
- Send transaction data to the server
- Receive transaction data from the client
- Send transaction data to the client
- Transaction data to exchange between client and server
Identify the transaction data to receive from the server
At the client, define the type of vouchers that the client will receive from the server.
- Press Alt+Z (Exchange) > Client Rules > Create or Alter.
- In the Client Rule Creation or alteration screen,
- Rule Type – Transaction.
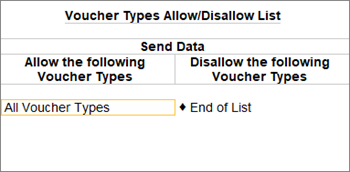
- Direction of sync – Receive Data, and select the voucher types as needed.

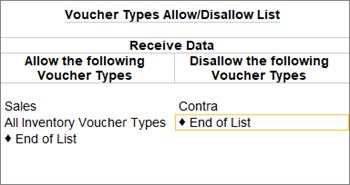
- Set/alter advanced configurations – Yes.
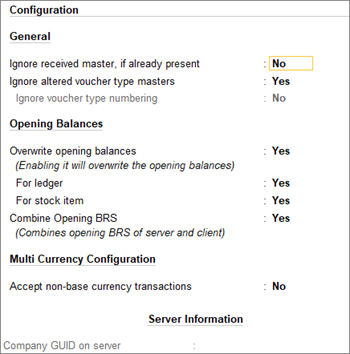
- Ignore received master, if already present – No, to stop receiving masters that are already present.
- Ignore altered voucher type masters – Yes, to ignore changes in voucher types made at the server company.
- Ignore voucher type numbering – No, to accept voucher numbering and related configurations. You can alter this only if Ignore altered voucher type masters is set to No.
- Overwrite opening balances – Yes, to overwrite the values available at the client.
- For ledger – Yes, to update the ledger opening balances.
- For stock item – Yes, to update the opening balances for stock items.
- Combine opening BRS – Yes, to combine the opening BRS of the server and the client.
- Accept non-base currency transactions – No, to avoid synchronising transactions that are not in the same base currency.
- Save the configurations.
Based on this rule, the client will receive vouchers from the server.
Identify the transaction data to send to server
At the client, define the type of vouchers that the client will send to the server.
- Press Alt+Z (Exchange) > Client Rules > Create or Alter.
- In the Client Rule Creation/Alteration screen,
- Save the configurations.
Based on this rule, the client will send vouchers to the server.
Identify the transaction data to receive from client
At the server, define the type of vouchers that the server will receive from the client.
- Press Alt+Z (Exchange) > Server Rules > Alter.
- Select the rule to alter.
- In the Server Rule Alteration for Transaction screen,
- Save the configurations.
Based on this rule, the server will receive vouchers from the client.
Identify the transaction data to send to the client
At the server, define the type of vouchers that the server will send to the client.
- Press Alt+Z (Exchange) > Server Rules > Alter.
- Select the rule to alter.
- In the Server Rule Alteration for Master screen,
- Save the configurations.
Based on this rule, the server will send vouchers to the client.
Transaction data to exchange between client and server
At the client, if you select Direction of sync as Both, you will get the following screen. On the same screen you can define the transactions that the client will exchange with the server.
The Send and Receive options are the same, as explained above.
Similarly, at the server, when you select Direction of sync as Both, on the same screen you can define the transactions that the server will exchange with the client.
Subsequently, synchronisation will follow these rules.
Connect your company for synchronisation using Tally.NET server
In case you are using online synchronisation, you need to keep the server and the client connected to Tally.NET server.
- Press F11 > Show More > Enable Tally.NET Services for Remote Access & Synchronisation > Yes.
- If you have enabled security control for your company, move to step 2.
- In case you have not enabled security control for your company, then TallyPrime will prompt you to enable it.
- In the Security Control screen, set the Use security control option to Yes.
- Provide the administrator details. This login credential is for the company data.
- Press Alt+K (Company Management) > Connect.
On successfully connecting to Tally.NET Server, the connected (c) symbol will appear next to the company name in the Gateway of Tally.
Manage Synchronisation Rule
Alter synchronisation rule
When there is a change in the data exchange needs, you can alter the synchronisation rules.
- Press Alt+Z (Exchange) > Client/Server Rules > Alter.
- Select the rule from the List of Rules.
- Alter the details, and accept the screen.
You can view the information on synchronisation for masters and transactions by pressing Alt+I (Rule Info.).
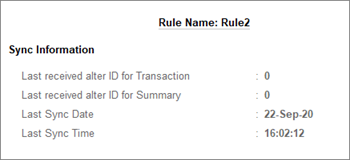
Migrate synchronisation rule
When data is migrated from an earlier version of TallyPrime to a new version, the sync rules are also migrated.
After migration of sync rules,
- In the Rule Info screen for masters, Last Master Sent/Received Alter ID is 0. This field is updated on synchronising the data.
- In the Rule Info screen for transactions, Last Transaction Sent/Received Alter ID is 0. This field is updated on synchronising the data.
Synchronisation Reports
The Synchronisation reports display details of the transactions synchronised, name of the rule, data type, last synced date, status and mode of synchronisation, and other exceptions.
Transaction Sync Summary
This report displays details of synchronisation of transactions.
- Press Alt+Z (Exchange) > Sync Reports> Transaction Sync Summary.
- Select a rule from the List of Rules. The Transaction Synchronisation Summary appears as shown below:

- Press F2 (Sent) to view details of the vouchers that have been sent since the last synchronisation.
- Press F3 (Receive) to view details of the vouchers that have been received since the last synchronisation.
- Press F4 (Change Rule) to view the synchronisation report for a different rule.
Synchronisation Status
The Synchronisation Status report provides details of the synchronisation, such as the name of the rule, data type, last synced date, status, and mode of synchronisation.
- Press Alt+Z (Exchange) > Sync Reports > Sync Status. The Synchronisation Status report appears as shown below:
Note: To display further details of each synchronisation, press F1 (Detailed).
Sync Exceptions
The Sync Exceptions report displays details of the errors while synchronising vouchers. You can correct them directly from this report. This report is for on-demand synchronisation.
- Press Alt+Z (Exchange) > Sync Reports > Sync Exceptions. The Sync Exceptions report appears as shown below:

- Drill down from the transaction for more information. You can correct the details as needed.
- Press F2 (Sent) to view the errors in the vouchers sent since the last synchronisation.
- Press F3 (Receive) to view the errors in the vouchers received since the last synchronisation.
Snapshot Exchange
Snapshot exchange sends and receives all the data created or altered after the last exchange. When doing the first snapshot exchange, all data gets exchanged. Thereby, this is ideal for the bulk exchange of data between branches.
It is essential to create the client rule and activate it on the server before exchanging a snapshot.
Snapshot Exchange
- Press Alt+Z (Exchange) > Snapshots > Exchange Snapshot Online.

- Select the required rule and press Enter.
After the exchange of data between the client and the server, press F1 (Help) > Troubleshooting > Event Log for more details.
Export Snapshot
You can export your masters and transactions in the XML format. By default, the file gets created in the TallyPrime installation folder.
Export Snapshot exports all the data created or altered after the last export. While exporting the first snapshot, all data gets exchanged. The masters are exported first, followed by the transactions.
- Press Alt+Z (Exchange) > Snapshots > Export Snapshot.
- Select Masters or Transactions in the field Export for.
- Select the rule from the List of Rules.
- Specify the export location.
- Specify the output file name.
After exporting the data, press F1 (Help) > Troubleshooting > Event Log. You can now import this data to the server of your choice.
Import Snapshot
After exporting the masters and transactions from a client, you can import the data in the XML format to a server of your choice.
- Press Alt+Z (Exchange) > Snapshots > Import Snapshot. The Import Snapshot for Selected Rule screen appears.
- Select Masters or Transactions for the option Import for.
- Select the rule from the List of Rules.
- Enter the Import location or use the default export location.
- Enter an Output file name.
Press F1 (Help) > Troubleshooting > Event Log for more details. The message “Importing snapshot of XXXX” appears.
 Yes
Yes
 Rule Type