Sales Under GST
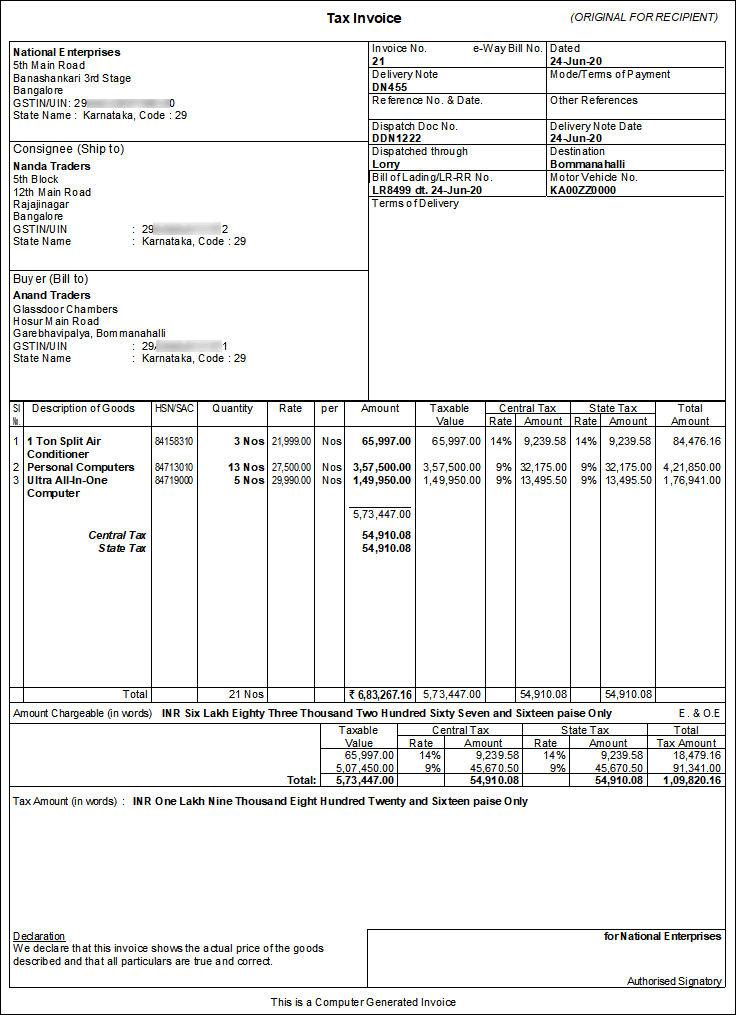
You can record sales under GST in TallyPrime and print a valid GST tax invoice with party’s GST registration and location, item details (HSN or SAC), and tax rates. You can also record the export of goods, sales to other territory and SEZ, sales to foreign tourists, nil rated and exempt sales, deemed export, and so on, using a sales voucher.
Select the Sales Ledger in a Sales Transaction
While recording any type of sales transaction, you can choose either of the following methods:
- Method 1: For a specific type of sales transaction, you can create or update the sales ledger with the relevant Nature of transaction. Select this sales ledger while recording the sales transaction.
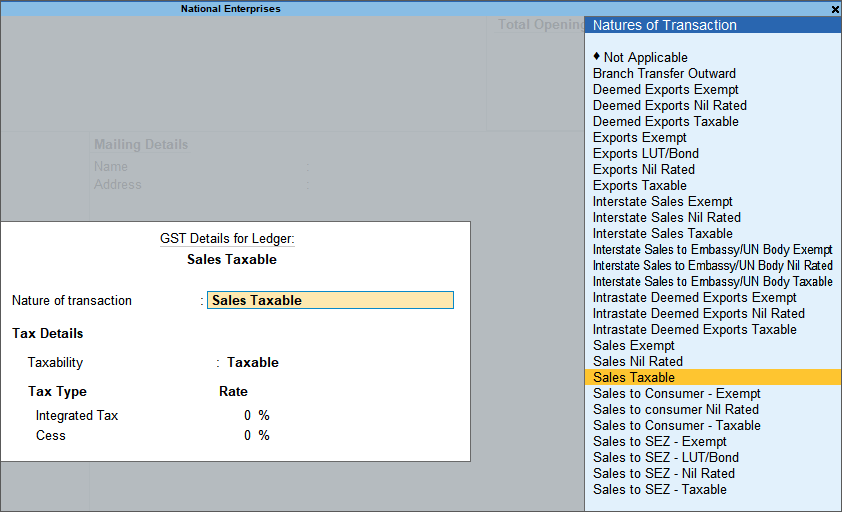
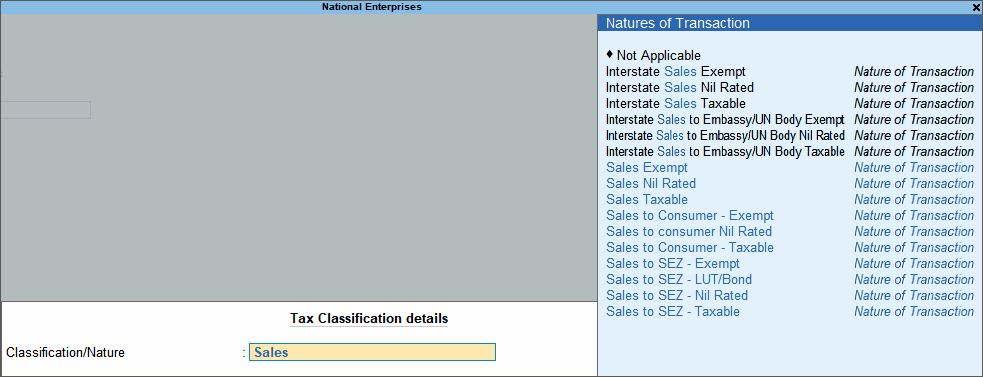
- Method 2: Select the common sales ledger during the sales transaction. Press F12 (Configure) > set the option Modify Tax Rate details for GST to Yes. Select the Classification/Nature.
Local Taxable Sales with Multiple GST Rates in an Invoice
- Gateway of Tally > Vouchers > F8 (Sales).
Alternatively, press Alt+G (Go To) > Create Voucher > press F8 (Sales). - In Party A/c name, select the customer ledger or the cash ledger.
- Select the common sales ledger in which GST rate is not defined.
- Select the stock items defined with different GST rates, and specify the quantities and rates for each of them.
- Select the central and state tax ledgers. GST will be calculated based on the GST rates defined in the stock items.
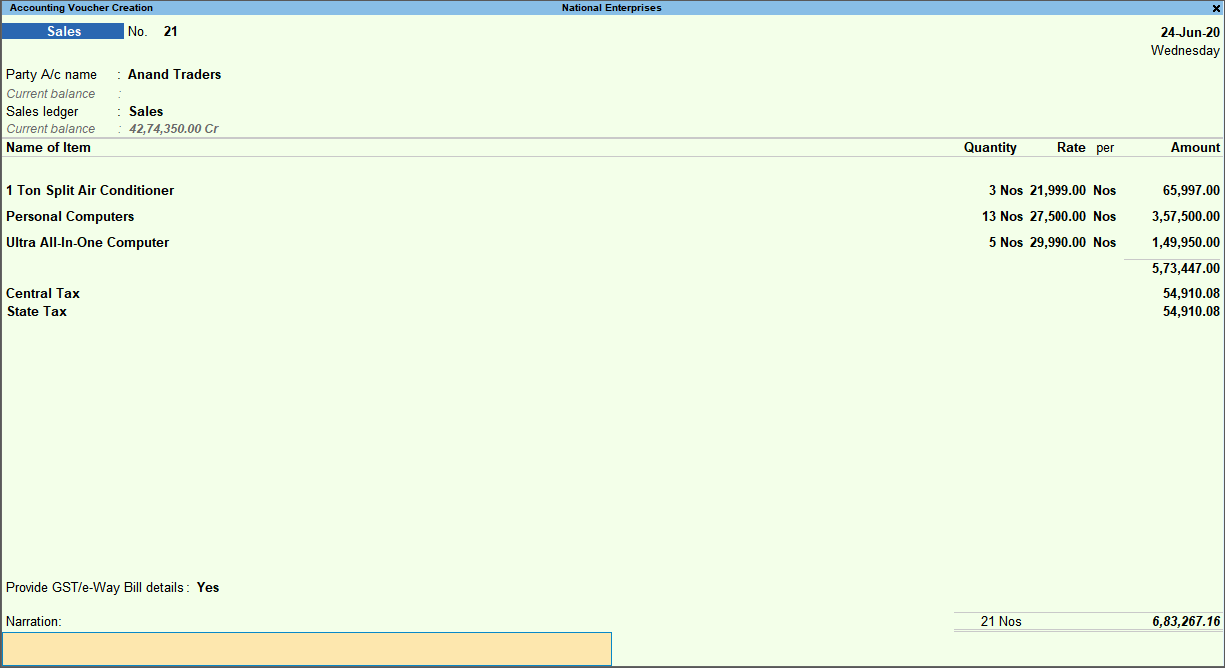
- Press Ctrl+O (Related Reports) > type or select GST – Tax Analysis to view the tax details. Press Alt+F5 (Detailed) to view the detailed break-up of tax.
Note: If you are on TallyPrime Release 1.1.3 or earlier, follow the step:
Press Ctrl+I (More Details) > type or select GST – Tax Analysis to view the tax details. Press Alt+F5 (Detailed) to view the detailed break-up of tax.
- Press Alt+P (Print) > press Enter on Current > and press P (Print) to print.
For multiple copies:
- Press Alt+P (Print) > press Enter on Current > press C (Configure) > type or select Number of Copies > and press Enter.
- Provide the Number of Copies and select the Type of Copy.
- Press Esc to return to the Voucher Printing screen.
- Press P (Print) to print.
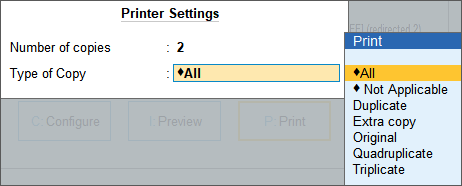
Note: When you are printing multiple copies of the invoice, only the page number of the current invoice will be displayed, and not the number of the copy. For example, if you want to print 3 copies for an invoice (original, duplicate, and triplicate), then in the print preview, the page number would be displayed as 1 of 1, and not 1 of 3.
For services, original copy for buyer and duplicate copy for supplier will be printed in the invoice.
For goods, original for buyer, duplicate for transporter and, triplicate for supplier will be printed in the invoice. If you do not want to print the transporter’s copy, then disable the option Print Transporter’s Copy in the Print Configuration screen.
Print invoice with Item-wise GST details
As per GST guidelines, details such as the applicable taxes and tax rates, and the GSTIN/UIN of the company and the customer will be captured. After selecting the state in the ledger master, the state name and the state code will be captured in the printed invoice. Depending on your requirements, you can include additional details in your invoice by clicking F12: Configure.
To ensure that company GSTIN is printed on the sales invoice:
- Specify GSTIN under Company GST Details screen in F11 (Features).
- In the Voucher Printing screen of the sales invoice, press F12 and set:
- Show GSTIN to Yes.
Note: - The total value of Total Amount column does not appear, as the invoice value is captured with GST in the Amount column. - When both taxable and nil-rated/exempt goods are selected in the same invoice and party is an unregistered dealer, then the title of the invoice is printed as Invoice-cum-Bill of Supply.
Print the party’s contact details in the pre-printed format
- Press Alt+P (Print) > press Enter on Configuration > press Enter on Show More.
- Type or select Reduce space between Address and Name of Items/Particulars > press Enter to set it to No.
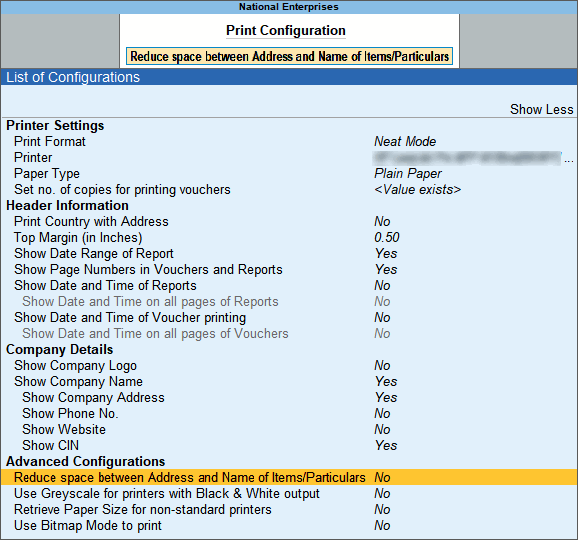
- Press Esc to accept and return to the previous screen.
Interstate Sales with GST
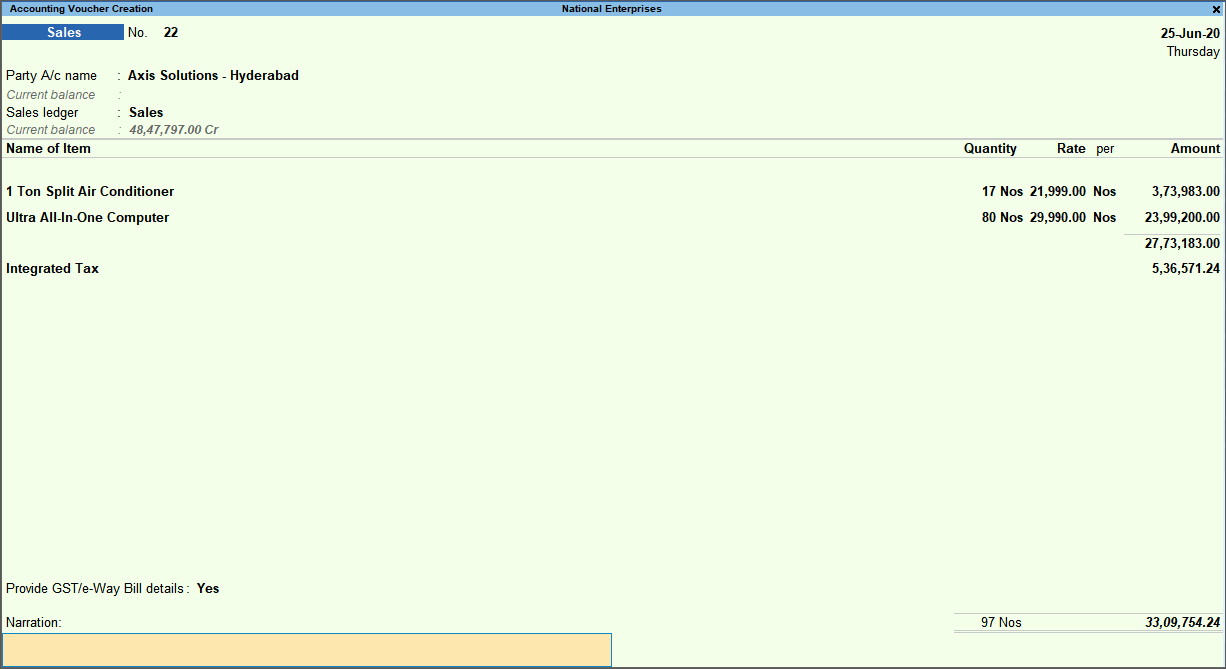
Follow the steps used for recording a local sales transaction. The only difference is that you have to select the integrated tax ledger instead of central tax and state tax.
Sale of Services
When you maintain only accounting transactions (but not inventory of your goods), or when your company deals with services, you can use the accounting invoice mode for recording your local and interstate sales.
- Gateway of Tally > Vouchers > F8 (Sales).
Alternatively, press Alt+G (Go To) > Create Voucher > press F8 (Sales). - Press Ctrl+H (Change Mode) to select the required voucher mode (Accounting Invoice, in this case).
- In Party A/c name, select the customer ledger or the cash ledger.
- Select the required service ledgers, and specify the amount. Alternatively, press Alt+C to create the ledgers.
- Select the central and state tax ledgers for local sales and the integrated tax ledger for interstate sales.
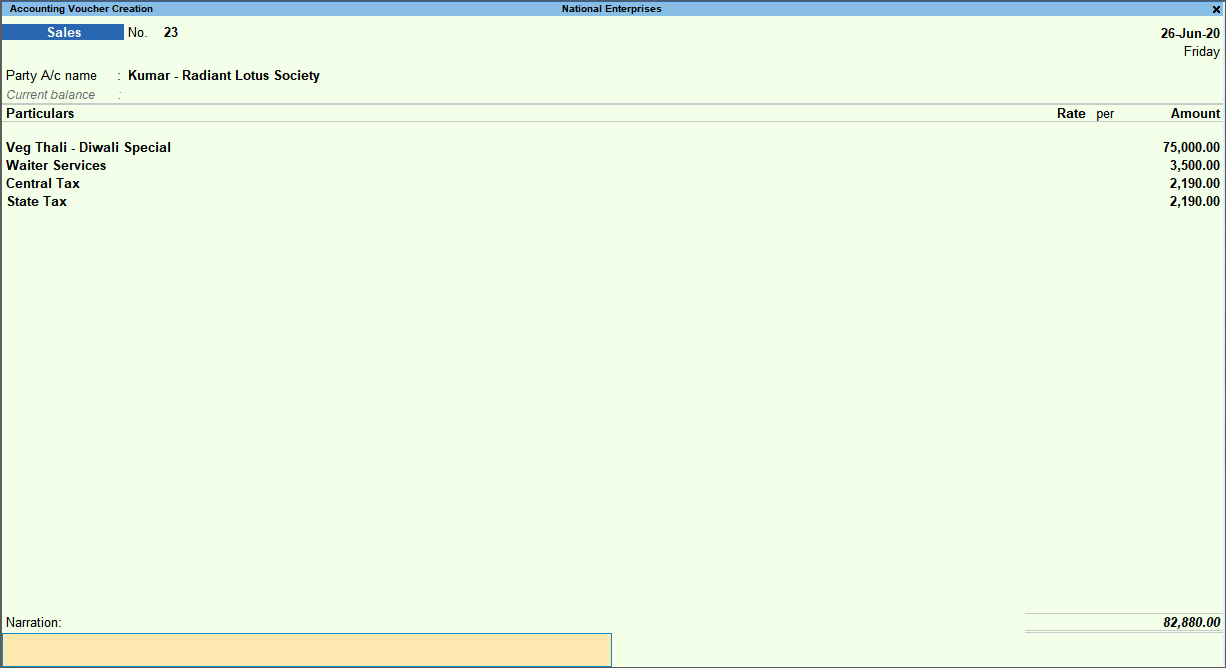
Override assessable value in invoice
- In the sales invoice, press F12 and set the options as given below:
- Select common Ledger Account for Item Allocation – No.
- Modify Tax Rate details of GST – Yes.
- Select the party ledger and stock item.
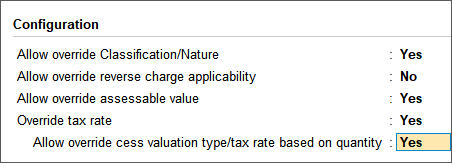
- Select the sales ledger. In the GST Details screen, press F12 and set the option Allow override assessable value to Yes.
- Add the amount which should form part of the Taxable Value. GST will be calculated on this updated amount.

- Similarly, select the required stock items, and update the Taxable Value.
- Select the GST ledgers.
- Press Ctrl+O (Related Reports) > type or select GST – Tax Analysis to view the tax details. Press Alt+F5 (Detailed) to view the detailed break-up of tax.
Note: If you are on TallyPrime Release 1.1.3 or earlier, follow the step:
The GST assessable value appears as overridden by user.
Press Ctrl+I (More Details) > type or select GST – Tax Analysis to view the tax details. Press Alt+F5 (Detailed) to view the detailed break-up of tax.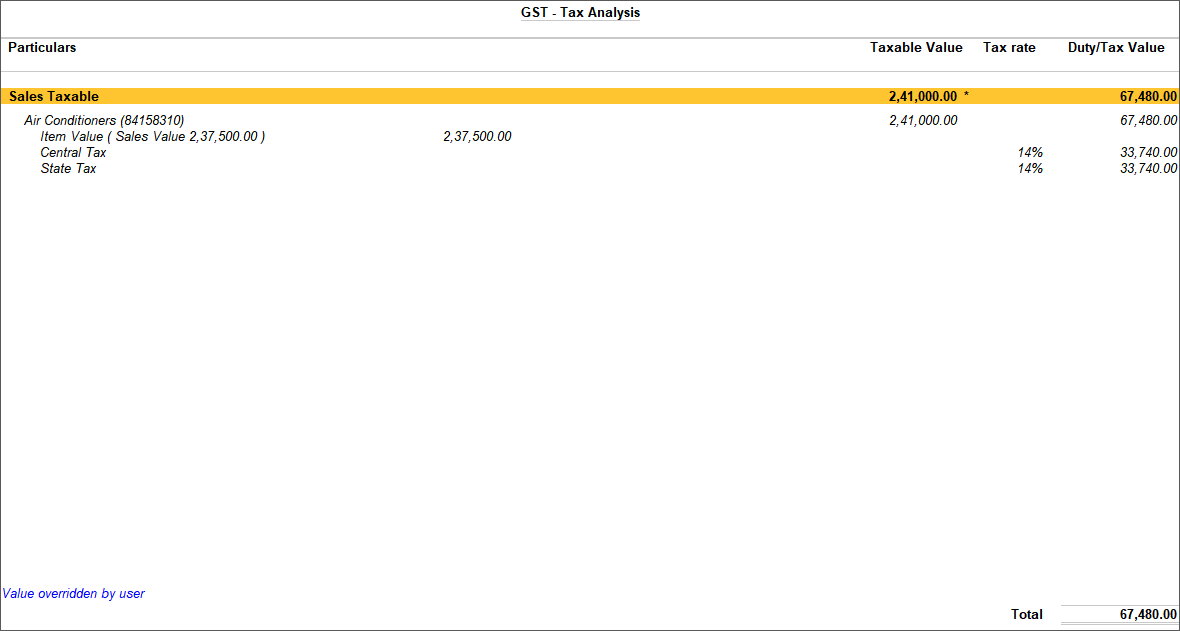
- Press Esc to return to the sales invoice. The sales invoice appears as shown:
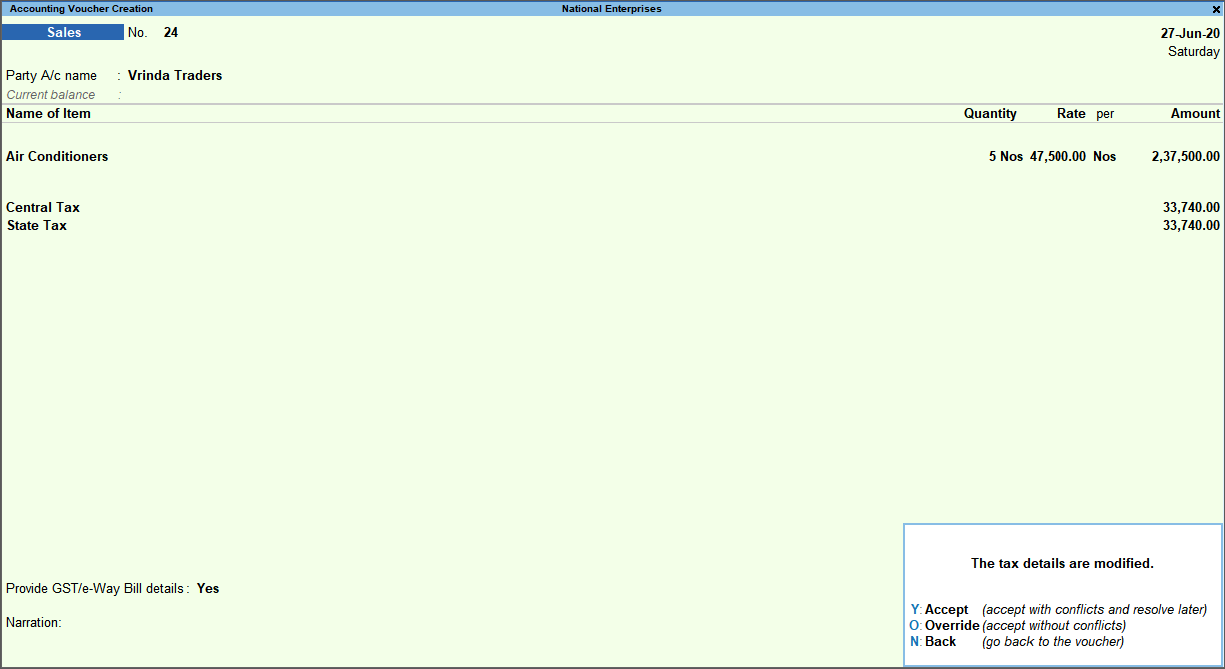
- Press O to override the values.
Note: When you override tax rate details in a company with Ladakh as the State, the field State Tax is displayed if the voucher date is earlier than 01-Jan-2020 and UT Tax, if the date is 01-Jan-2020 or later.
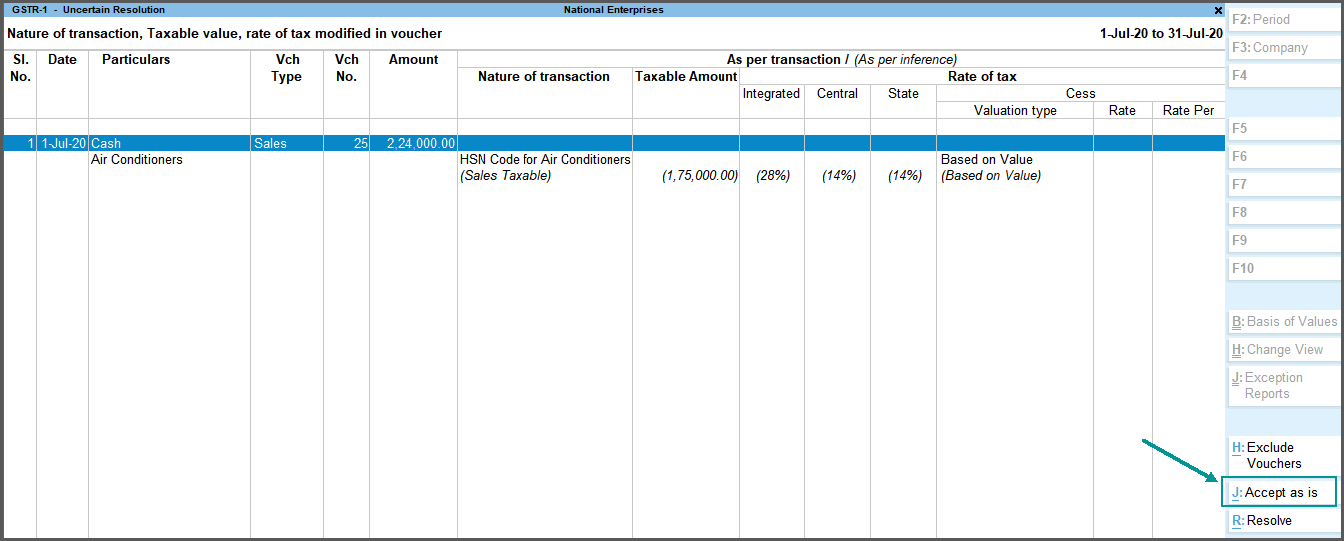
If you press Y (Enter) instead of O, the transaction will appear as an exception in the GST report as shown below:
You can press Enter to view the transaction, select it by pressing Spacebar, and press Alt+J (Accept as is) to accept the voucher as is.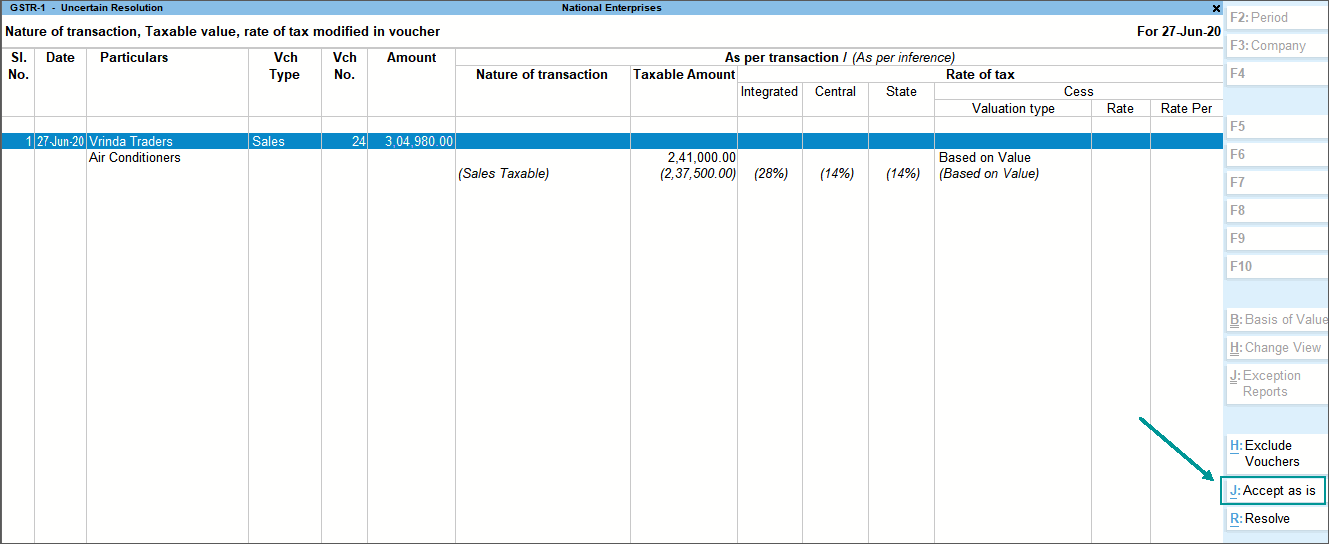
The transaction will get included in the relevant section of the GST report.
Override HSN code in invoice
If you had defined HSN code in the stock item, but want to change it in the invoice, you can select the HSN classification.
Follow the steps given below:
- In Company GST Details, set the option Enable GST Classifications to Yes.
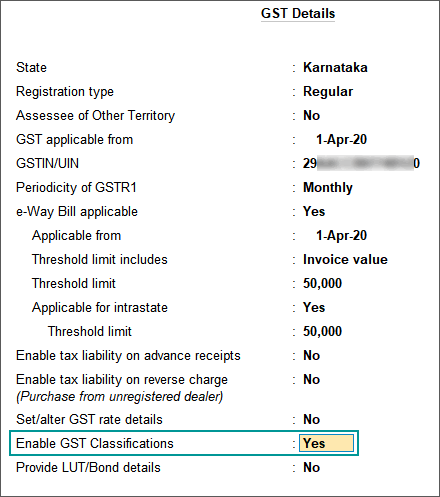
- Create a new HSN Classification with the required HSN code.
- Gateway of Tally > Create > type or select GST Classification > and press Enter.
Alternatively, press Alt+G (Go To) > Create Master > type or select GST Classification > and press Enter.
In case the feature is inactive, you will be prompted to activate the GST Classification. Select Yes or press Y to proceed. - Enter the HSN code, and applicable GST details.
- Press Enter to save.
- Gateway of Tally > Create > type or select GST Classification > and press Enter.
- Record the sales invoice by overriding the HSN code.
- In the sales invoice, press F12 and set the options as given below:
- Select common Ledger Account for Item Allocation – No.
- Modify Tax Rate details of GST – Yes.
- Select the party ledger and stock item.
- Select the sales ledger. In the GST Details screen, press F12 and set the option Allow override Classification/Nature to Yes.
- Select the HSN classification.
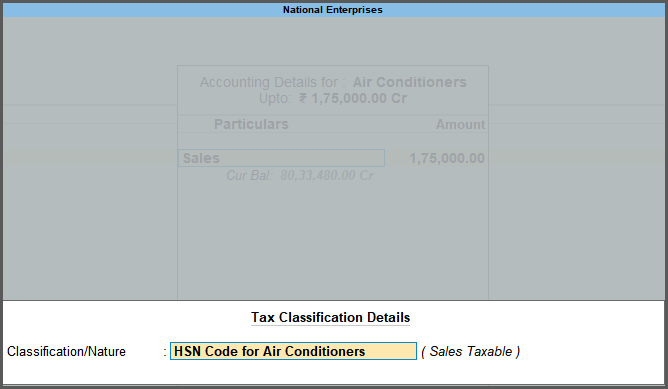
Note: Similar to sales invoice, you can record purchase invoice by selecting the required HSN classification.
Similarly, select the required stock items, and select the HSN classification. - Select the GST ledgers.
- Press Ctrl+O (Related Reports) > type or select GST – Tax Analysis to view the tax details. Press Alt+F5 (Detailed) to view the detailed break-up of tax.
Note: If you are on TallyPrime Release 1.1.3 or earlier, follow the step:
The GST assessable value appears as overridden by user.
Press Ctrl+I (More Details) > type or select GST – Tax Analysis to view the tax details. Press Alt+F5 (Detailed) to view the detailed break-up of tax.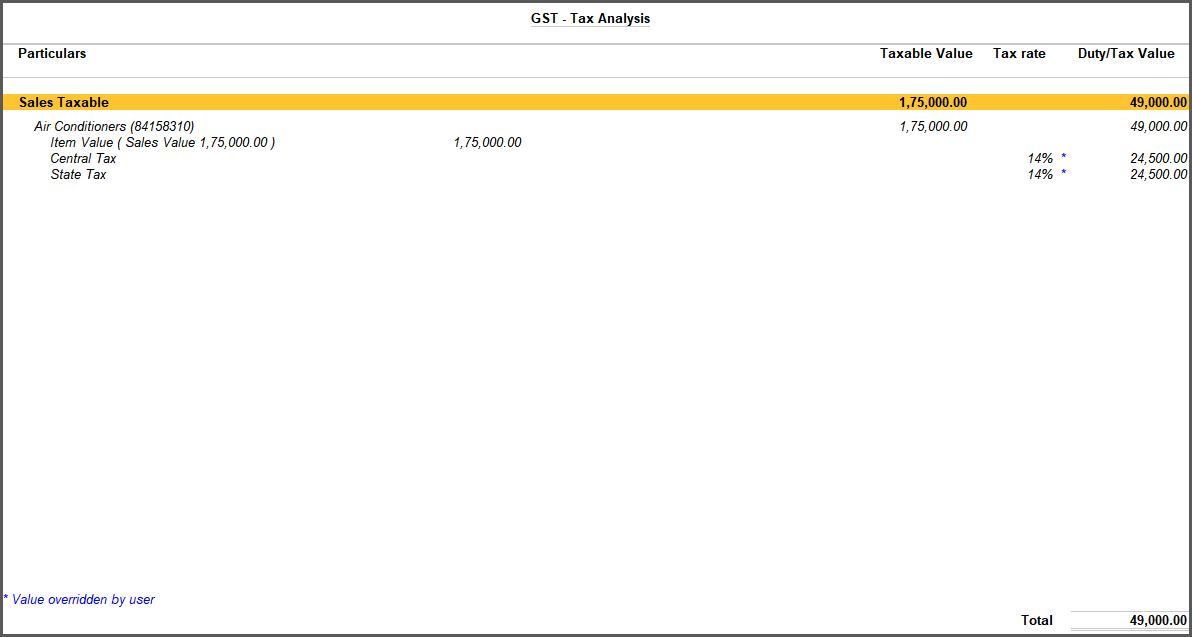
- Press Esc to return to the sales invoice. The sales invoice appears as shown:
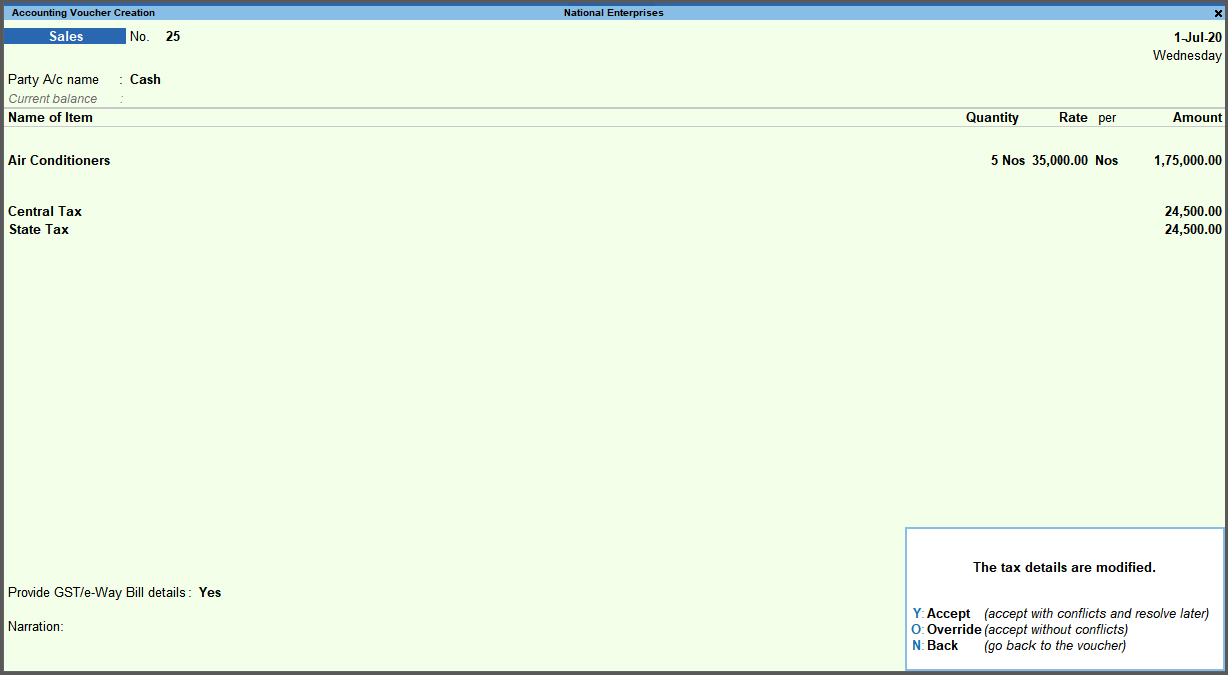
- Press O to override the values.
- In the sales invoice, press F12 and set the options as given below:
If you press Y (Enter) instead of O, the transaction will appear as an exception in the GST report as shown below:
You can press Enter to view the transaction, select it by pressing Spacebar, and press Alt+J to accept it as is.
The transaction will get included in the relevant section of the GST report.
Update Party Details in Invoice
- Open the invoice in alteration mode
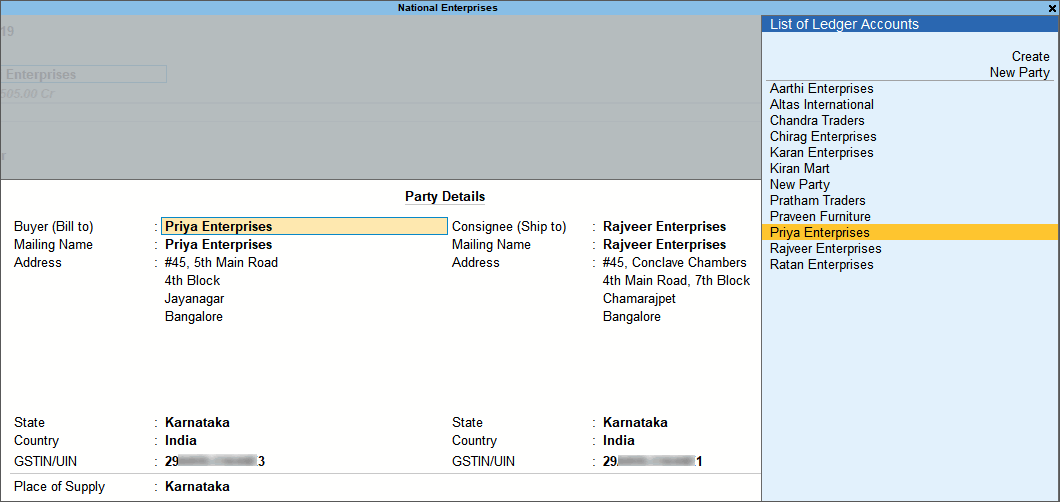
- Select the party ledger > provide the dispatch, order and export details, as applicable and accept > select or create the required party in the Party Details screen.
Sales of Composite Supply Under GST (Expense Apportioning)
You can record the sales of a composite supply using a sales invoice. The rate of tax applicable on the principal supply will be considered as the rate of tax for the composite supply.
In a composite supply of both goods and services, either one of them can be the principal supply. If you are not sure about the principal supply and the secondary supply, you can create separate invoices for the goods and services.
In this section
- Create a service ledger to participate in the sales of composite supply.
- Record sales of composite supply.
Create a service ledger
- Gateway of Tally > Create > type or select Ledger > and press Enter.
Alternatively, press Alt+G (Go To) > Create Master > Ledger > and press Enter. - Set the option Is GST applicable to Not Applicable.
- Set the option Include in assessable value calculation for to GST.
- Select Goods in Appropriate to field, as the principal supply is considered as goods in this example.
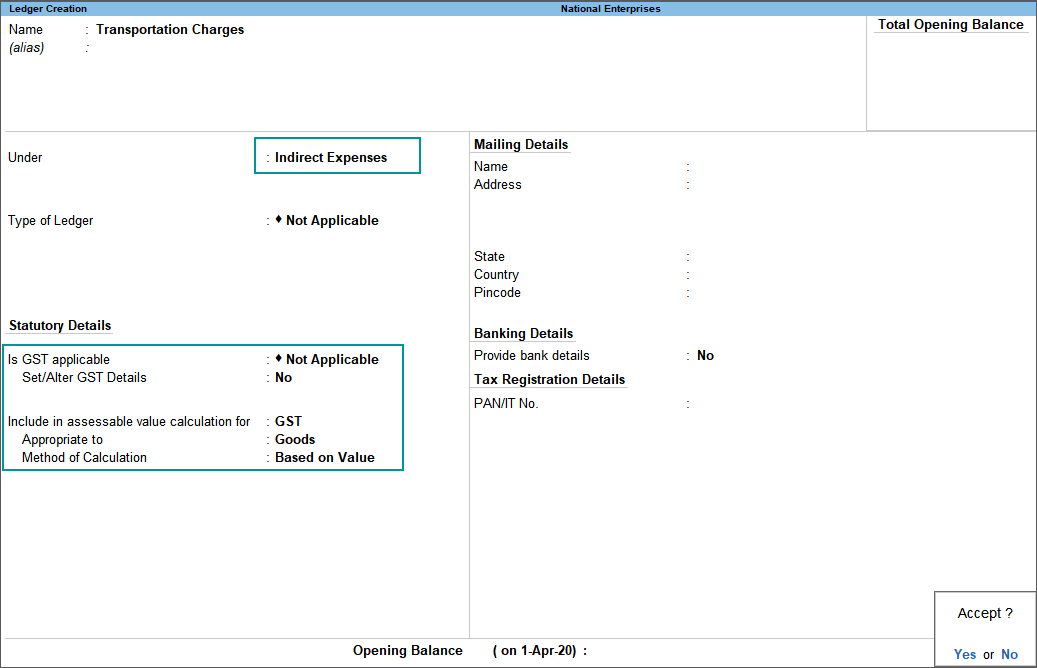
- Press Ctrl+A to accept.
Record the sales of composite supply with goods as principal item
- Gateway of Tally > Vouchers > F8 (Sales).
Alternatively, press Alt+G (Go To) > Create Voucher > press F8 (Sales). - Select the service ledger (in this example, the ledger applicable for transportation charges).
- Select the applicable tax ledgers (central and state/union territory taxes for local supply, integrated tax for interstate supply).
- Press Ctrl+O (Related Reports) > type or select GST – Tax Analysis to view the tax details. Press Alt+F5 (Detailed) to view the detailed break-up of tax.
Note: If you are on TallyPrime Release 1.1.3 or earlier, follow the step:
Press Ctrl+I (More Details) > type or select GST – Tax Analysis to view the tax details. Press Alt+F5 (Detailed) to view the detailed break-up of tax.
- Press Esc to return to the sales invoice.

- Press Ctrl+A to save.
Sale of Mixed Supply
In case of mixed supply the tax of the highest-rated item in the bundle is applicable for the bundled unit. You can record the sale of a mixed supply in Tally using a sales invoice. For this, create a new stock item for the bundle of items, with the individual items as components (BoM).
In this section
- Create stock item for the mixed supply with GST details
- Transfer individual items to mixed supply stock item
- Record sale of mixed supply
Create stock item for the mixed supply with GST details
Create stock items for the products Watch, Wallet, and Pen with applicable tax. Now for corporate offer, create one more product – Corporate Kit, as shown below by enabling BOM and description. Press F12 (Configure) and enable options Provide Descriptions for Stock Items and Set Components List (Bill of Materials) in stock items:
- Gateway of Tally > Create > type or select Stock Item > and press Enter.
Alternatively, press Alt+G (Go To) > Create Master > Stock Item > and press Enter.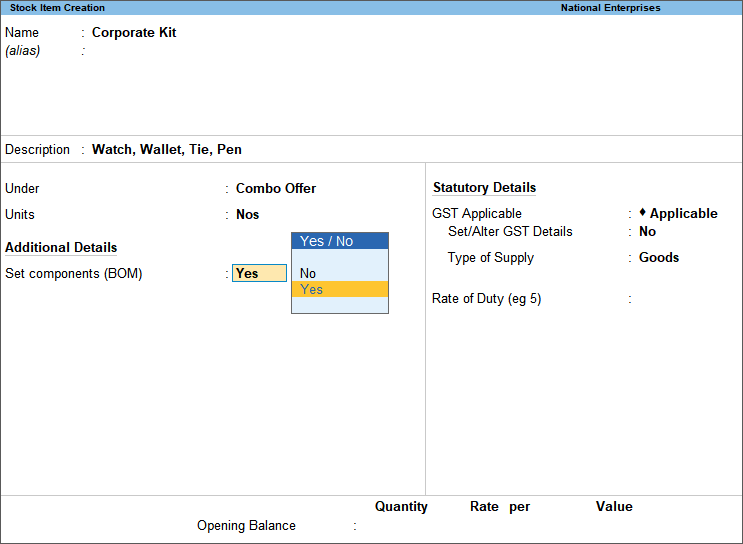
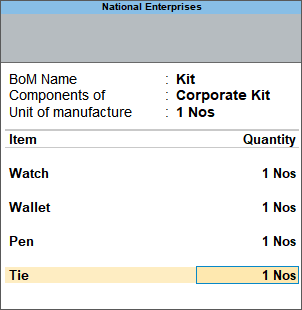
- Create BOM, and add items which are part of combo kit. In this scenario, each item has one quantity for one Corporate Kit:
- Now enable GST for Corporate Kit, enter the HSN code and tax rate of the item which has the highest tax rate among the combo.
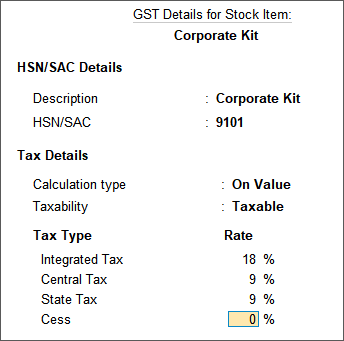
Your stock item for the mixed supply is created and ready to be used in transactions.
Transfer individual items to mixed supply stock item
Since items are procured individually and used to create the corporate kit. The items need to be transferred to reduce the quantity of individual items and create stock quantity for the combo kit.
Before transferring the items to corporate kit, the Stock Summary will appear as shown:
Record a stock journal voucher for transfer of items. You have to create a voucher type under stock journal to record such transaction.
- Gateway of Tally > Vouchers > press F10 (Other Vouchers) > type or select Stock Journal > and press Enter.
Alternatively, press Alt+G (Go To) > Create Voucher > press F10 (Other Vouchers) > type or select Stock Journal > and press Enter. - Press Ctrl+H (Change Mode) > select Use for Manufacturing Journal > and press Enter.
- Select Corporate Kit as the Name of product.
- Select Name of BOM.
- Specify Qty as 10. Automatically, related items will be moved under the kit as shown below:
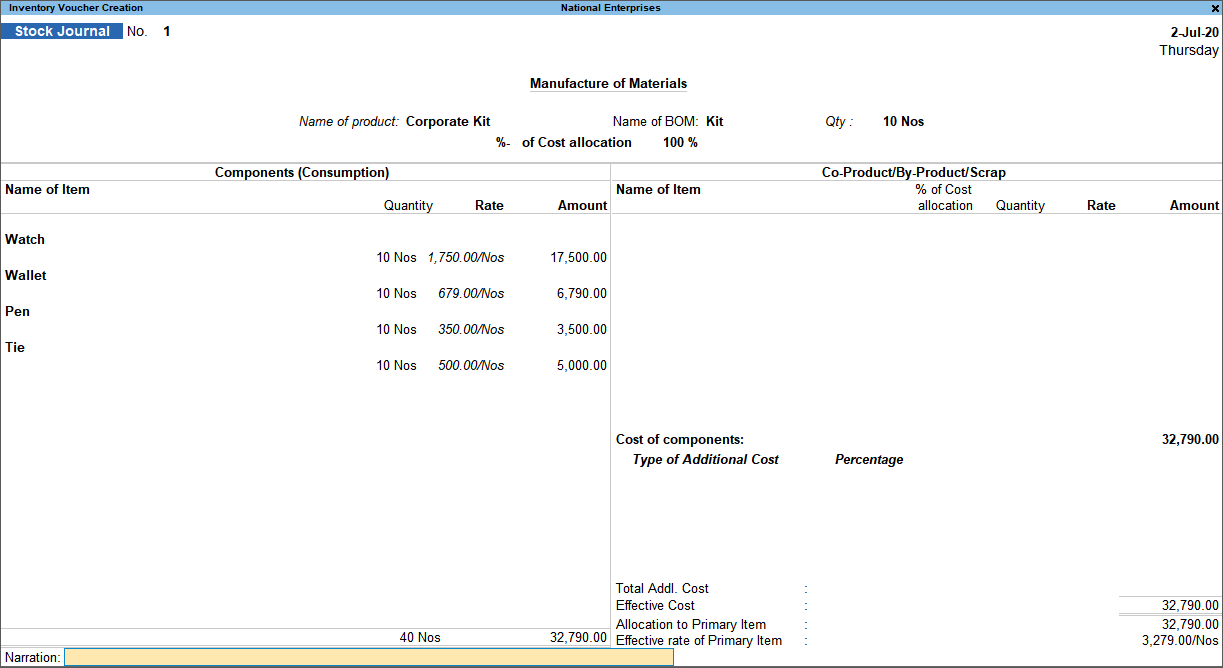
- Press Ctrl+A to save.
After the stock transfer, the stock for the corporate kit is increased and individual items stock is reduced to the same extent.
Record Sale of Mixed Supply
- Gateway of Tally > Vouchers > F8 (Sales).
Alternatively, press Alt+G (Go To) > Create Voucher > press F8 (Sales). - Press F12 (configure) > set Provide Additional Descriptions for Stock Items to Yes, to view the additional description entered in the stock item.
- Select the applicable tax ledgers (central and state/union territory taxes for local supply, integrated tax for interstate supply).
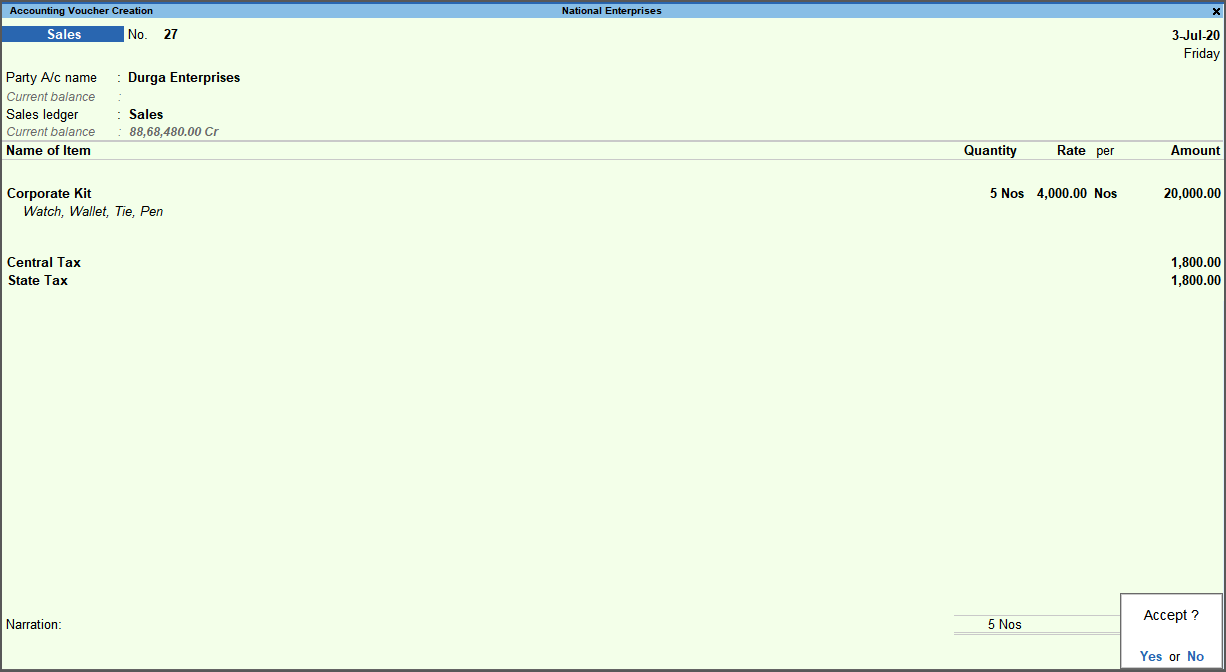
- Press Ctrl+A to save.
- Open the voucher in alteration mode, and press Alt+P (Print) > press Enter on Current > press P (Print) to print. The printed invoice with item description, discount value and GST details appear as shown below:
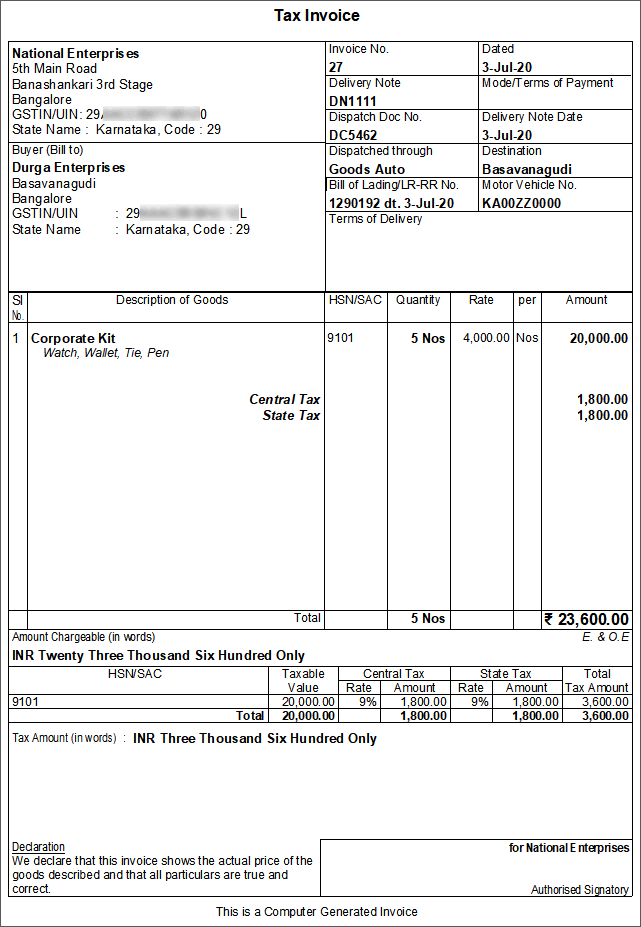
Sale of Fixed Assets
You can record the relevant transactions for sale of fixed assets and view the details in GST reports and Balance Sheet.
In this section
- Purchase of fixed assets
- Voucher for depreciation
- Sale of fixed assets
- View details in GST report
- Journal entries for adjusting profit or loss on sale of fixed assets
Purchase of fixed assets
- Gateway of Tally > Vouchers > F9 (Purchase).
Alternatively, press Alt+G (Go To) > Create Voucher > press F9 (Purchase). - Press Ctrl+H (Change Mode) to select the required voucher mode (Accounting Invoice, in this case).
- Select the ledger grouped under Fixed Assets with the nature of transaction set to Purchase Taxable, and Nature of goods set to Capital Goods.
- Select the GST ledgers.
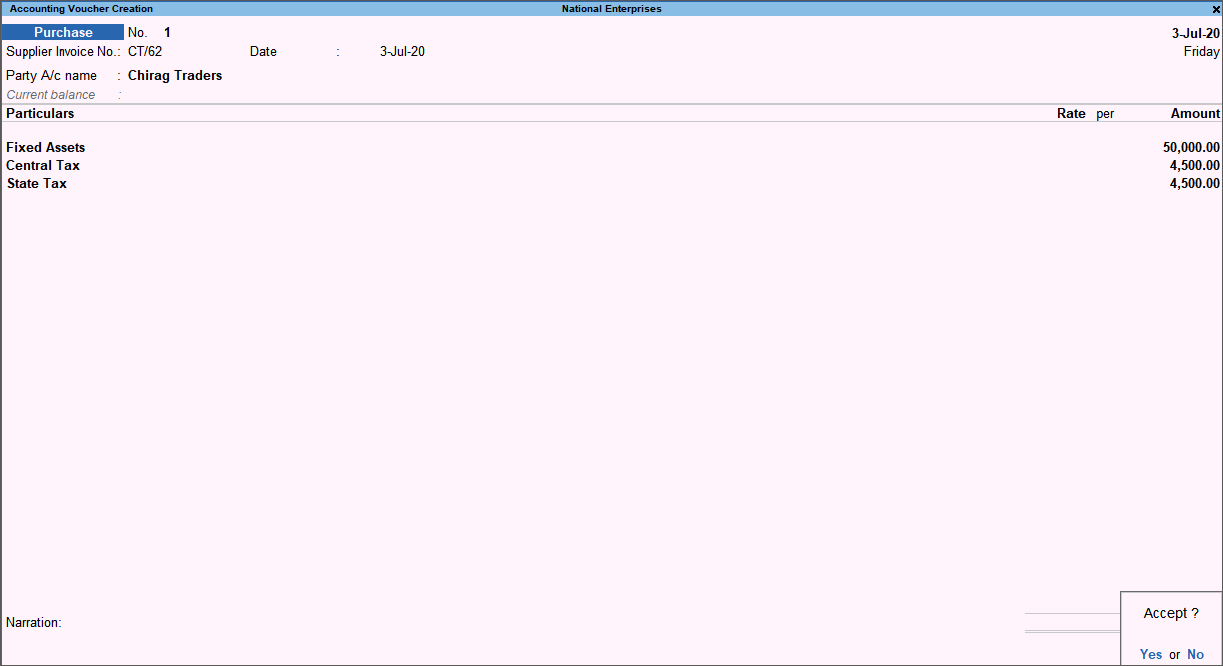
- Press Enter to save.
Voucher for depreciation
Record the depreciation voucher before recording the sale of fixed assets.
- Gateway of Tally > Vouchers > F7 (Journal).
Alternatively, press Alt+G (Go To) > Create Voucher > press F7 (Journal). - Debit the depreciation ledger grouped under expenses, and enter the value of depreciation.
- Credit the fixed assets ledger.
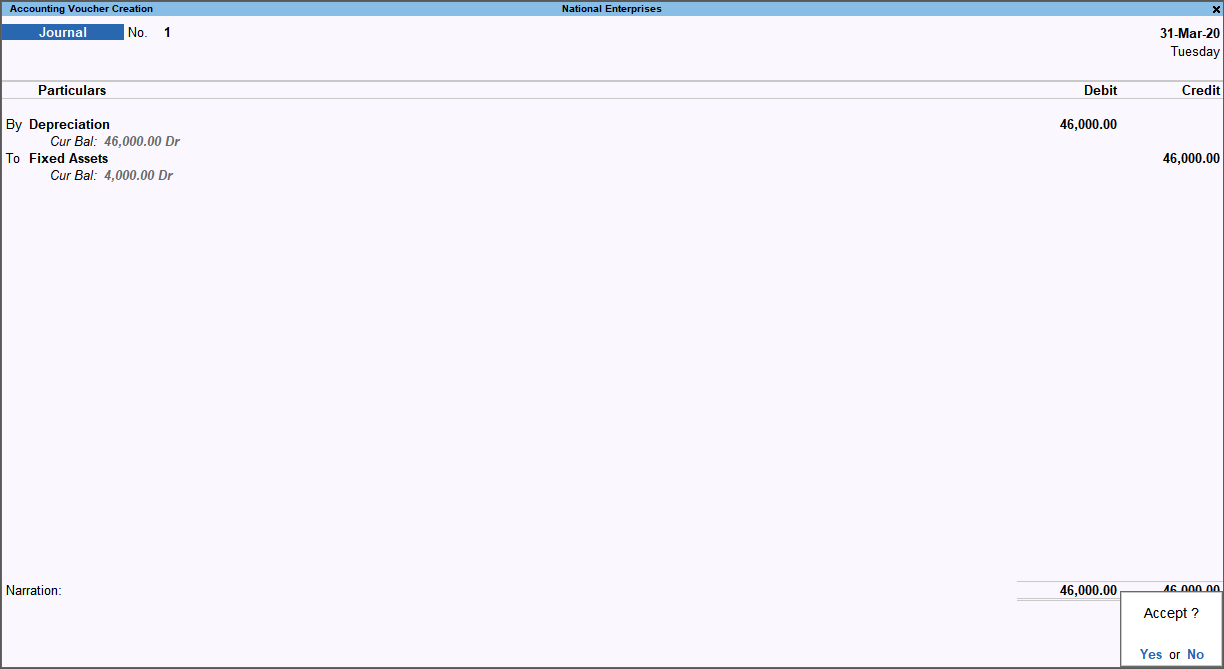
- Press Enter to save.
Sale of fixed assets
- Gateway of Tally > Vouchers > F8 (Sales).
Alternatively, press Alt+G (Go To) > Create Voucher > press F8 (Sales). - Press Ctrl+H (Change Mode) to select the required voucher mode (Accounting Invoice, in this case).
- In the accounting invoice, select the fixed asset ledger grouped under Sales Accounts.
- Select the GST ledgers based on the party’s Place of Supply.
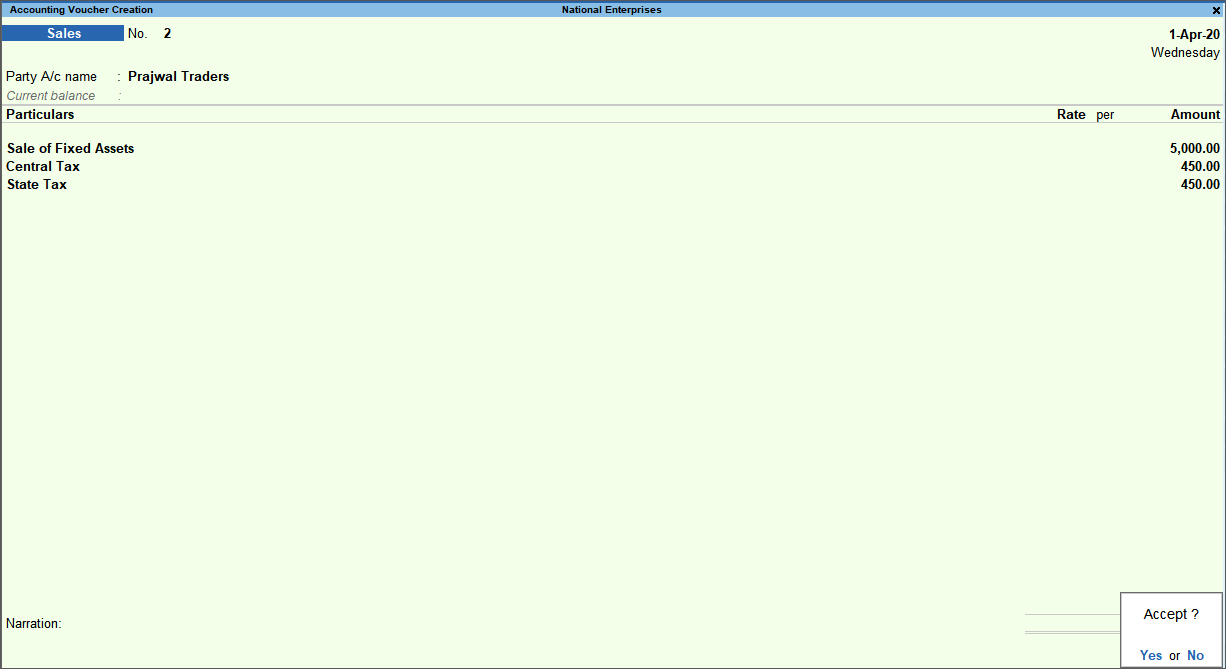
This sale value will appear in your trading account and Sales Register. As the sale is of fixed asset, you need to transfer this amount to fixed asset ledger, to form part of the Balance Sheet.
Note: Sale of fixed asset can be recorded in journal voucher as shown below, but you cannot generate the sales invoice.
View details in GST report
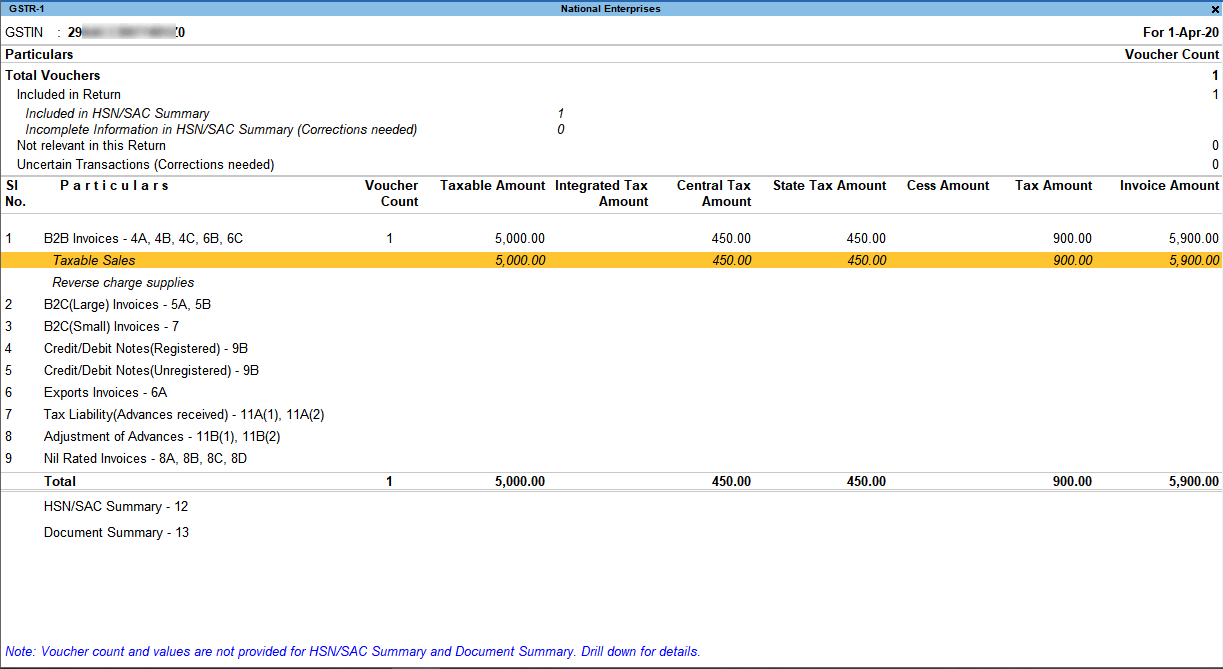
- Gateway of Tally > Display More Reports > GST Reports > GSTR-1.
Alternatively, press Alt+G (Go To) > type or select GSTR-1 > and press Enter.
If the fixed asset is sold to:- Registered dealer, the details will appear under B2B Invoices.
- Unregistered dealer, the details will appear under B2C Invoices.
Journal entries for adjusting profit or loss on sale of fixed assets
Account for profit on sale of fixed asset
Transfer the profit to income ledger to reflect the actual value of fixed assets in Balance sheet.
Example: After charging depreciation on fixed assets, if the net value of the fixed assets is 4,000 and the sale value is 5,000, record a Journal voucher to transfer the profit as given below:
- Debit: Sale of Fixed assets = 5,000
- Credit: Fixed Assets = 4,000
- Credit: Indirect Income = 1,000
Account for loss on sale of fixed asset
Transfer the loss to expense ledger to reflect the actual value of fixed assets in Balance sheet.
Example: After charging depreciation on fixed assets, if the net value of the fixed assets is 5,000 and the sale value is 4,000, record a Journal voucher to transfer the loss as given below:
- Debit: Sale of Fixed assets = 4,000
- Debit: Indirect Expenses = 1,000
- Credit: Fixed Assets = 5,000
Interstate Sales to Embassy or UN Body
You can record interstate sale of taxable, exempt and nil rated goods to Embassy or UN Body, using the new natures of transaction, even without selecting the party type in customer ledger.
In this section
- Interstate sale of taxable goods to Embassy/UN Body
- Interstate sale of exempt goods to Embassy/UN Body
Interstate sale of taxable goods to Embassy/UN Body
- Gateway of Tally > Vouchers > F8 (Sales).
Alternatively, press Alt+G (Go To) > Create Voucher > press F8 (Sales). - Select the interstate party ledger with the Party Type set to Embassy/UN body.
- Select the interstate sales ledger with the nature of transaction Interstate Sales to Embassy/UN Body Taxable.
- Select the stock item, enter the Quantity and Rate.
- Select the integrated tax ledger.
- Set Provide GST details or Provide GST/e-Way Bill details to Yes, and set the option Supplies under section 7 of IGST Act to Yes/No as needed.
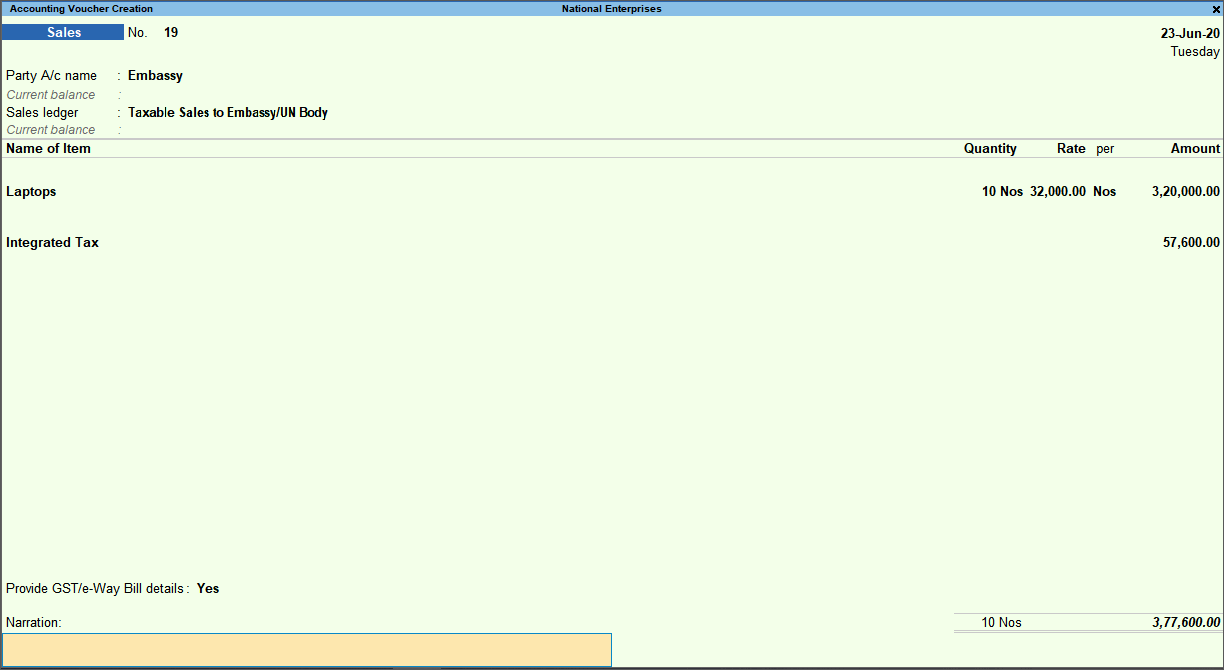
- Press Enter to save.
Interstate sale of exempt goods to Embassy/UN Body
- Gateway of Tally > Vouchers > F8 (Sales).
Alternatively, press Alt+G (Go To) > Create Voucher > press F8 (Sales). - Select the interstate party ledger with the Party Type set to Embassy/UN body.
- Select the interstate sales ledger with the nature of transaction Interstate Sales to Embassy/UN Body Exempt.
- Select the stock item, enter the Quantity and Rate.
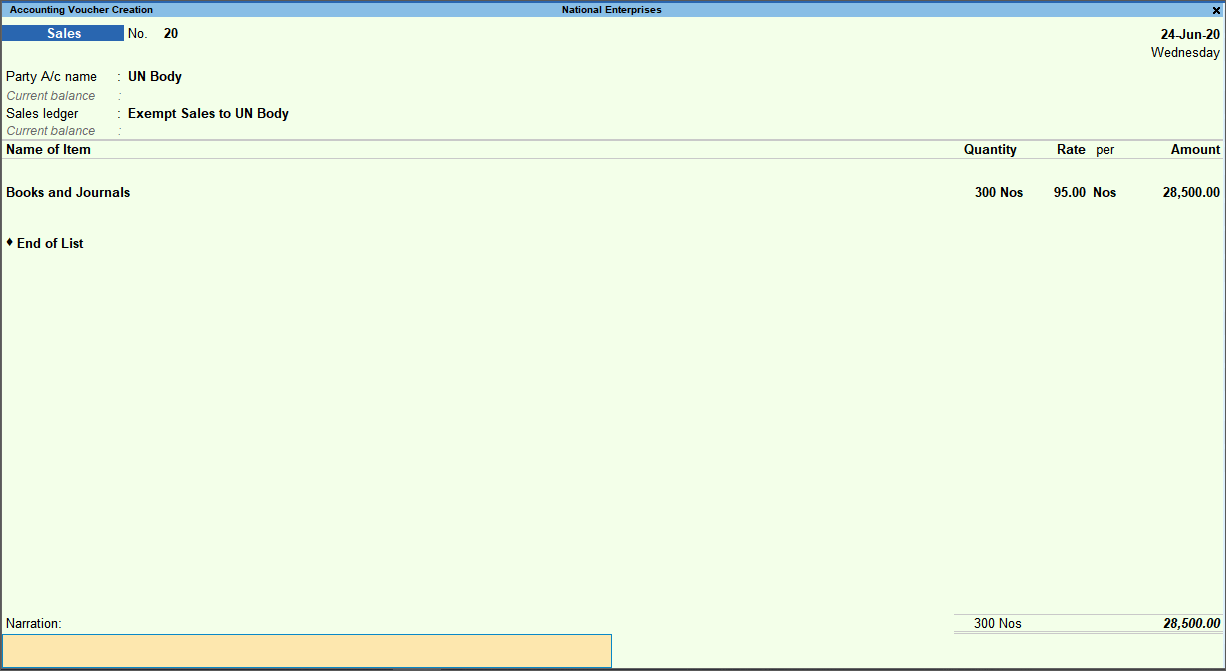
- Accept the sales invoice.
Similarly, record sale of nil rated goods to embassy/UN Body by selecting the nature of transaction Interstate Sales to Embassy/UN Body Nil Rated.
Sales of Stock Items with Cess
You can record sale of items on which cess is applicable. To apply cess on items, create a separate tax ledger for cess. Under GST cess is applicable on quantity or value of the item. It is better to maintain separate tax ledgers for cess on quantity and cess on value.
In this section
- Cess based on quantity and value
- Cess based on quantity
- Change the Valuation Type of Cess in Invoice
Record sales with cess on value and quantity
To record sales of items with cess, configure the stock item with cess details, create separate cess ledgers, and use the ledgers in sales invoice. You can print the cess values in the invoice.
Configure stock items for the calculation of cess based on quantity and value
- Gateway of Tally > Create/Alter > type or select Stock Item > and press Enter.
Alternatively, press Alt+G (Go To) > Create Master > Stock Item > and press Enter. - Specify the required details in the fields Name, Under, and Units.
- Set the option GST Applicable to Applicable.
- Enable the option Set/alter GST Details to open the GST Details screen.
- Specify the Description and HSN/SAC.
- Press F12 (Configure) > set Select Valuation Type and Show all GST Tax Types to Yes > accept the configuration screen.
- Select On Value as the Calculation type, and Taxability as Taxable.
- Enter the percentage of Integrated Tax Rate.
- For Cess:
- Enter the percentage of Integrated Tax. The Central Tax and State Tax rates are displayed.
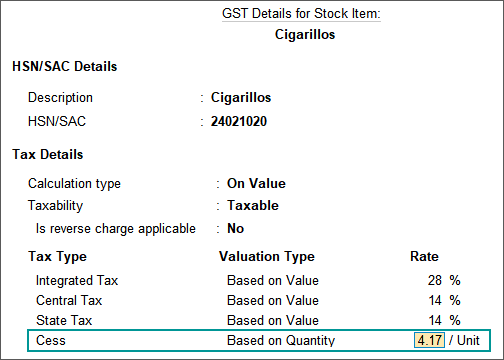
- For Cess, the cursor moves to the Rate column. Press Backspace to select the Valuation Type as Based on Value and Quantity. Enter the cess Rate and cess rate per unit.
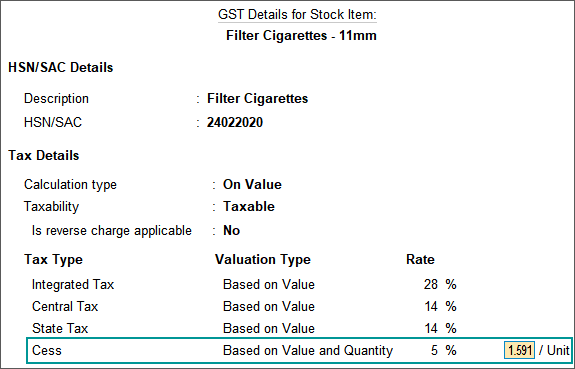
Note: You can also select the Valuation Type of cess as Based on Value and Quantity in the GST Rate Details screen of Tax Rate History.
- Accept the GST Details screen.
- Accept the stock item master.
Record sales of stock items with cess based on value and quantity
- Gateway of Tally > Vouchers > F8 (Sales).
Alternatively, press Alt+G (Go To) > Create Voucher > press F8 (Sales). - Select the central and state tax ledgers, or integrated tax ledger (for interstate sales).
- Select the cess ledgers defined with valuation types Based on Quantity and Based on Value. The taxes are calculated based on the cess rate and cess rate per unit defined in the stock item master.
- Press Ctrl+O (Related Reports) > type or select GST – Tax Analysis to view the tax details. Press Alt+F5 (Detailed) to view the detailed break-up of tax.
Note: If you are on TallyPrime Release 1.1.3 or earlier, follow the step:
Press Ctrl+I (More Details) > type or select GST – Tax Analysis to view the tax details. Press Alt+F5 (Detailed) to view the detailed break-up of tax.
- Press Esc to return to the sales invoice.
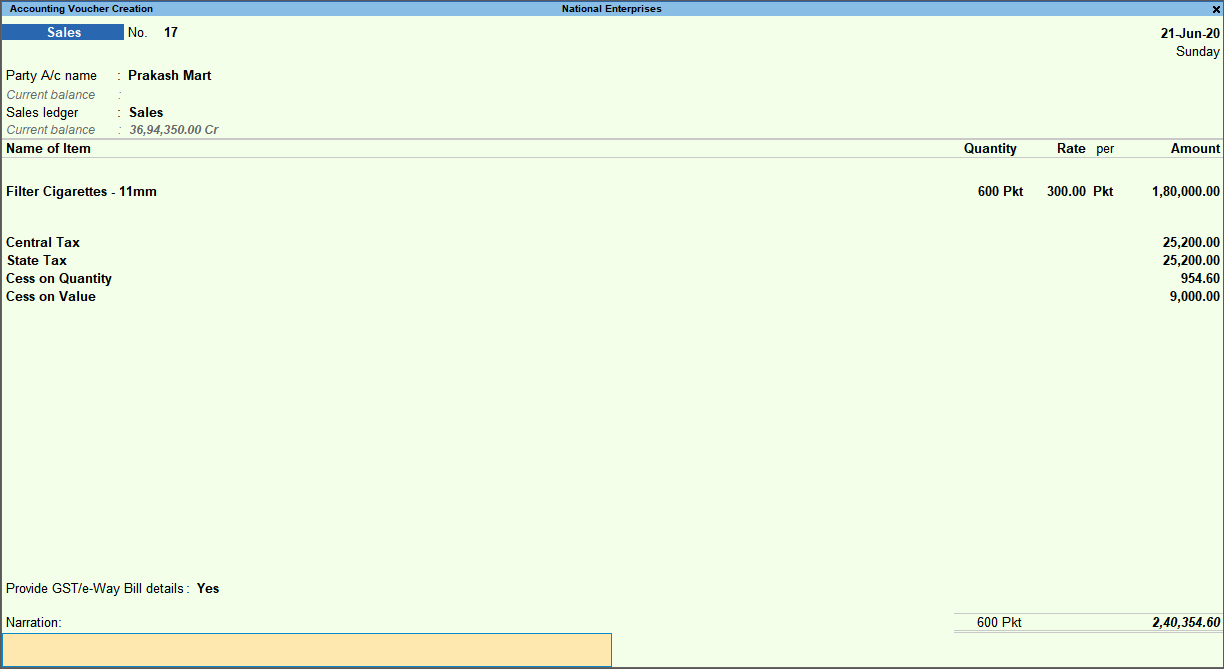
- Accept the sales invoice.
Print cess on quantity and cess on value in the sales invoice
- On the sales voucher, press Alt+P (Print) > press Enter on Current.
- Press C (Configure) > press Enter on Show GST Analysis to set it to Yes.
- Press Esc to return to Voucher Printing screen.
- Press P (Print) to print. The printout of the sales invoice appears as shown below, with the cess values.

Record sales with cess on quantity
You can configure a stock item with cess based on quantity and record an invoice.
- Gateway of Tally > Create > type or select Stock Item > and press Enter.
Alternatively, press Alt+G (Go To) > Create Master > Stock Item > and press Enter. - Specify the required details in fields Name, Under, and Units.
- Set the option GST Applicable to Applicable.
- Enable the option Set/Alter GST Details to open GST Details screen.
- Press F12 (Configure) > set Select Valuation Type to Yes, and accept the Configuration screen.
- In the GST Details screen
- Accept the stock item master.
To record a sales invoice for a stock item configured with cess amount charged per unit
- Gateway of Tally > Vouchers > F8 (Sales).
Alternatively, press Alt+G (Go To) > Create Voucher > press F8 (Sales). - Select the GST ledgers. The taxes are calculated based on the rates defined in the stock item master.
- Select the cess ledger defined with the valuation type Based on Quantity. The cess is calculated based on the rate per unit defined in the stock item master.
- Press Ctrl+O (Related Reports) > type or select GST – Tax Analysis to view the tax details. Press Alt+F5 (Detailed) to view the detailed break-up of tax.
Note: If you are on TallyPrime Release 1.1.3 or earlier, follow the step:
Press Ctrl+I (More Details) > type or select GST – Tax Analysis to view the tax details. Press Alt+F5 (Detailed) to view the detailed break-up of tax.
- Press Esc to return to the sales invoice.
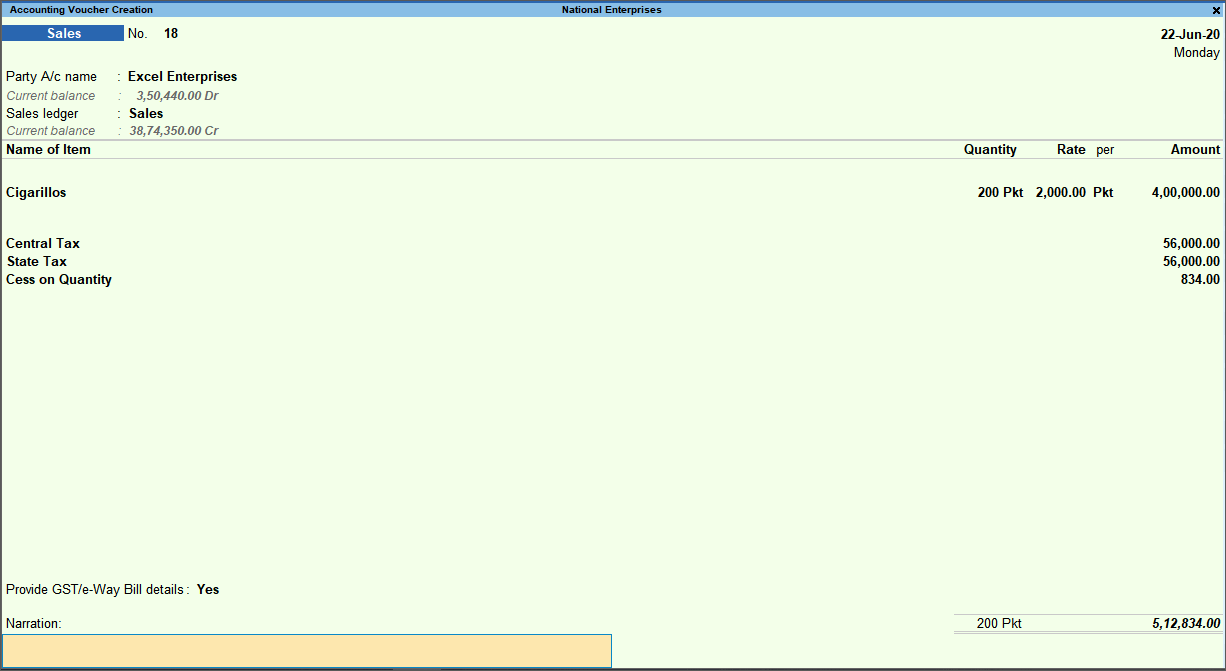
- Press Ctrl+A to save.
Change the Valuation Type of Cess in Invoice
You can override the valuation type of cess in the voucher.
- Press F12 (Configure).
- Set the option Select common Ledger Account for Item Allocation to No.
- Set the option Modify Tax Rate details of GST to Yes.
Note: Retain Select common Ledger Account for Item Allocation as Yes, if you want to set a common cess rate for all the stock items selected at the invoice level.
- Accept the Configuration screen.
- In the invoice, select the stock item, then the sales ledger. In the GST Details screen, press F12 (Configure).
- Select the Valuation Type of Cess as Based on Value and Quantity, and enter the cess rate and cess rate per unit.

Sales of Stock Items with Slab-wise Tax Rates
Record GST invoice for items with slab wise tax rates. You can apply slab based on MRP of the item or item rate recorded in the invoice. The slab rates are recorded in the stock item master. You can also choose applicability of slab rate based on MRP in the item master.
For example, tax rate of 5% is applicable on an item if the price is less than 500, and 12% when the price is 500 or above. If you have two different prices for the item – MRP and rate manually entered in the invoice, you can choose to apply slab rate based on the MRP or the item rate.
In this section
