GST Advance Receipts
You can keep a track of the GST advance receipts in TallyPrime. It is also called GST on advance received or the tax payable on the advance receipt. The facility enables you to track the advance payment received under GST.
Advance Receipts if Turnover is Less than Rs. 1.5 Crores
If your turnover in the previous financial year was less than Rs. 1.5 crores you need not pay tax on advance receipts. The tax liability calculation on advance receipts for supply of goods is disabled by default.
The journal transactions recorded to account for tax liability on advance receipts for supply of goods will not be included in GSTR-1 and GSTR-3B returns. All adjustment transactions recorded for this purpose using the following journal flags will be moved under Not relevant for returns in GSTR-1 and GSTR-3B reports.
|
Nature of Adjustment |
Additional Details |
|
Increase of Tax Liability |
Advance Receipts for Export/SEZ sales |
|
Increase of Tax Liability |
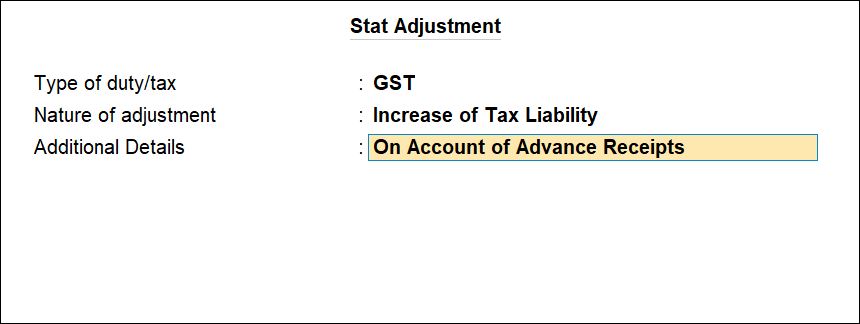
On Account of Advance Receipts |
|
Decrease of Tax Liability |
Cancellation of Advance Receipts |
|
Decrease of Tax Liability |
Cancellation of Advance Receipts for Exports/SEZ sales |
|
Decrease of Tax Liability |
Sales against Advance Receipts |
|
Decrease of Tax Liability |
Sales against Advance Receipts for Export/SEZ sales |
Advance Receipts if Turnover is More than Rs. 1.5 Crores
You can record the advance amount received from customers in a receipt voucher by marking it as advance receipt, and print it with the required GST details.
If the turnover of your business is over and above Rs 1.5 crores, set the option Enable tax liability on advance receipts to Yes in the Company GST Details screen to calculate tax liability on advance receipts. The liability will be included in GSTR-1 and GSTR-3B returns.
You need to pay GST on advance received for goods or services, if the supply is not fulfilled in the same period.
When a sales invoice is raised against an advance received in a different tax period, you need to track the sales against the advance received.
Advance receipt for orders completed in the same month
Advance receipt > Outward supply > File returns
Advance receipt for orders completed in subsequent month
Advance receipt > Raise tax liability > File returns > Outward supply in the next month > Reverse tax liability of advance amount > File returns
Advance receipt for orders cancelled in the same month
Advance receipt > Refund the amount > File returns
Advance receipt for orders cancelled in subsequent month
Advance receipt > Raise tax liability > File return > Refund the amount > Reverse the tax liability > File returns
Regular Taxable Transactions
Advance Receipt from Customer
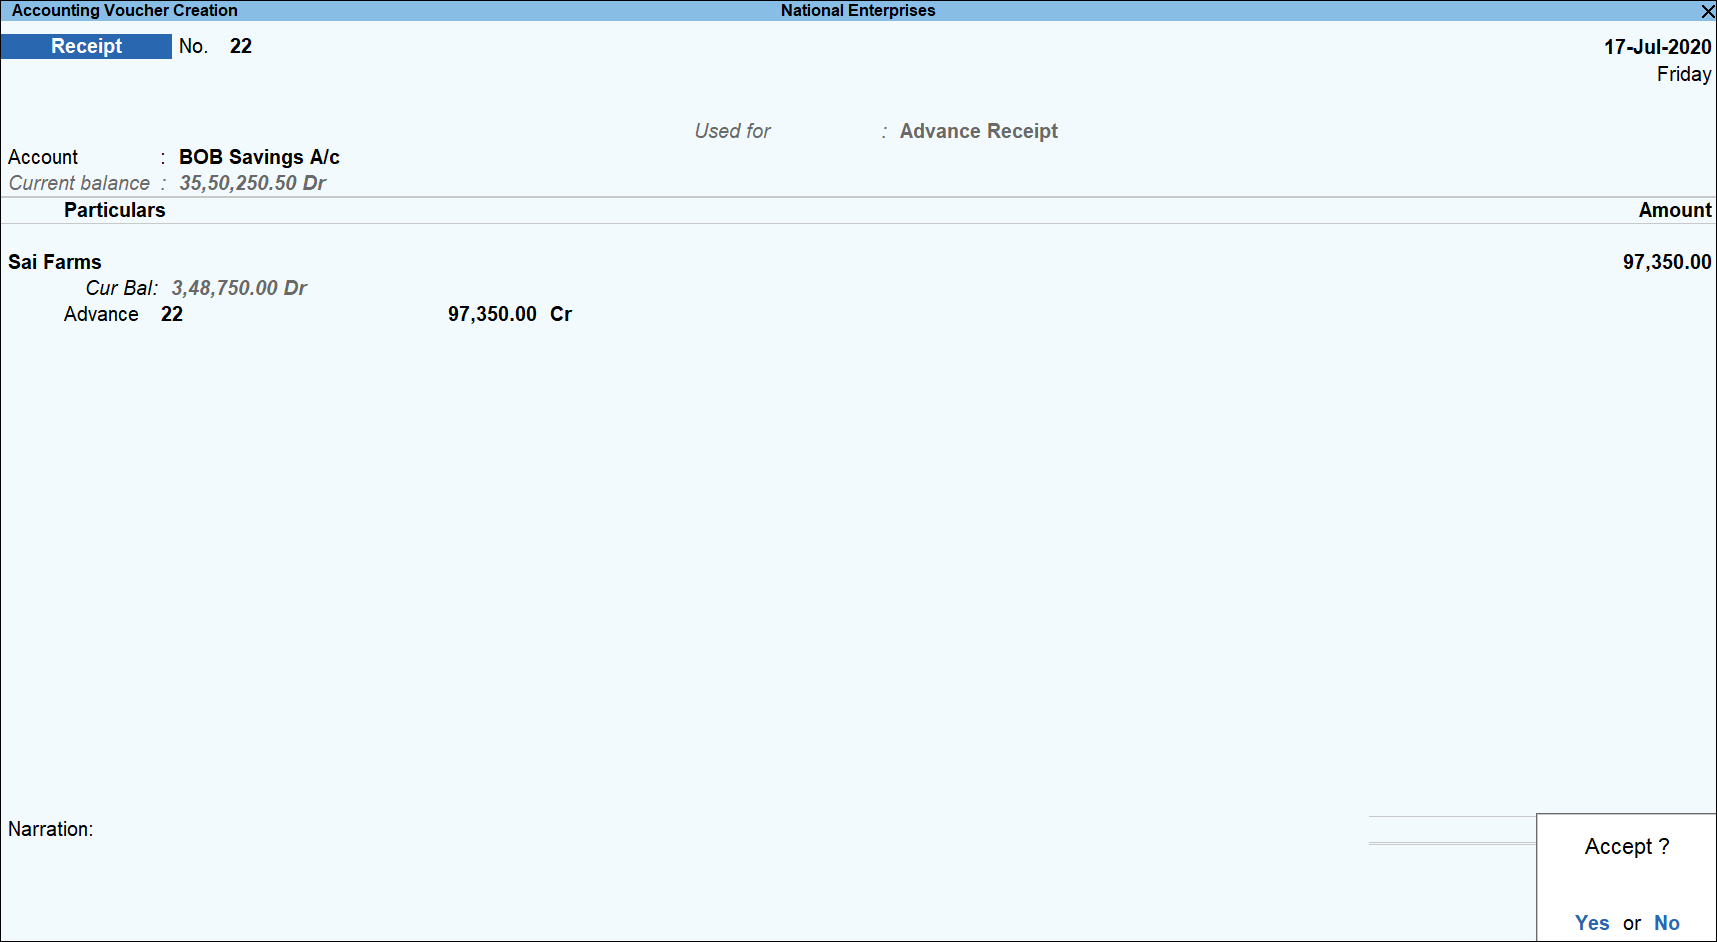
To record a receipt voucher for advance received from customer
- Gateway of Tally > Vouchers > press F6 (Receipt).
Alternatively, press Alt+G (Go To) > Create Voucher > press F6 (Receipt).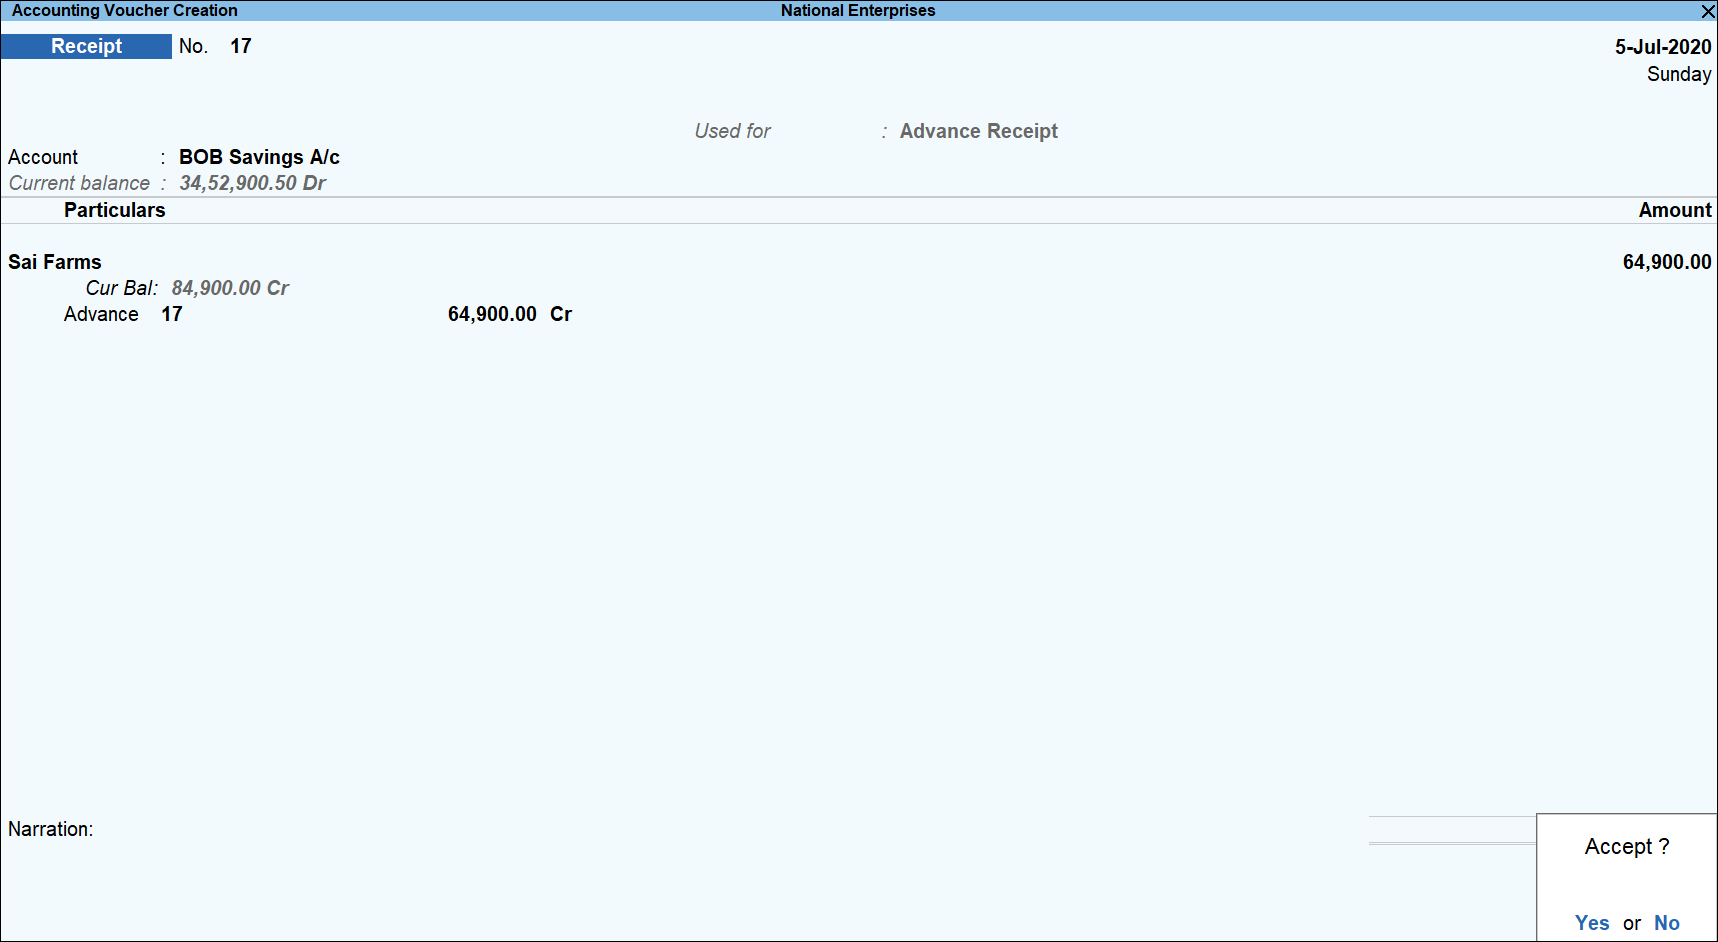
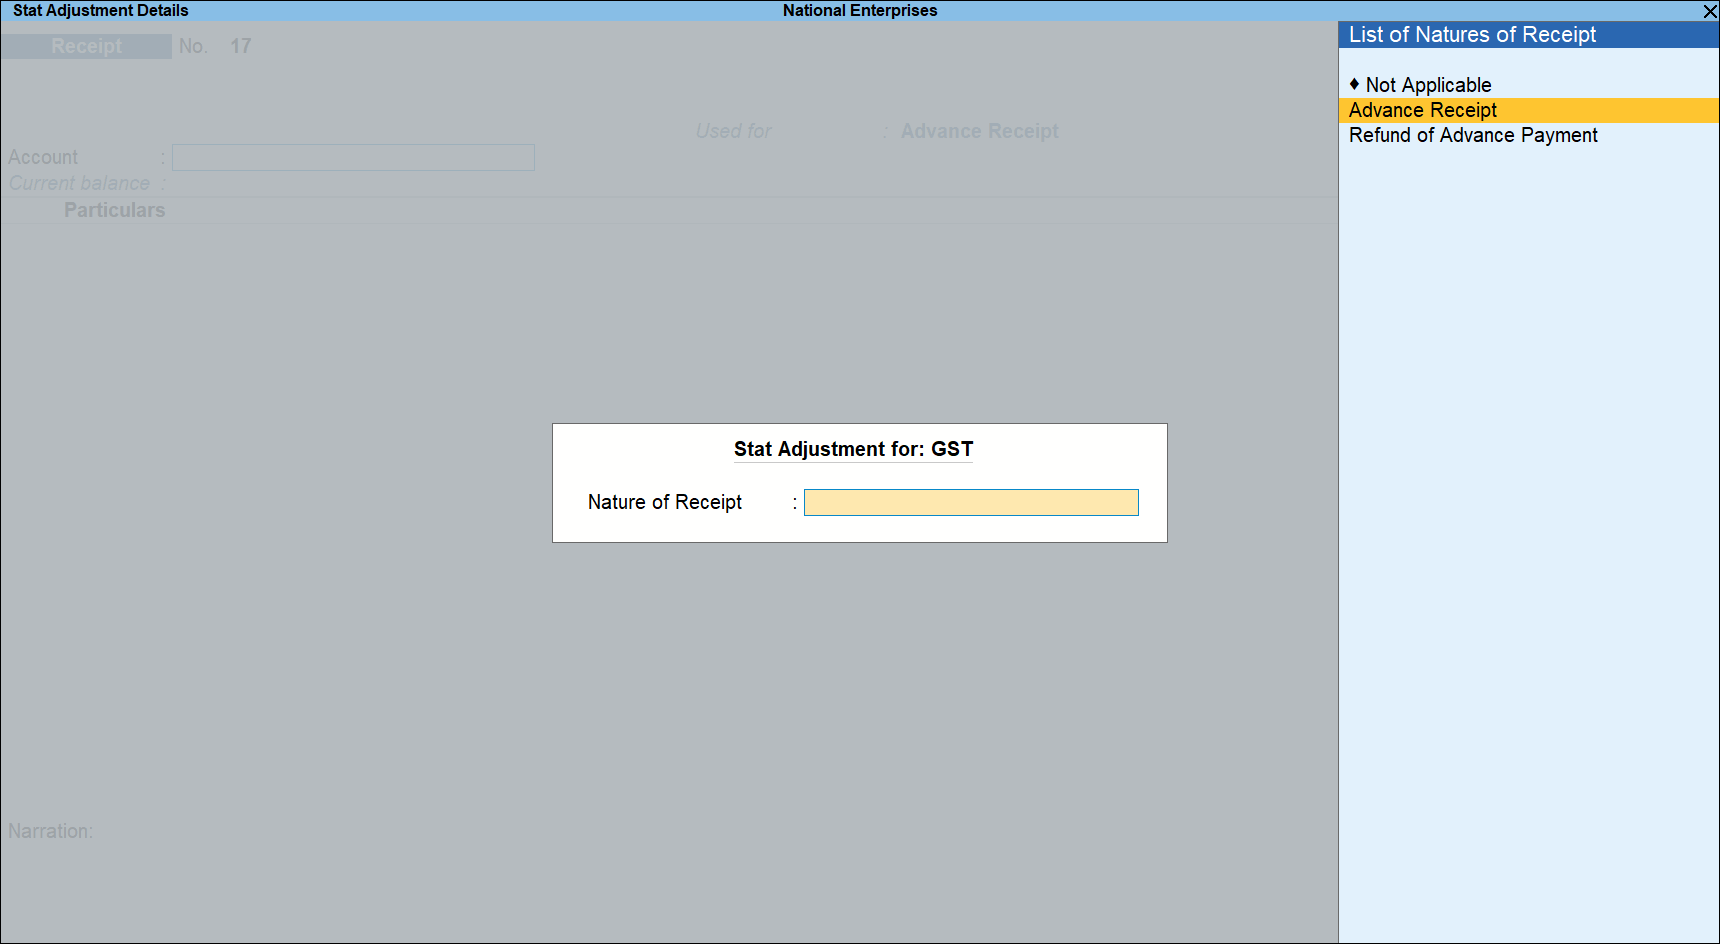
- Press Alt+J (Stat Adjustment) > select Nature of Receipt as Advance Receipt to mark the voucher for advance receipt.
- In Account select the bank to which the payment will be made.
- Select the Party Ledger. Ensure the bill-wise details is enabled in the ledger master.
As always, press Alt+C, to create a master on the fly. Alternatively, press Alt+G (Go To) > Create Master > type or select Ledger > press Enter.
The Advance Receipt Details screen appears with the list of stock items. To select a ledger, press Alt+L (Show Ledgers) . Press F12 (Configure) and set the options:- Allow to provide rate of stock items? to Yes , to enter/alter the slab rate of the stock item.
- Allow to provide quantity for calculation of cess on quantity? to Yes , to enter the cess rate and cess rate per unit.
- Allow modification of tax details? to Yes , to override the GST and cess rates in the voucher.
- Select the stock item (goods enabled for GST) or ledger (services enabled for GST).
- Enter the Advance Amount , which is inclusive of GST . You can adjust this against the sales invoice partially/fully, based on the sale value. At the end of the month, depending on the balance amount of the advance available, you can record a journal voucher to raise the liability.
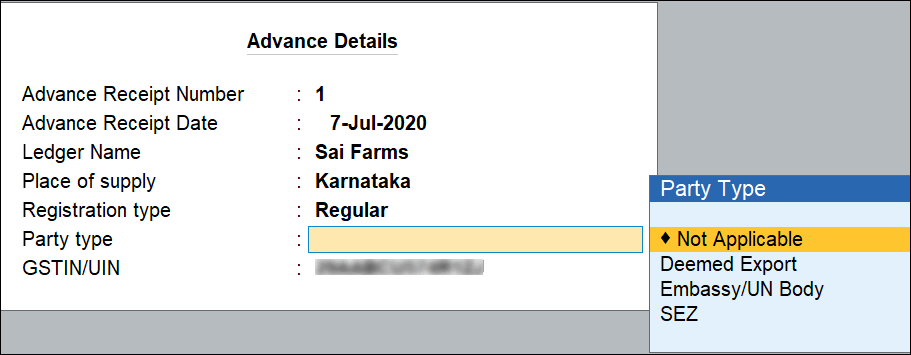
Based on the amount entered, the break-up of the GST amount gets auto calculated for Central Tax , State Tax , and Cess , if applicable. The Advance Receipt Details screen appears as shown below: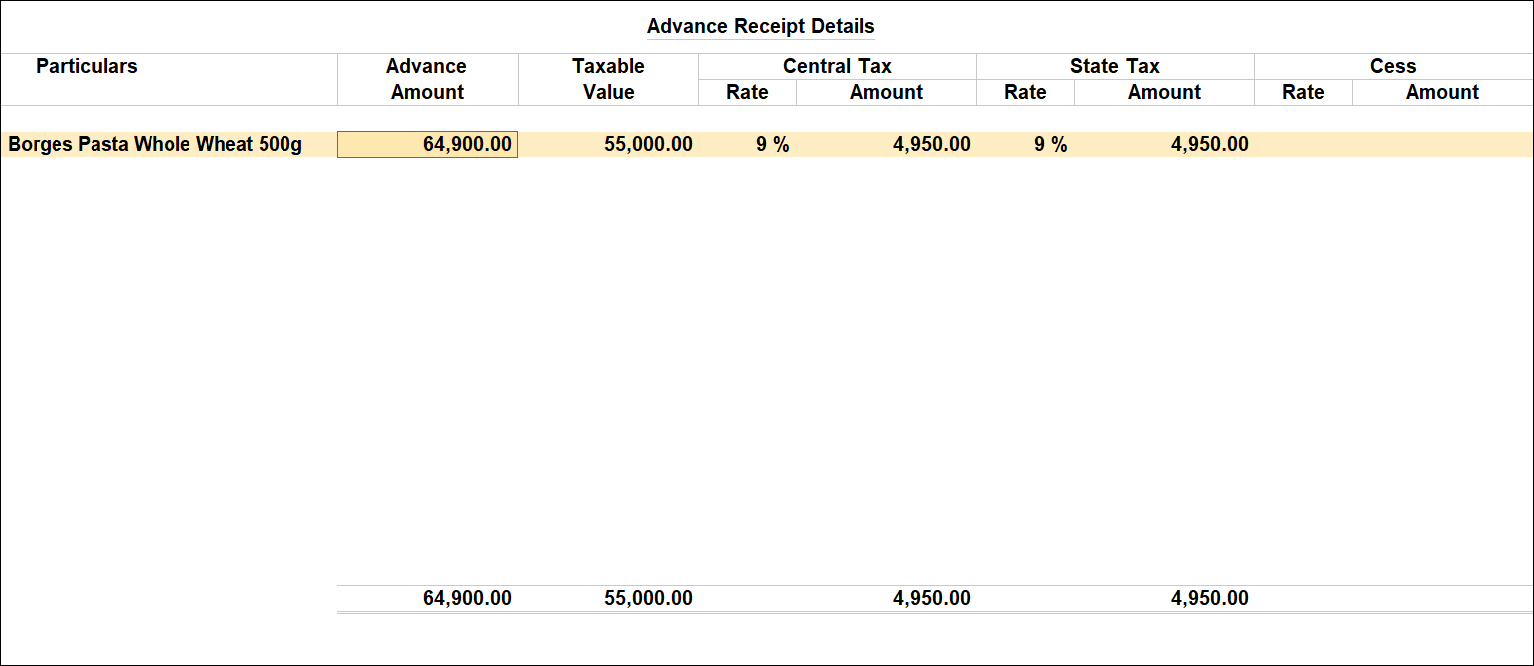
- Press Ctrl+A to accept the Advance Receipt Details screen and return to the receipt voucher.
- Select the type of reference as Advance and enter the reference details in the Bill-wise Details screen.
- Accept the screen. As always, you can press Ctrl+Ato save.
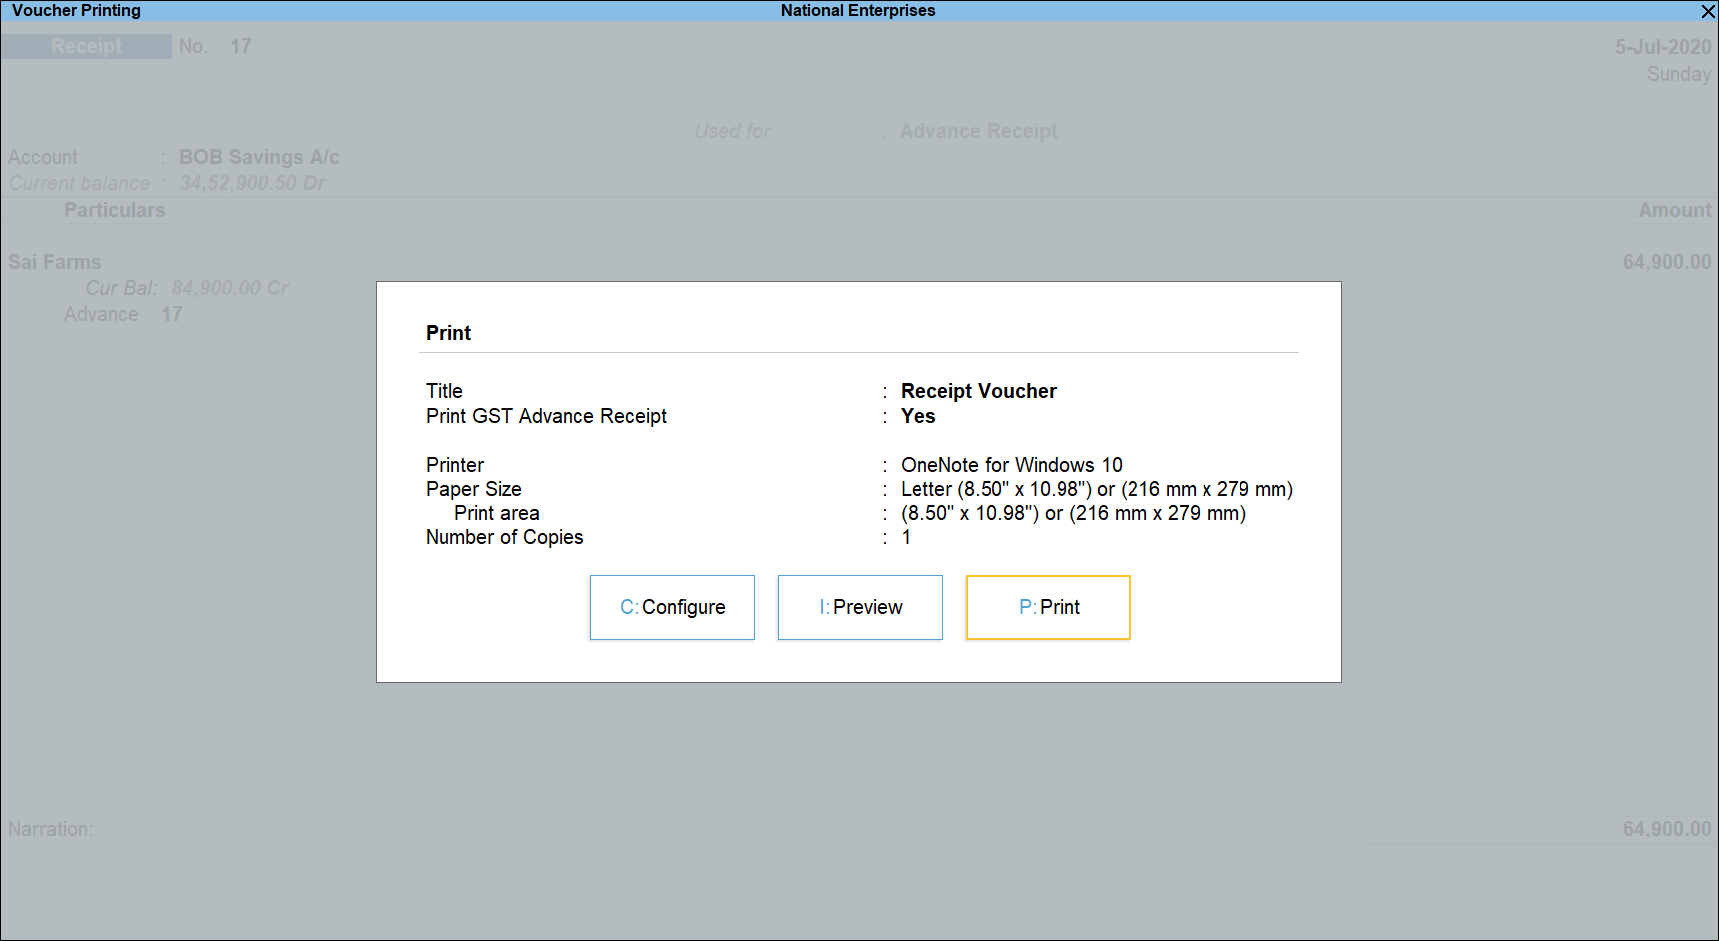
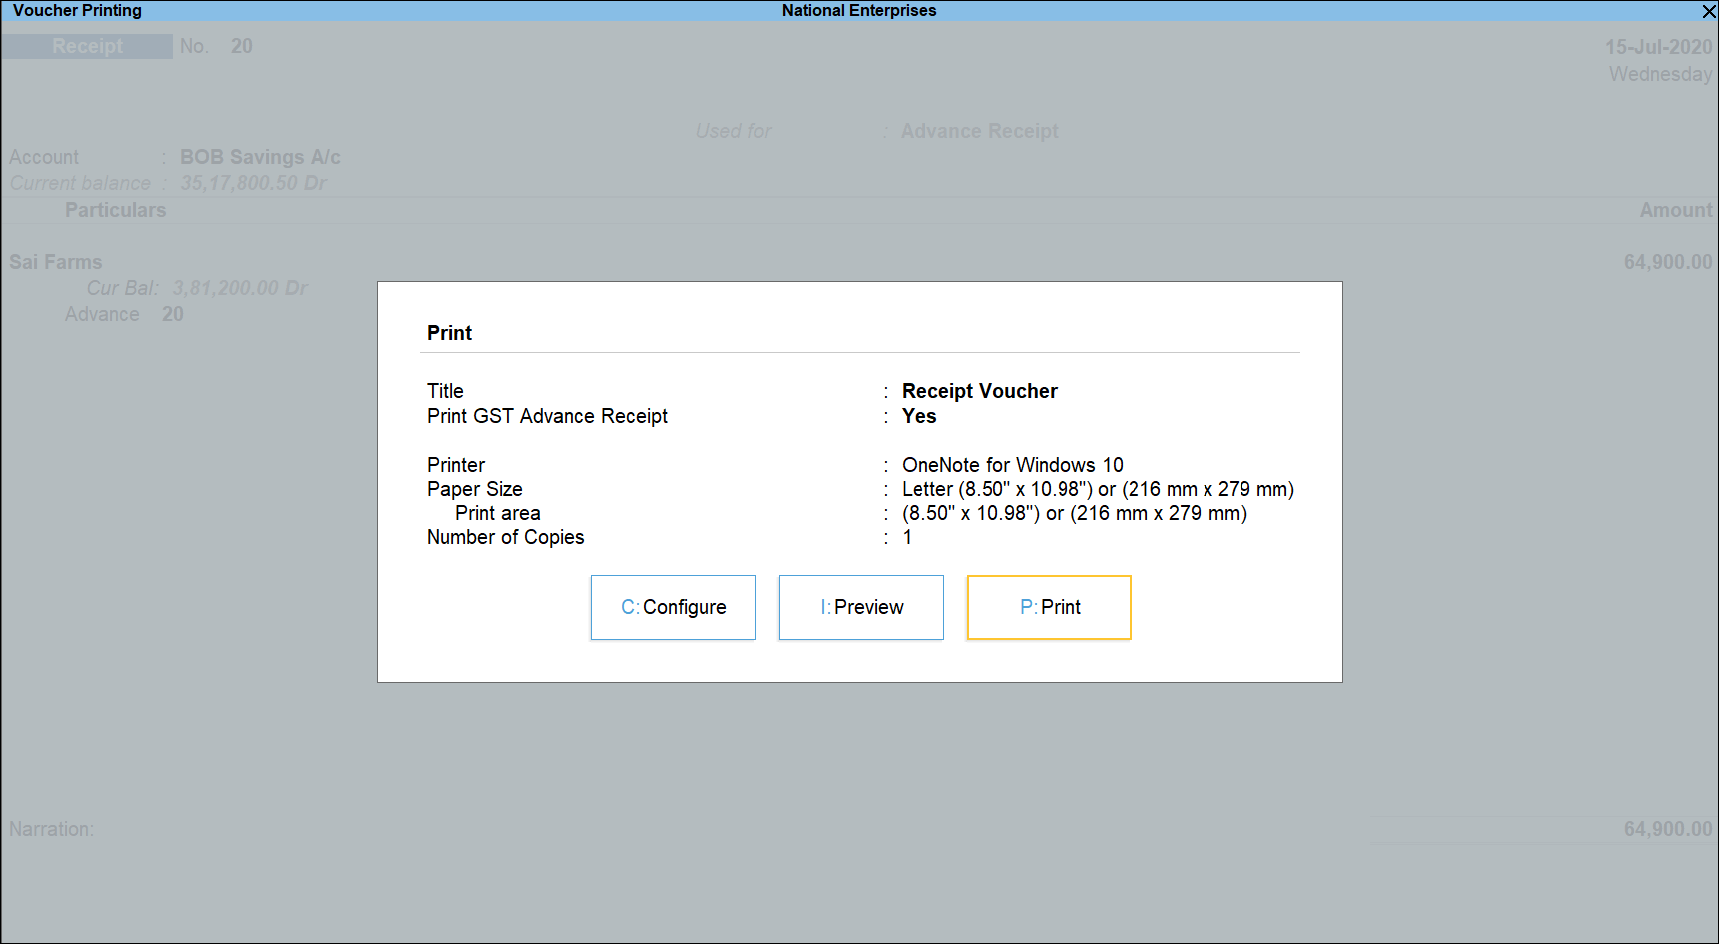
- Press Alt+P (Print) in the payment voucher . To print the State Name , Code , and Place of Supply in the voucher, press F12 (Configure) and set the options as given below:
- Press Enter to print.
The printed receipt voucher with the GST details appears as shown below: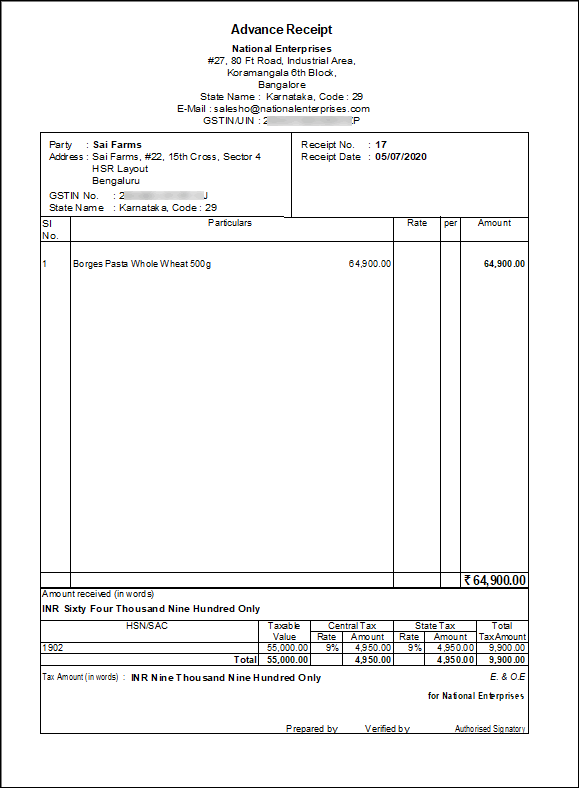
Journal voucher to raise the liability
To record a journal voucher to raise the liability
- Gateway of Tally > Vouchers > press F7 (Journal).
Alternatively, press Alt+G (Go To) > Create Voucher > press F7 (Journal).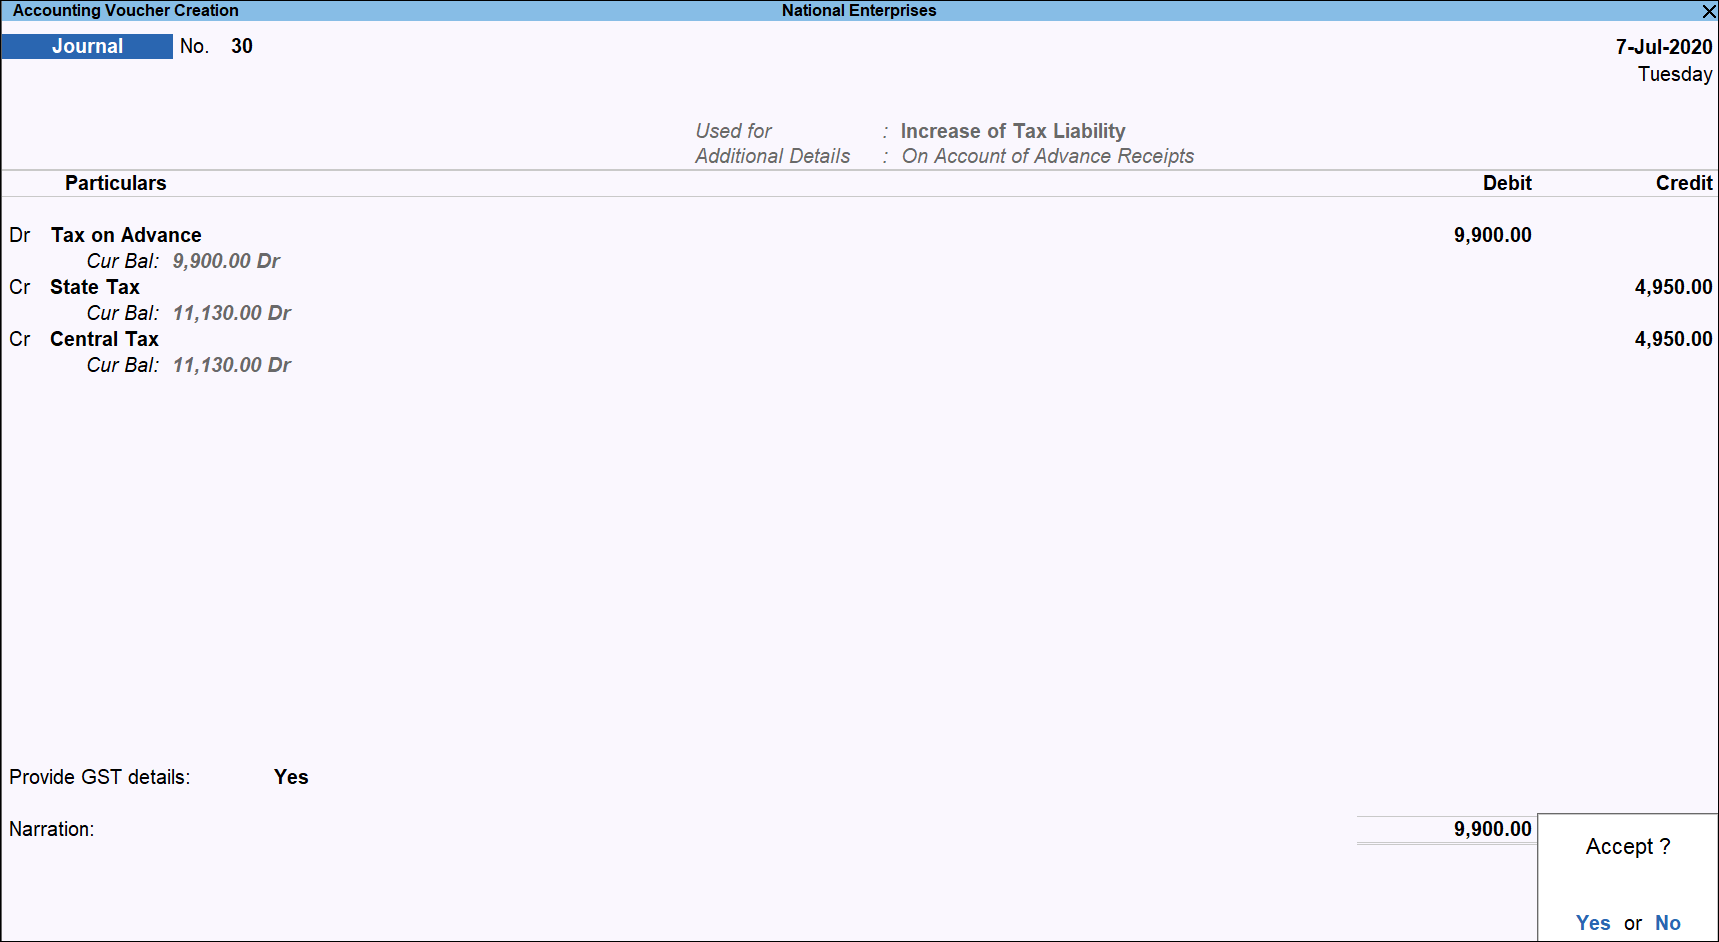
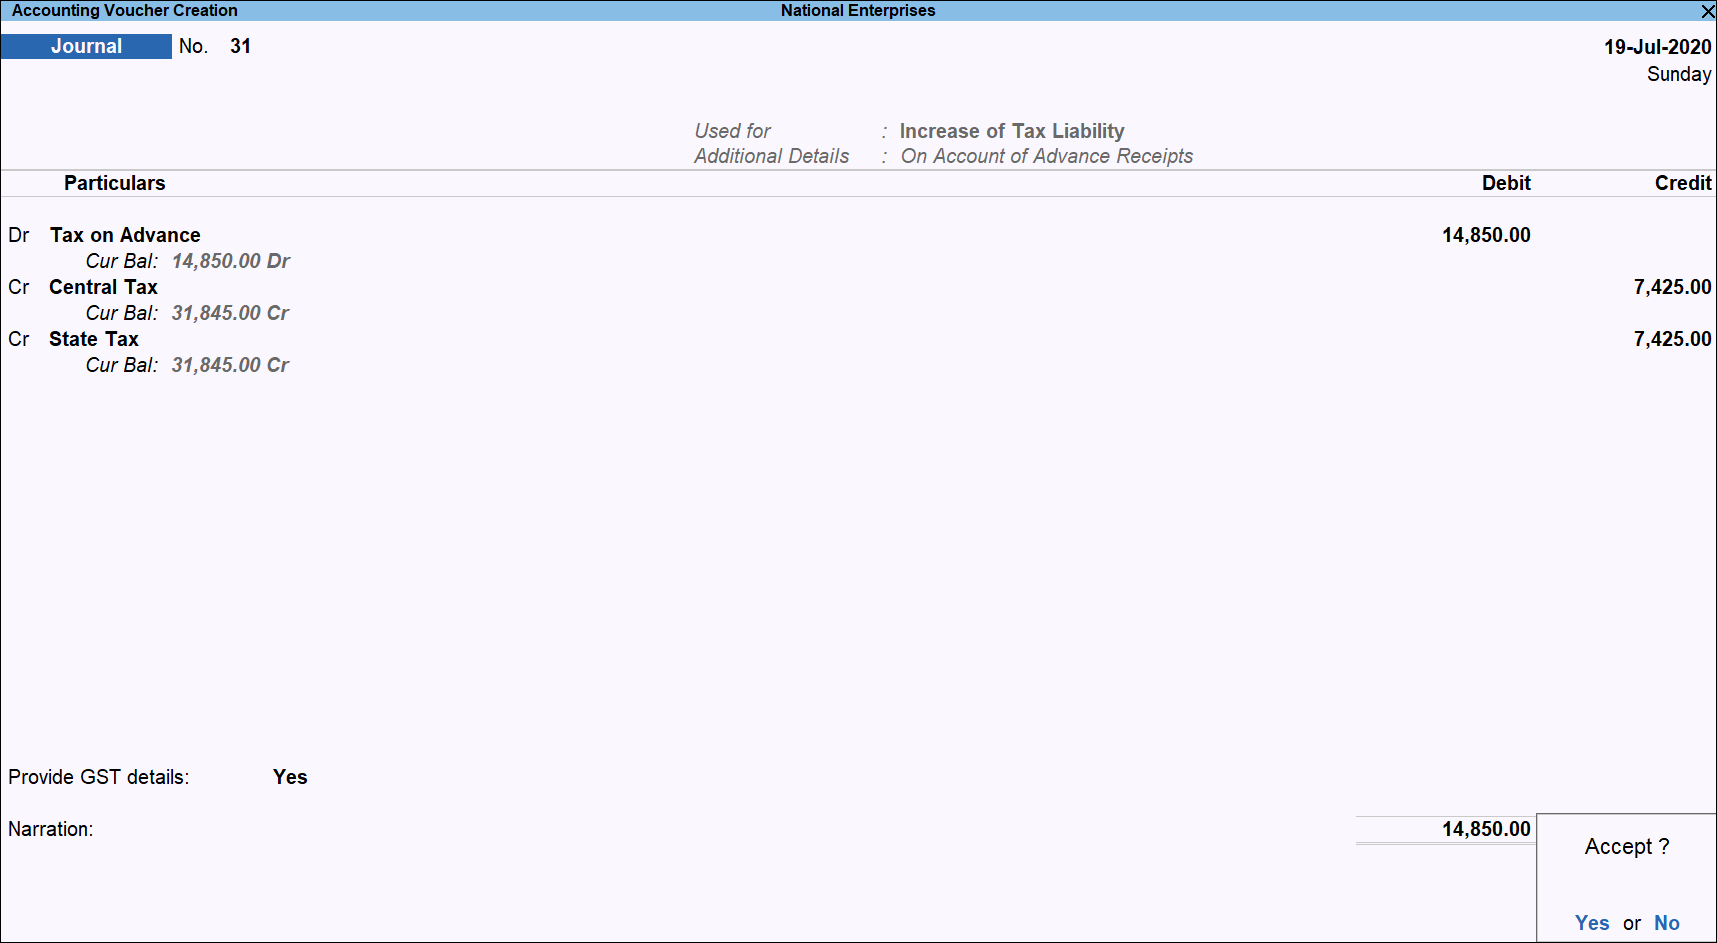
- Press Alt+J (Stat Adjustment) , select the options as shown below:
- Debit the expense ledger, or the ledger grouped under Current Assets.
- Credit the GST ledgers for the tax on advance receipt. Enter the tax Rate and Taxable Value in the GST Details screen displayed for each tax ledger.
- Set the option Provide GST Details to Yes .
- In the Statutory Details screen, select the party ledger.

Note: Place of supply has to be entered. You need not provide the party details.
- Press Enter to save.
- Accept the screen. As always, you can press Ctrl+A to save.
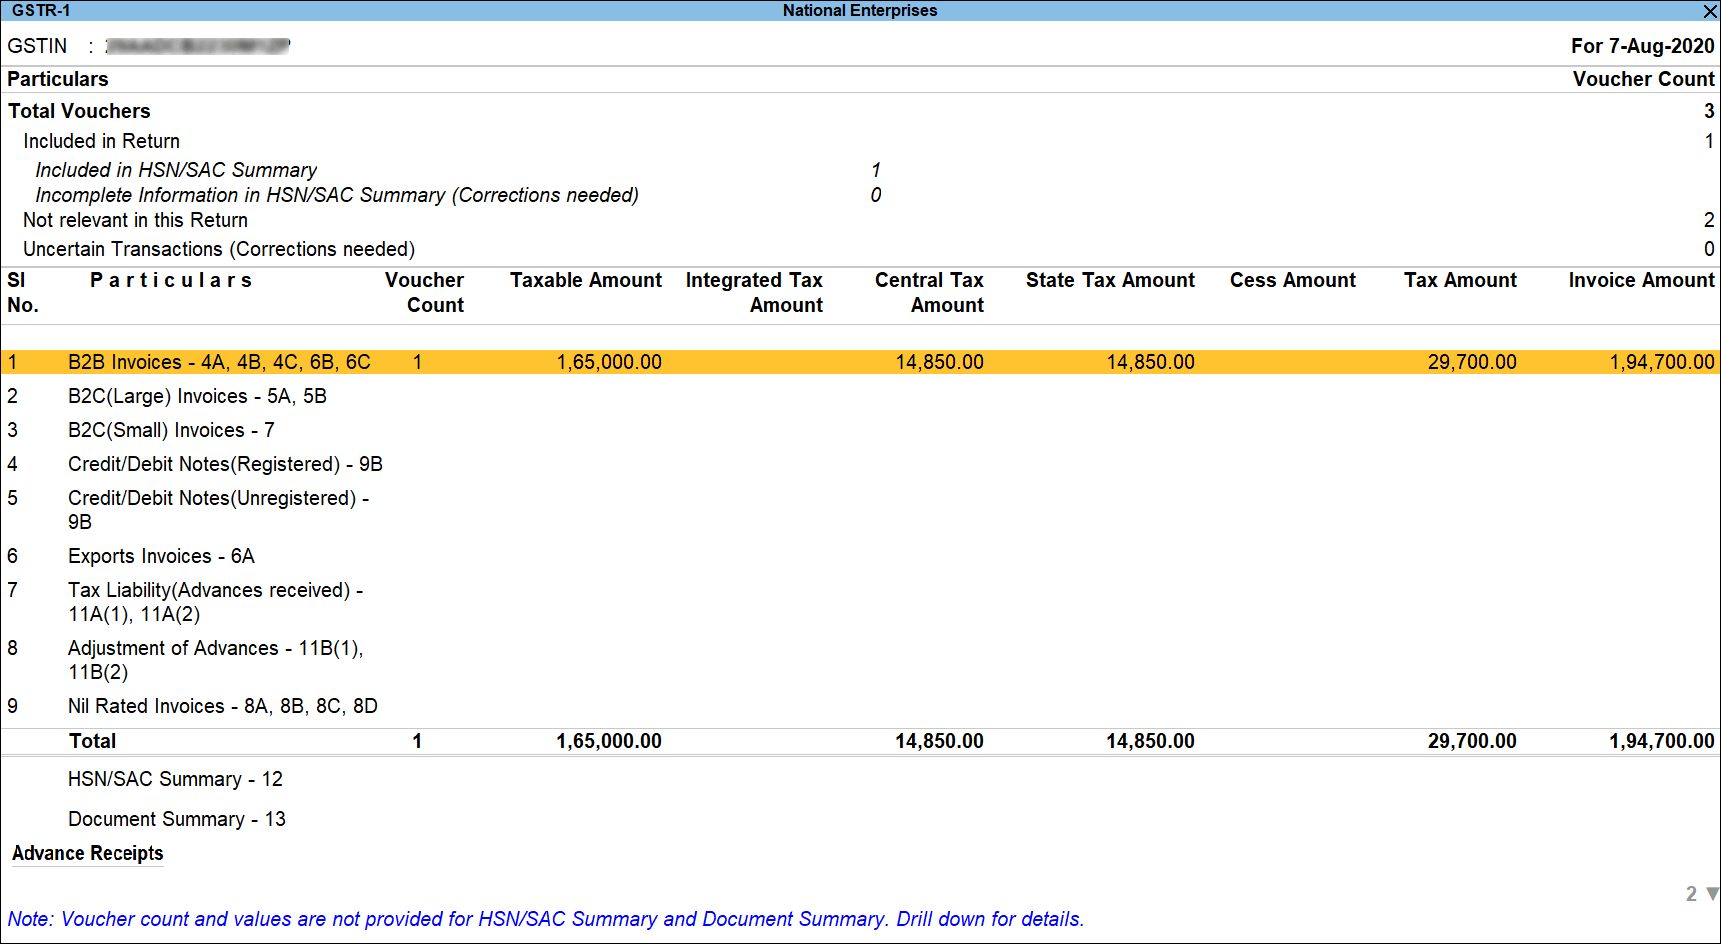
The tax liability raised on the advance amount appears in GSTR-1 , as shown below:
Reversing the liability on advance receipt after sales
Sales invoice linked to an advance receipt voucher
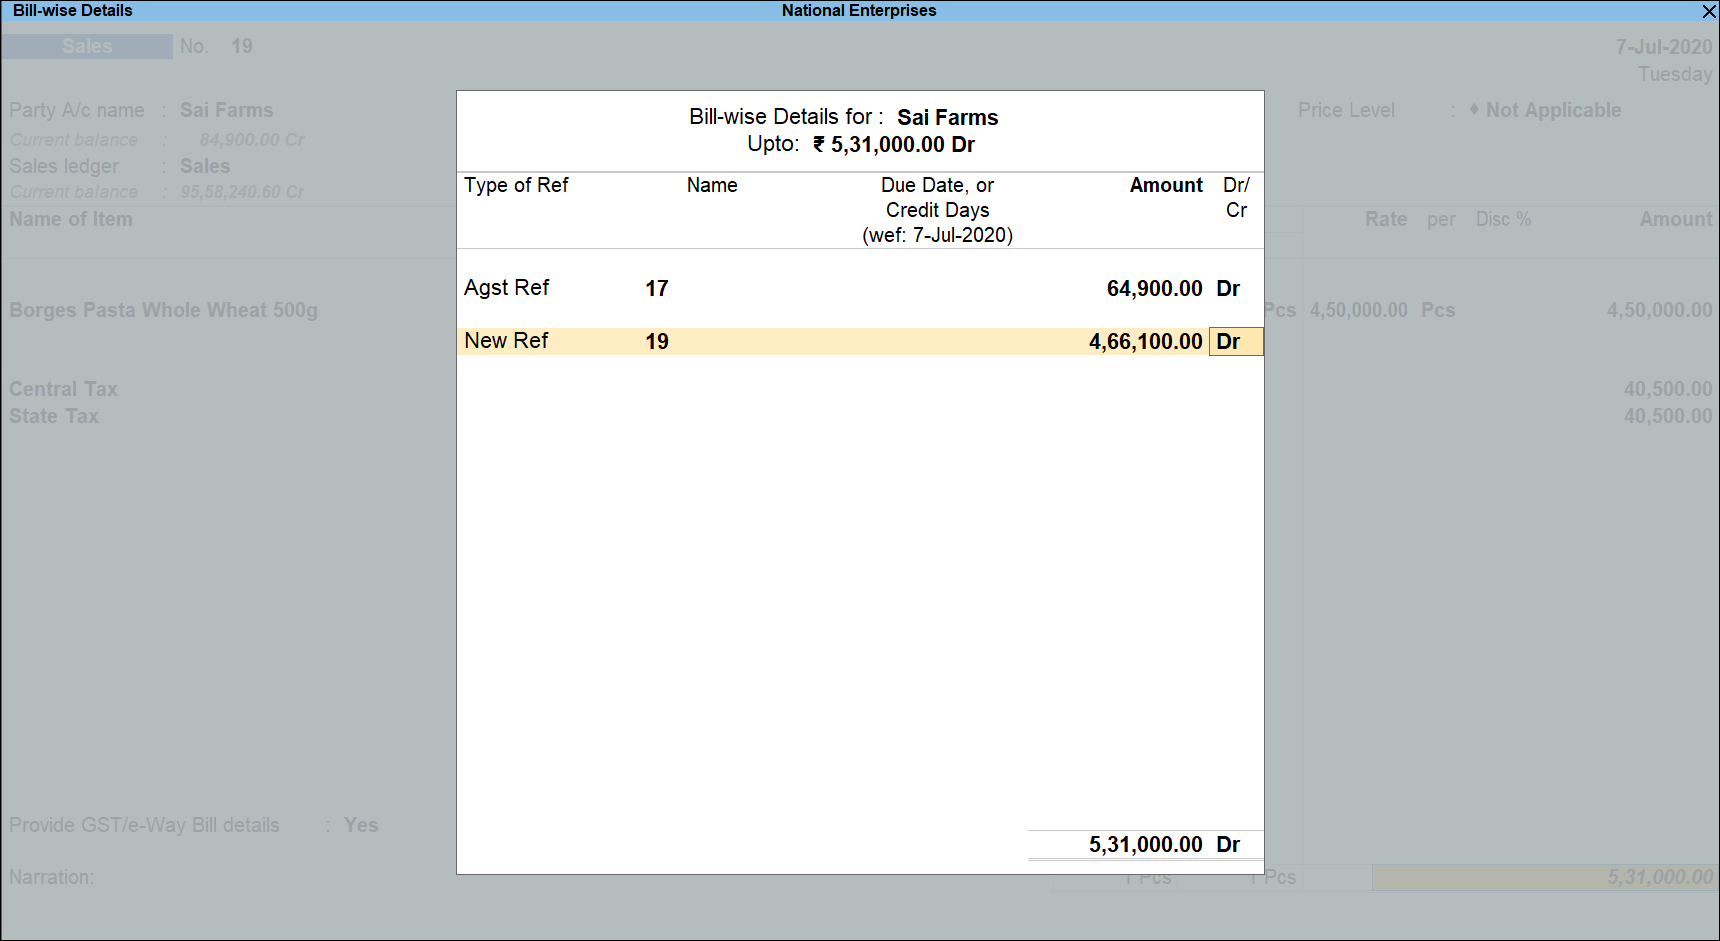
When the sales invoice is recorded, the receipt voucher has to be linked to it by selecting the Type of Ref as Agst Ref in the Bill-wise Details screen of the sales invoice.
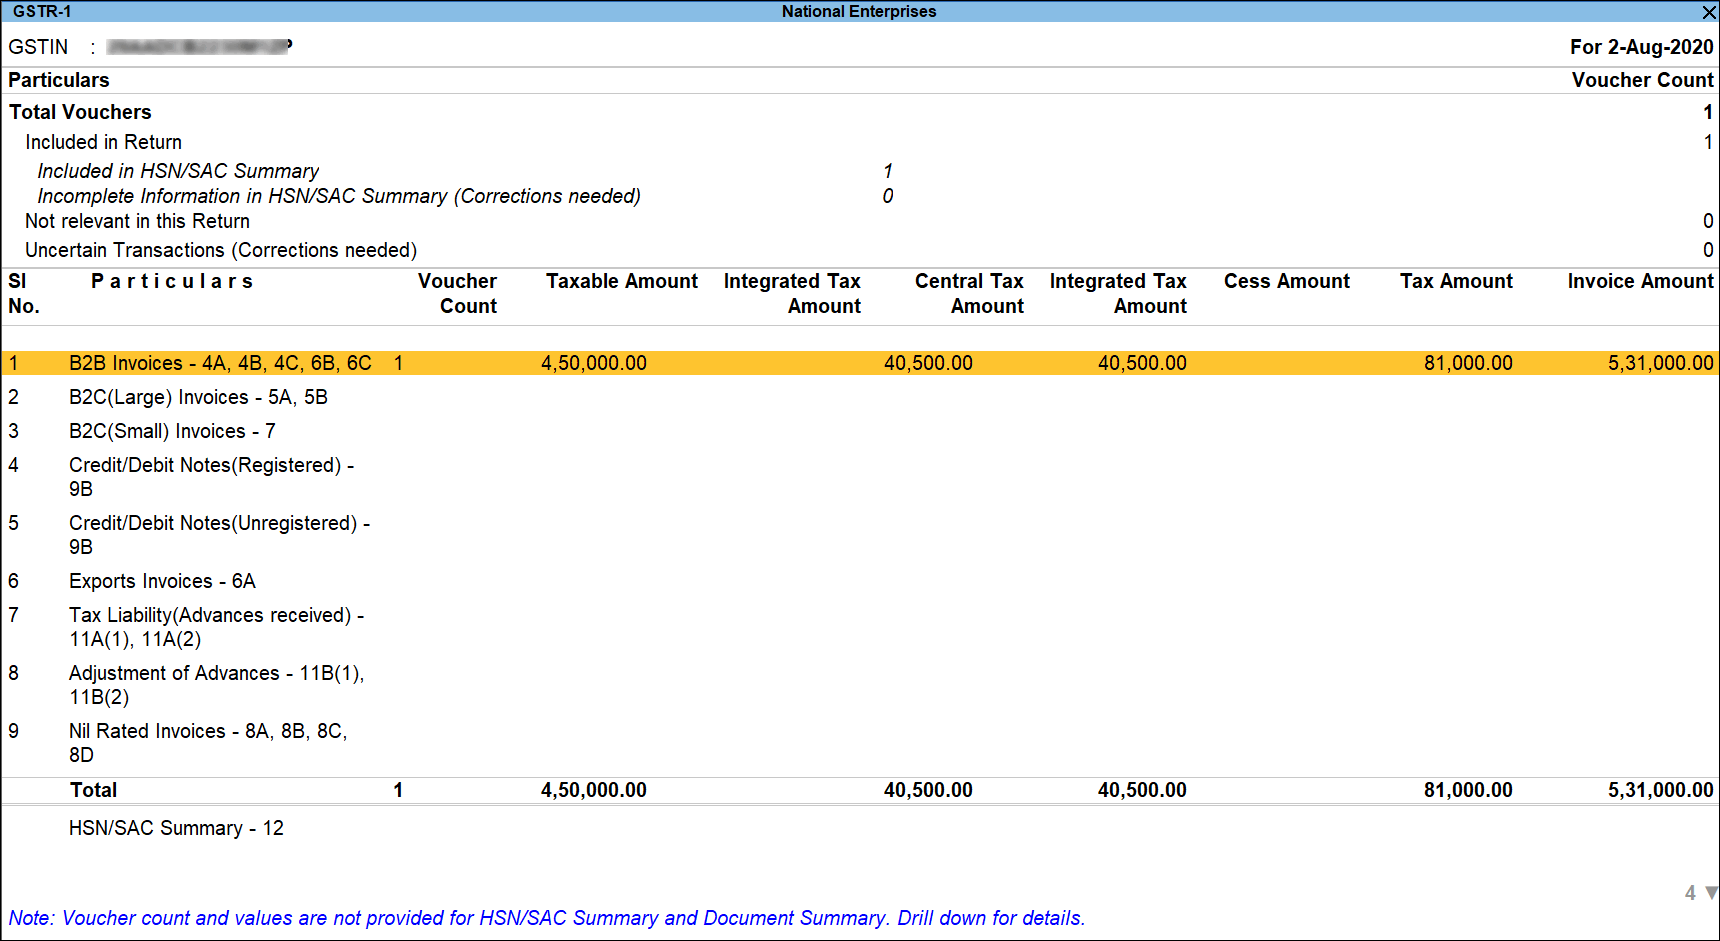
The GSTR-1 report displays the sales invoice, with tax on sales and advance amount as shown below:
To reverse the tax liability on advance receipt
- Gateway of Tally > Vouchers > press F7 (Journal).
Alternatively, press Alt+G (Go To) > Create Voucher > press F7 (Journal).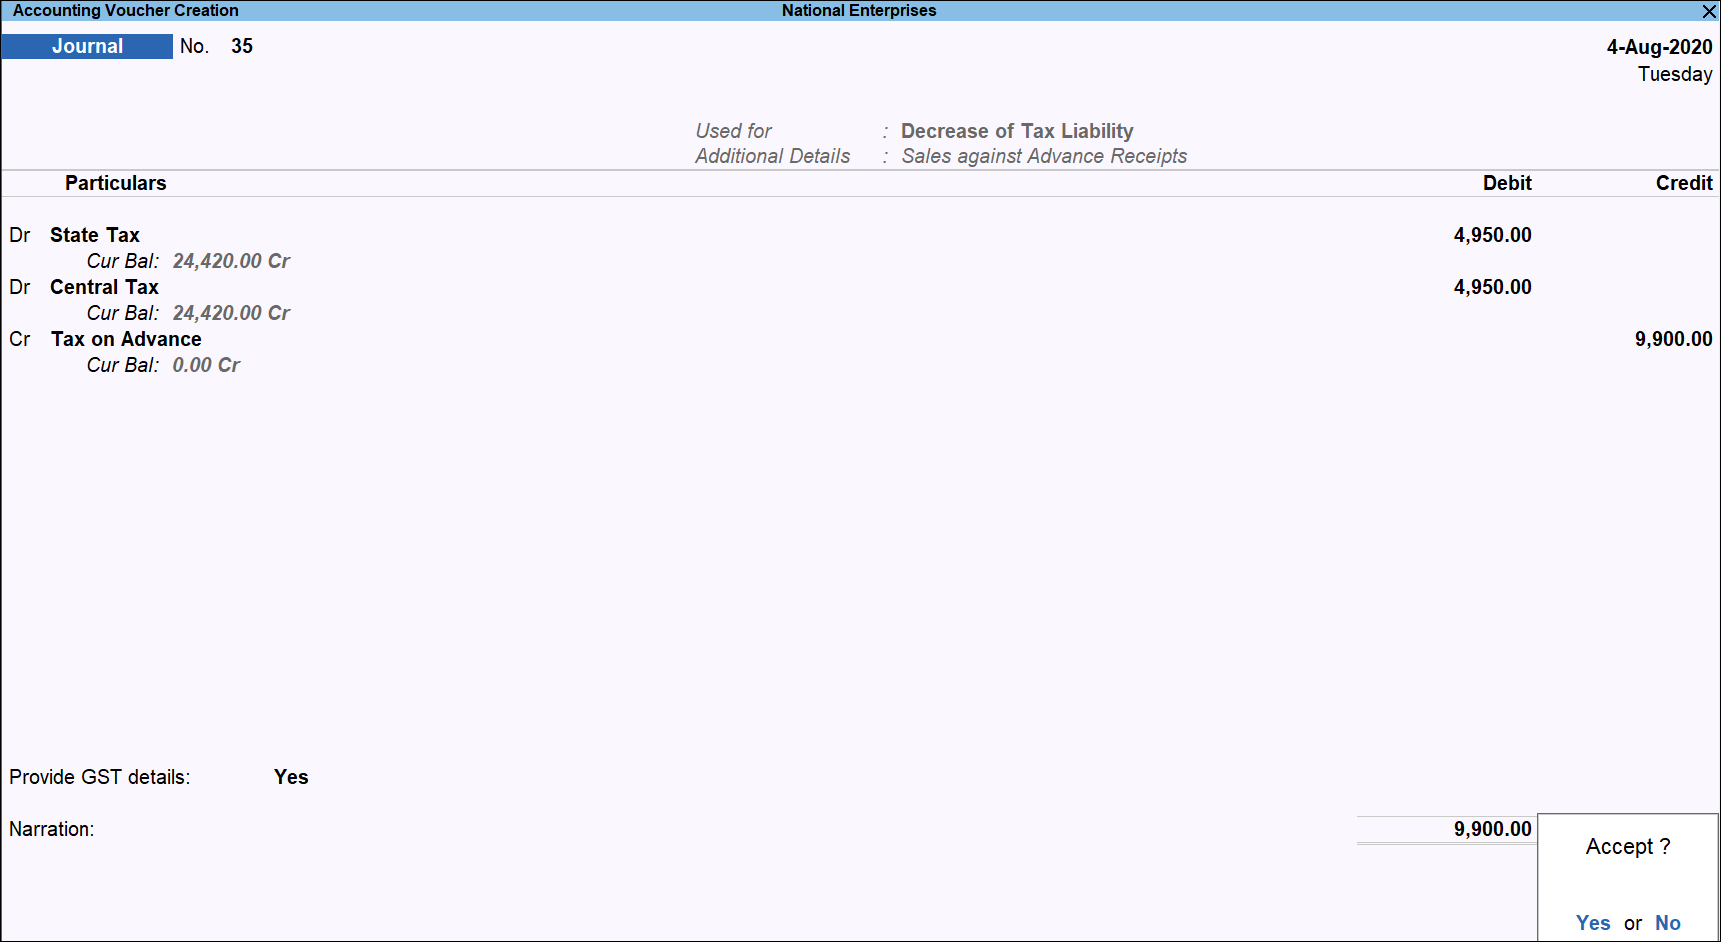
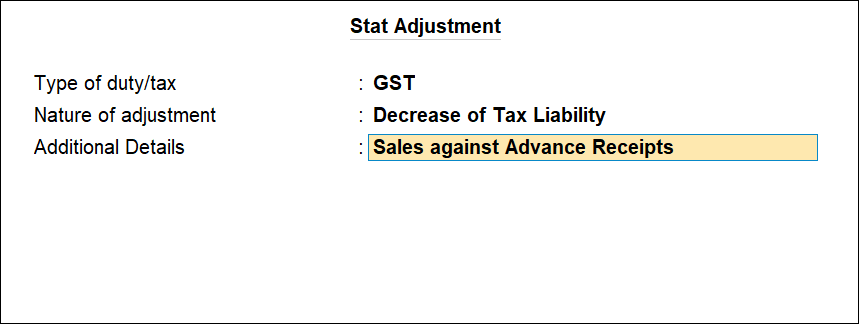
- Press Alt+J (Stat Adjustment) , select the options as shown below:
- Debit the GST ledgers, and enter the tax Rate and Taxable Value in the GST Details screen displayed for each tax ledger.
- Credit the expense ledger, or the ledger grouped under Current Assets for tax on advance receipt.
- Set the option Provide GST Details to Yes . Enter the details of advance receipt and select the party ledger.
The GSTR-1 report appears as shown below:
Reversal of GST on account of cancellation of advance receipt
If an advance receipt voucher is recorded, a journal voucher is recorded to raise the tax liability, and then the transaction is cancelled partially or fully:
- Record a refund voucher to return the advance amount .
- Record a journal voucher to reverse the tax liability .
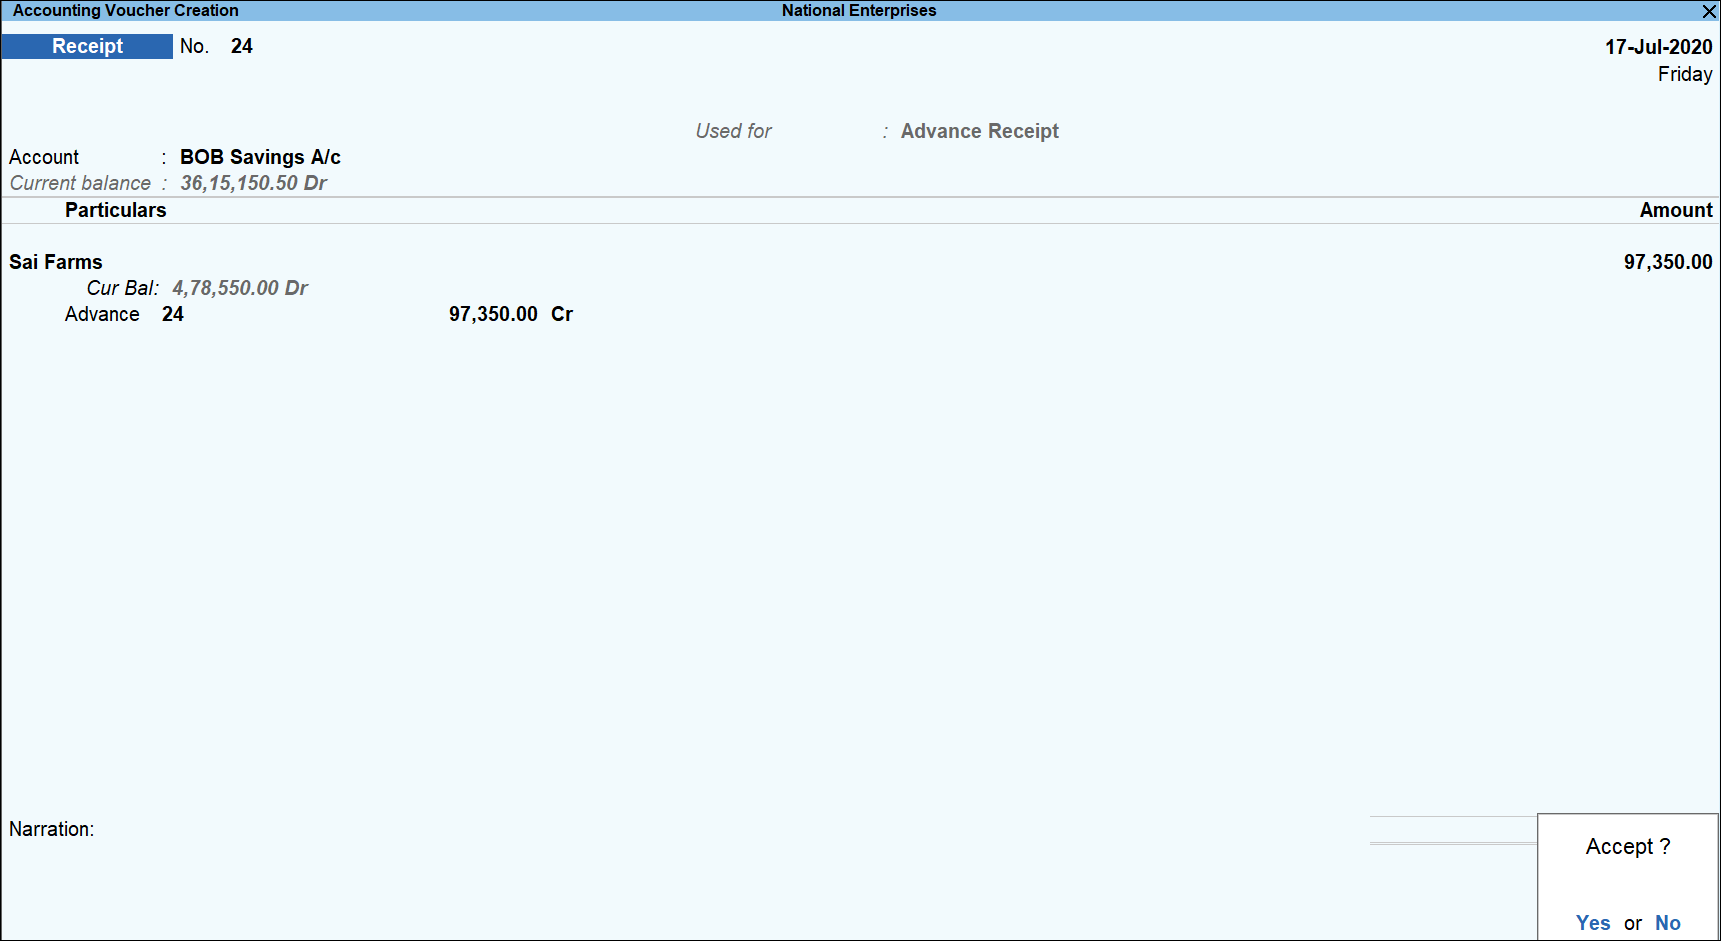
Record an advance receipt voucher as shown below:
Record a journal voucher to raise the tax liability as shown below:
To record a refund voucher
- Gateway of Tally > Vouchers > press F5 (Payment).
Alternatively, press Alt+G (Go To) > Create Voucher > press F5 (Payment).
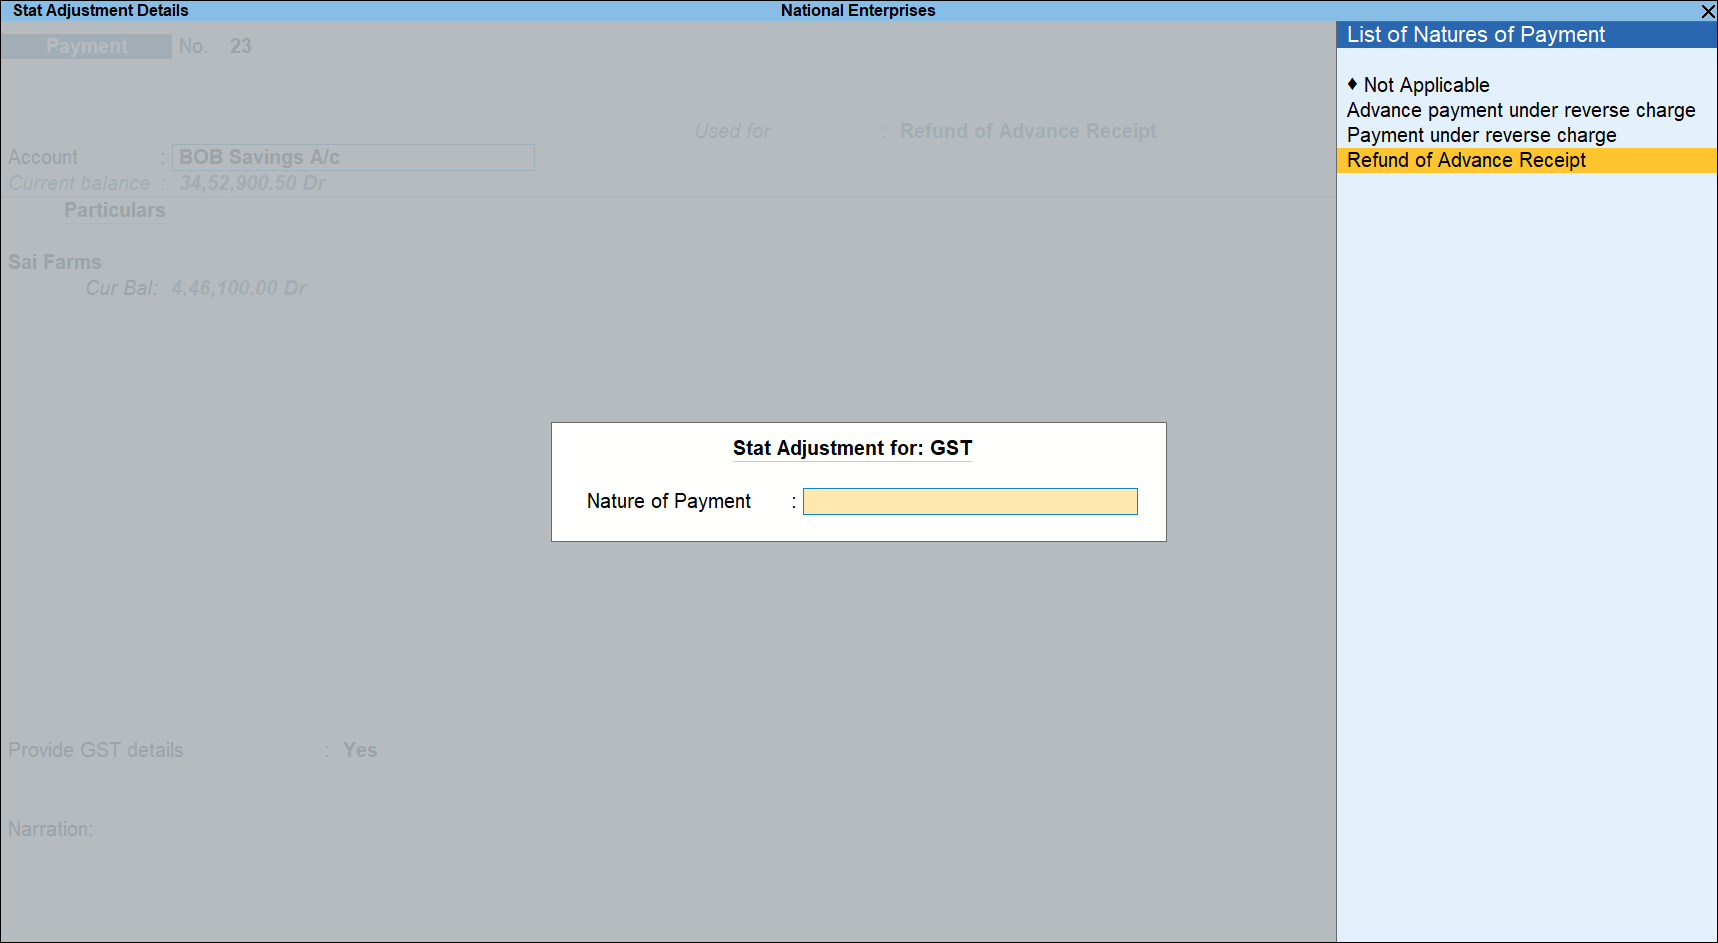
- Press Alt+J (Stat Adjustment) > select Nature of Payment as Refund of Advance Receipt to mark the voucher for advance receipt.
- Select the bank Account.
- Select the Party ledger. Ensure the bill-wise details is enabled in the ledger master.
As always, press Alt+C, to create a master on the fly. Alternatively, press Alt+G (Go To) > Create Master > type or select Ledger > press Enter. - Press F12 (Configure). Set the option Provide Party details for GST to Yes, to view the Party Details screen, and provide the relevant details.

- In the Refund Details section, the list of stock items appears for selection. To select a ledger, press Alt+L (Show Ledgers) . Press F12 (Configure) and set the options:
- Allow to provide rate of stock items to Yes , to enter/alter the slab rate of the stock item.
- Allow to provide quantity for calculation of cess on quantity to Yes , to enter the cess rate and cess rate per unit.
- Allow modification of tax details to Yes , to override GST and cess rates in the voucher.
- Select the stock item (goods enabled for GST) or ledger name (services enabled for GST).
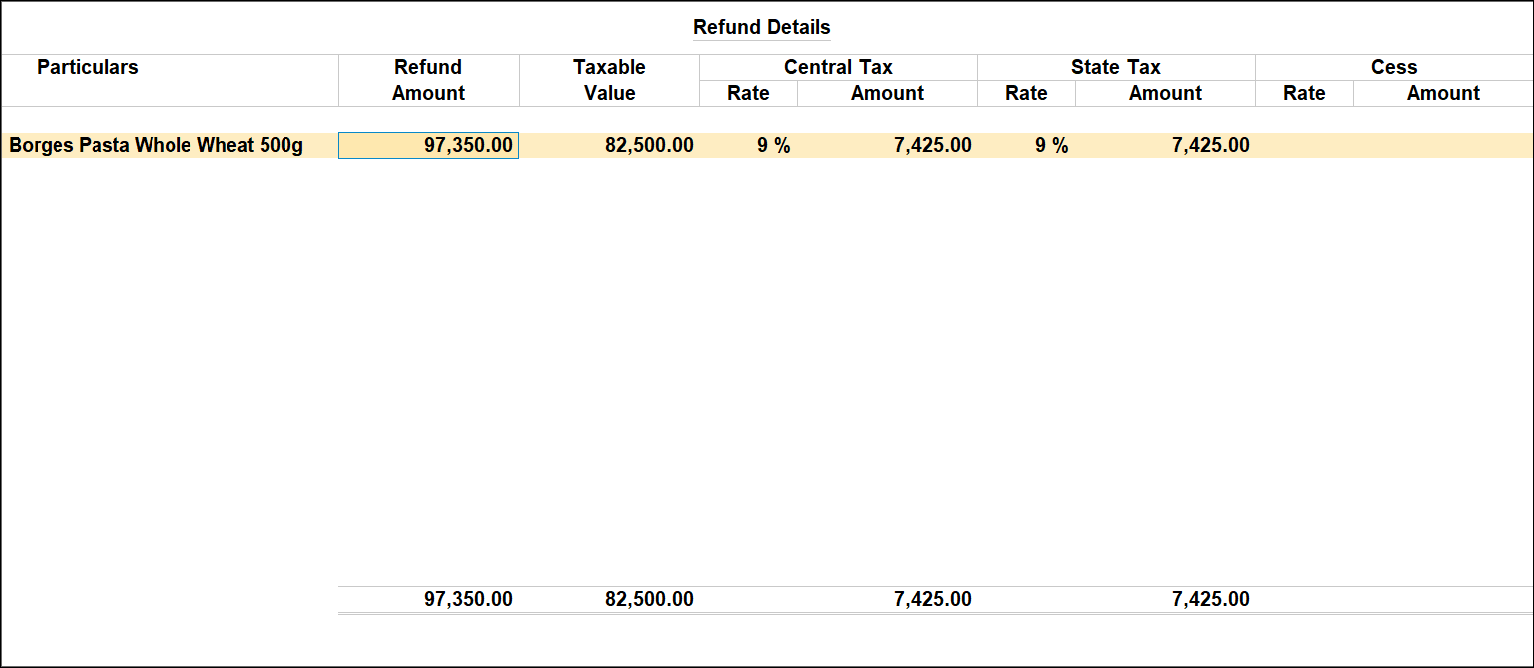
- Enter the Refund Amount , which is inclusive of GST. The break-up of the GST amount gets auto calculated for Central Tax , State Tax , and Cess , if applicable. The Refund Details section appears as shown below:
- Press Ctrl+A to accept and return to the payment voucher.
- Select the type of reference as Agst Ref , and select the reference details in the Bill-wise Details screen.
- Set Provide GST details to Yes , and enter the Receipt No. and Date of the advance receipt.
- Accept the screen. As always, you can press Ctrl+A to save.
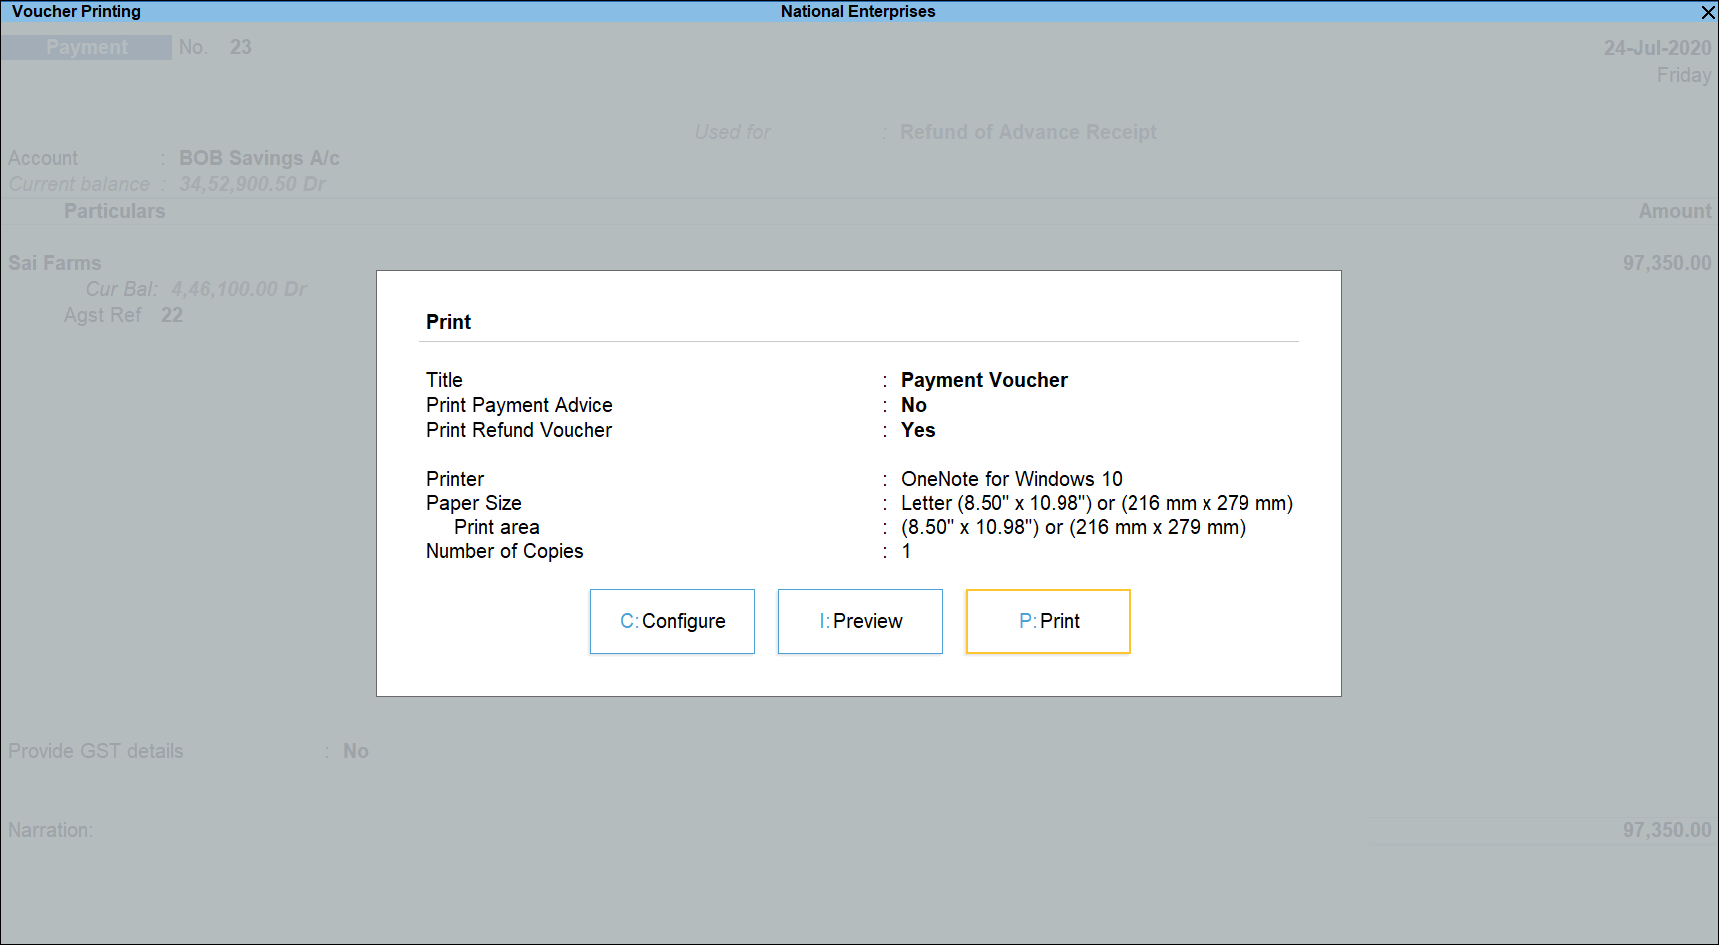
- Press Alt+P (Print) and select configure and set Print Refund Voucher to Yes , as shown below:
- Press Enter to print.
The printed refund voucher appears as shown below: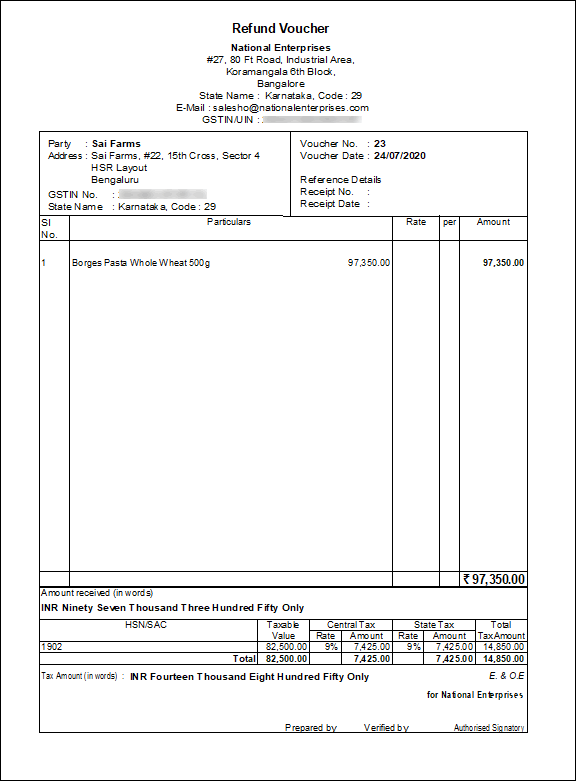
To reverse the liability on cancellation of a transaction
- Gateway of Tally > Vouchers > press F7 (Journal).
Alternatively, press Alt+G (Go To) > Create Voucher > press F7 (Journal). - Press Alt+J (Stat Adjustment) , select the options as shown below:
- Debit the GST ledgers and credit the ledger grouped under Current Assets.
- Enable the option Provide GST Details?
- Enter the details of the receipt voucher and refund voucher, and select the party ledger as shown below:

Note: Place of supply has to be entered. You need not provide the party details.
- Press Enter to save. The journal voucher appears as shown below:
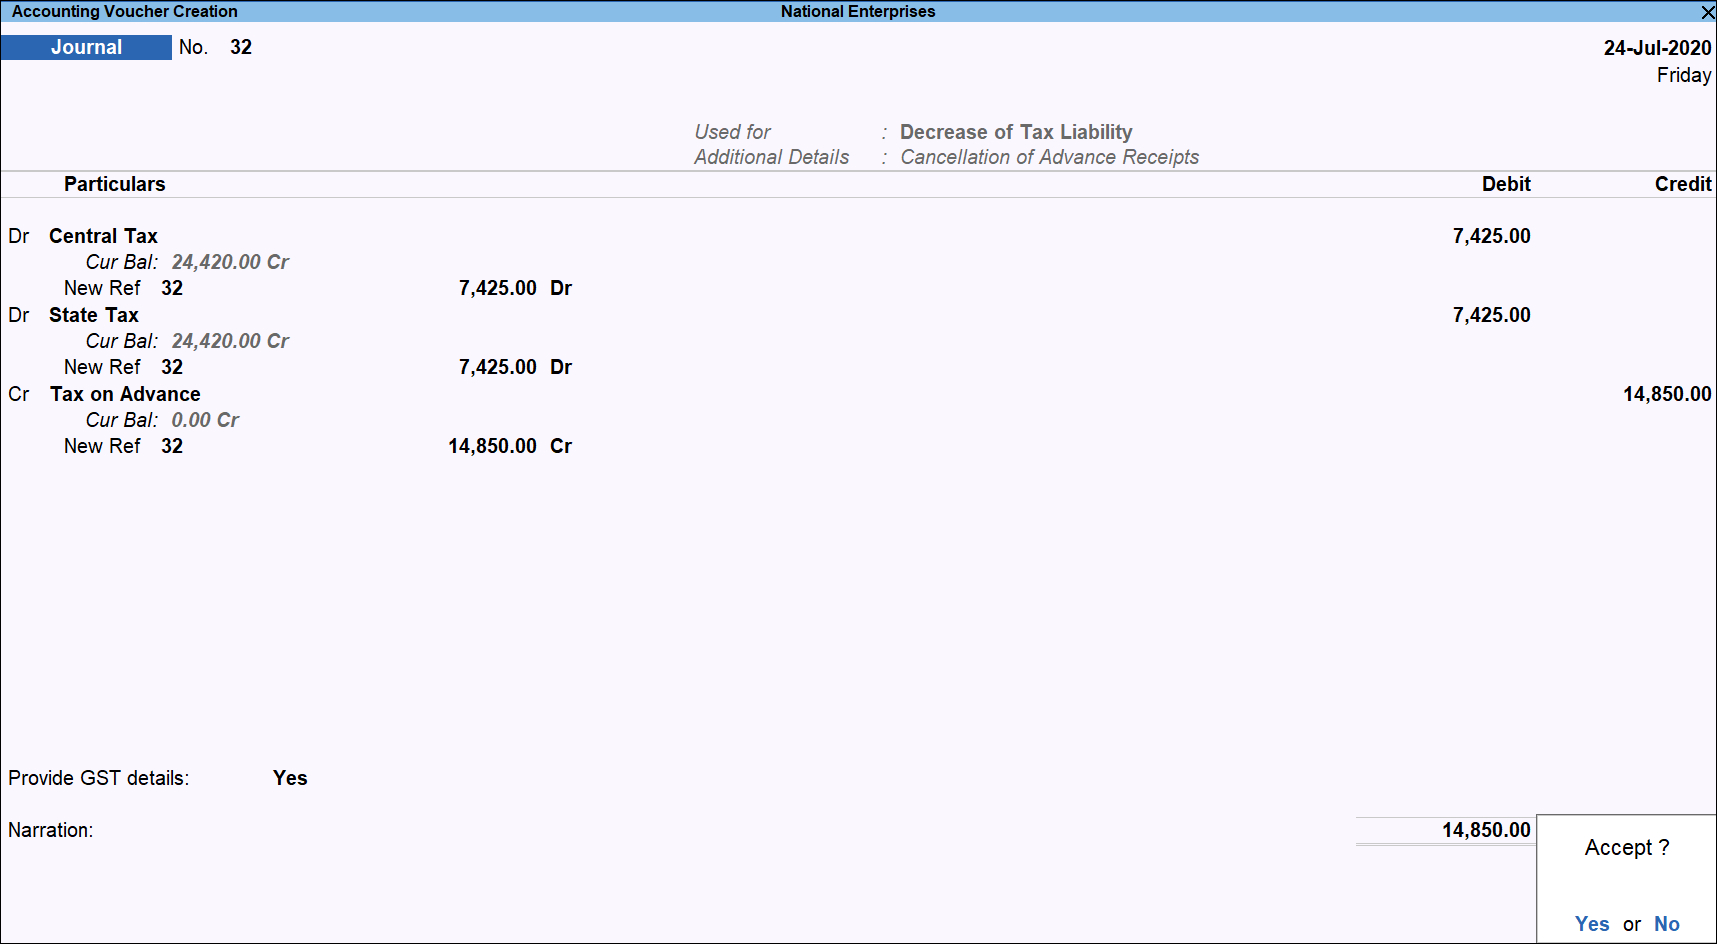
- Accept the screen. As always, you can press Ctrl+A to save. The GSTR-1 report appears as shown below:

Transactions under Reverse Charge
Advance Receipt from Customer
To record a receipt voucher for advance received from customer
- Gateway of Tally > Vouchers > press F6 (Receipt).
Alternatively, press Alt+G (Go To) > Create Voucher > press F6 (Receipt).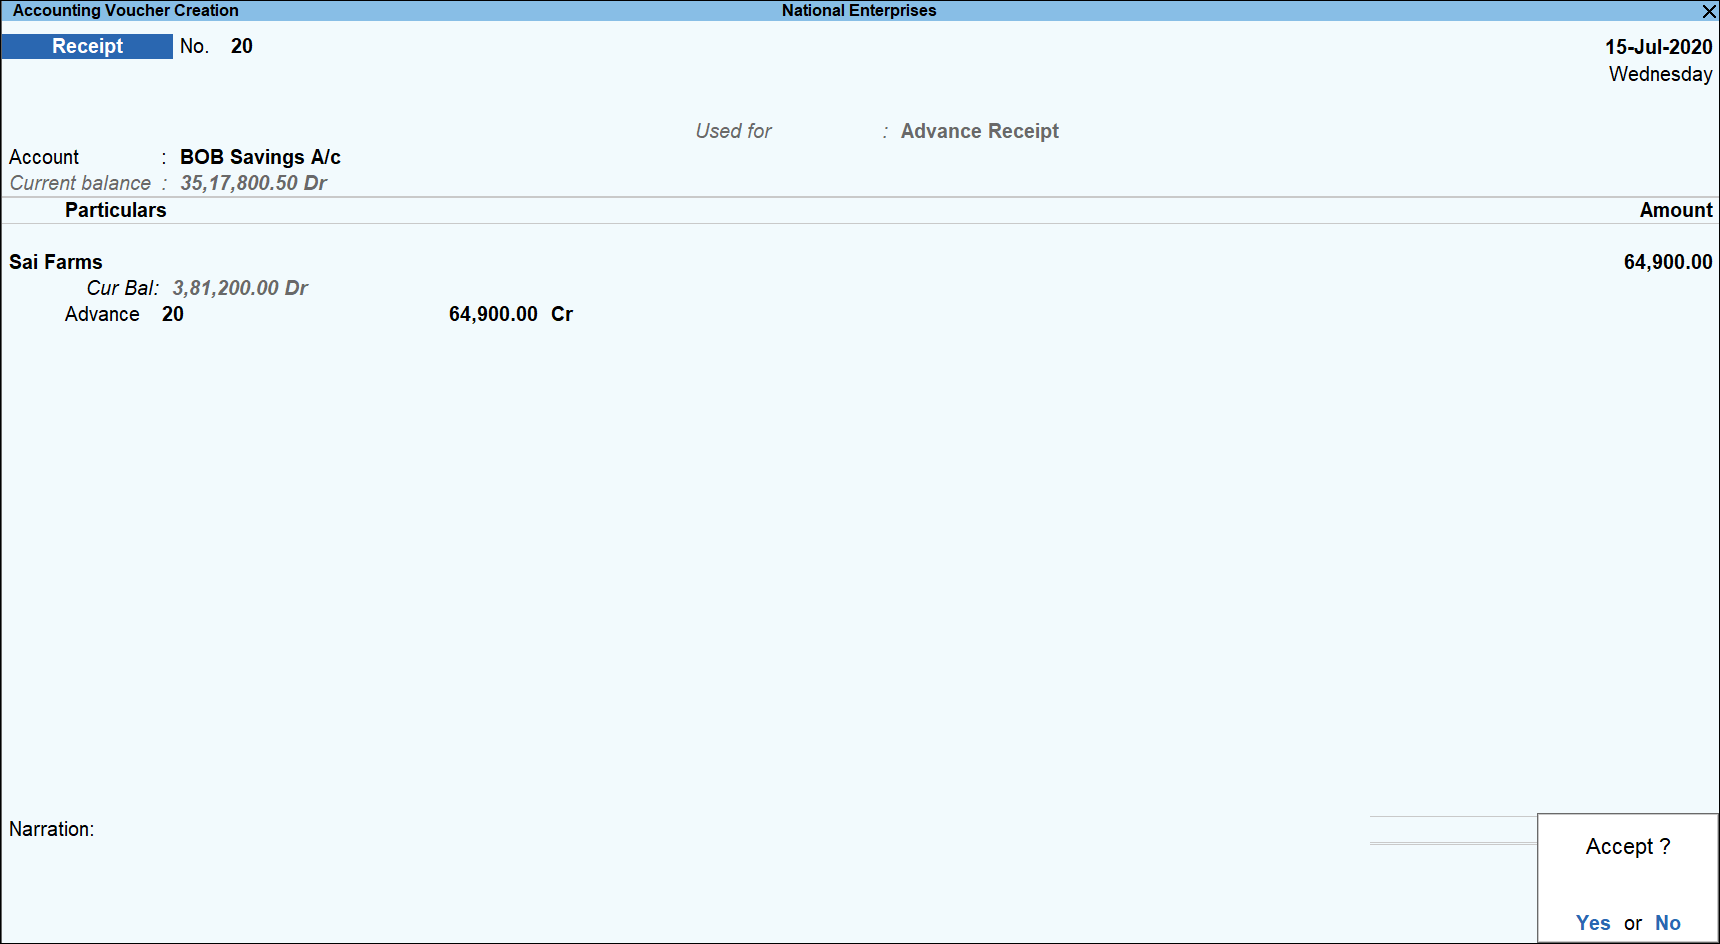
- Press Alt+J (Stat Adjustment) > select Nature of Receipt as Advance Receipt to mark the voucher for advance receipt.
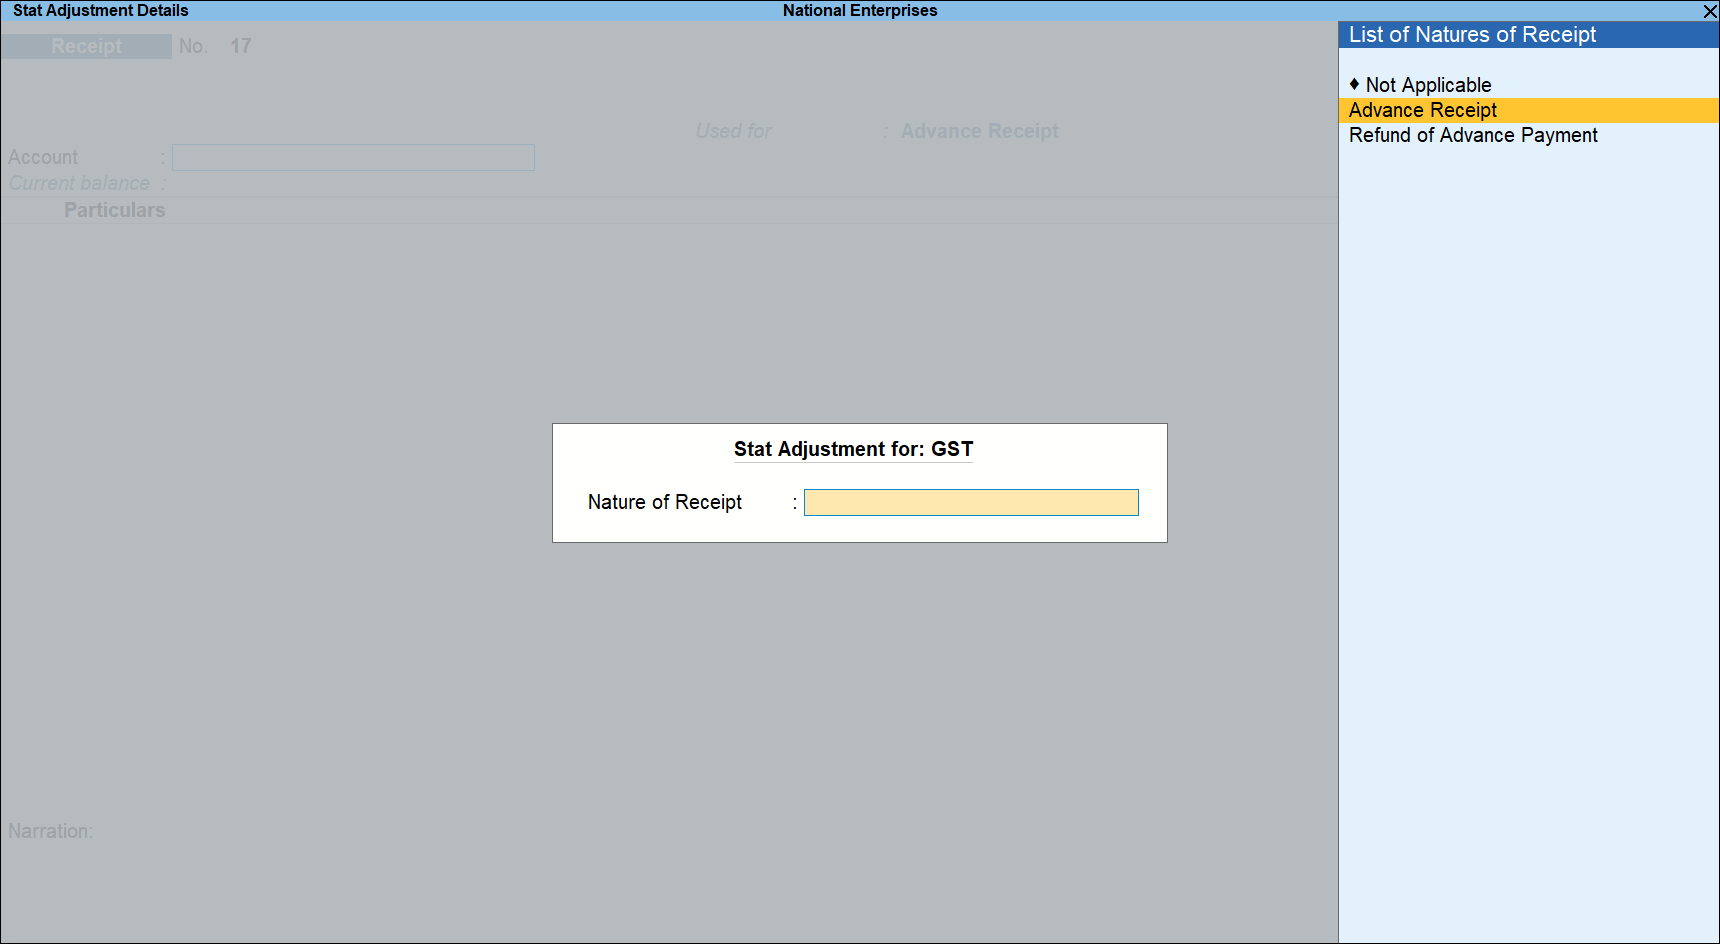
- In Account select the bank to which the payment will be made.
- Select the party ledger. Ensure the bill-wise details is enabled in the ledger master.
The Advance Receipt Details screen appears with the list of stock items. To select a ledger, press Alt+L (Show Ledgers). Press F12 (Configure) and set the options:- Allow to provide rate of stock items? to Yes , to enter/alter the slab rate of the stock item.
- Allow to provide quantity for calculation of cess on quantity? to Yes , to enter the cess rate and cess rate per unit.
- Allow modification of tax details? to Yes , to override the GST and cess rates in the voucher.
- Select the stock item (goods enabled for GST) or ledger (services enabled for GST). Ensure the option Is reverse charge applicable is set to Yes in the GST Details screen of stock item or ledger master stock item if the party selected is a regular dealer.
Note: In the GST Details screen of the invoice, the option Is reverse charge applicable appears as set in the master, and the same configuration appears in brackets for reference. You can change this while recording the invoice, if required.
- Enter the Advance Amount , which is inclusive of GST . You can adjust this against the sales invoice partially/fully, based on the sale value. At the end of the month, depending on the balance amount of the advance available, you can record a journal voucher to raise the liability.
Based on the amount entered, the break-up of the GST amount gets auto calculated for Central Tax , State Tax , and Cess , if applicable. The Advance Receipt Details screen appears as shown below: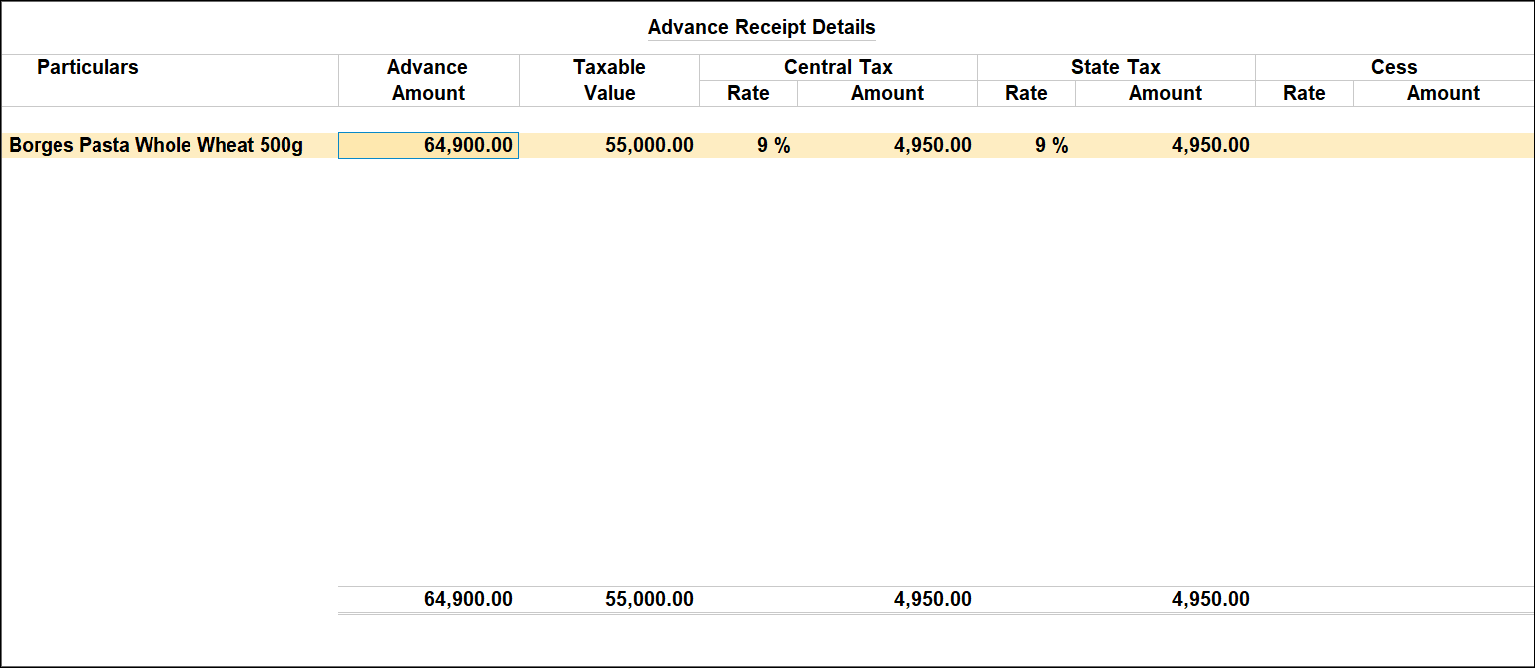
- Press Ctrl+A to accept the Advance Receipt Details screen and return to the receipt voucher.
- Select the type of reference as Advance and enter the reference details in the Bill-wise Details screen.
- Accept the screen. As always, you can press Ctrl+A to save.
- Press Alt+P (Print) in the payment voucher . To print the State Name , Code , and Place of Supply in the voucher, press F12 (Configure) and set the options as given below:
- Press Enter to print.
The printed receipt voucher with the GST details appears as shown below: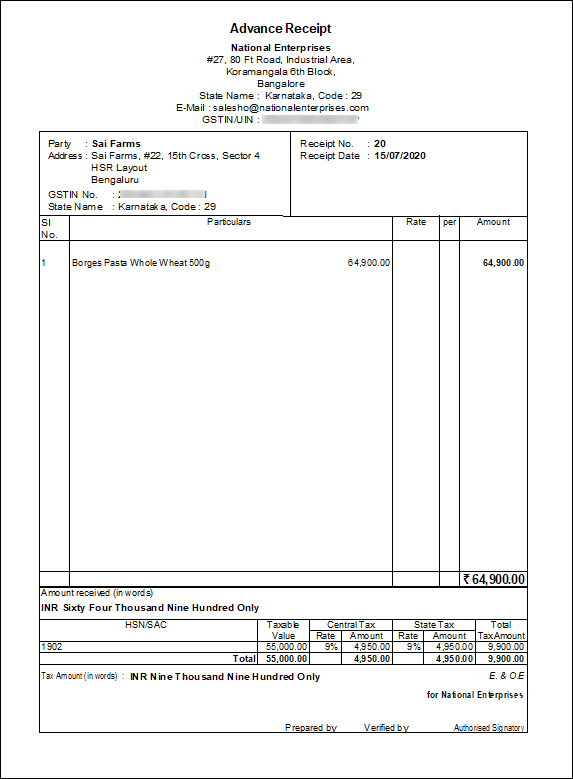
Sales invoice linked to an advance receipt voucher
When the sales invoice is recorded, the receipt voucher has to be linked to it by selecting the Type of Ref as Agst Ref in the Bill-wise Details screen of the sales invoice.
The GSTR-1 report displays the sales invoice, with tax on sales and advance amount as shown below:
Reversal of Advance Amount on Account of Cancellation
If an advance receipt voucher is recorded, record a refund voucher to return the advance amount.
Record an advance receipt voucher as shown below:
To record a refund voucher for cancellation of advance amount
- Gateway of Tally > Vouchers > press F5 (Payment).
Alternatively, press Alt+G (Go To) > Create Voucher > press F5 (Payment).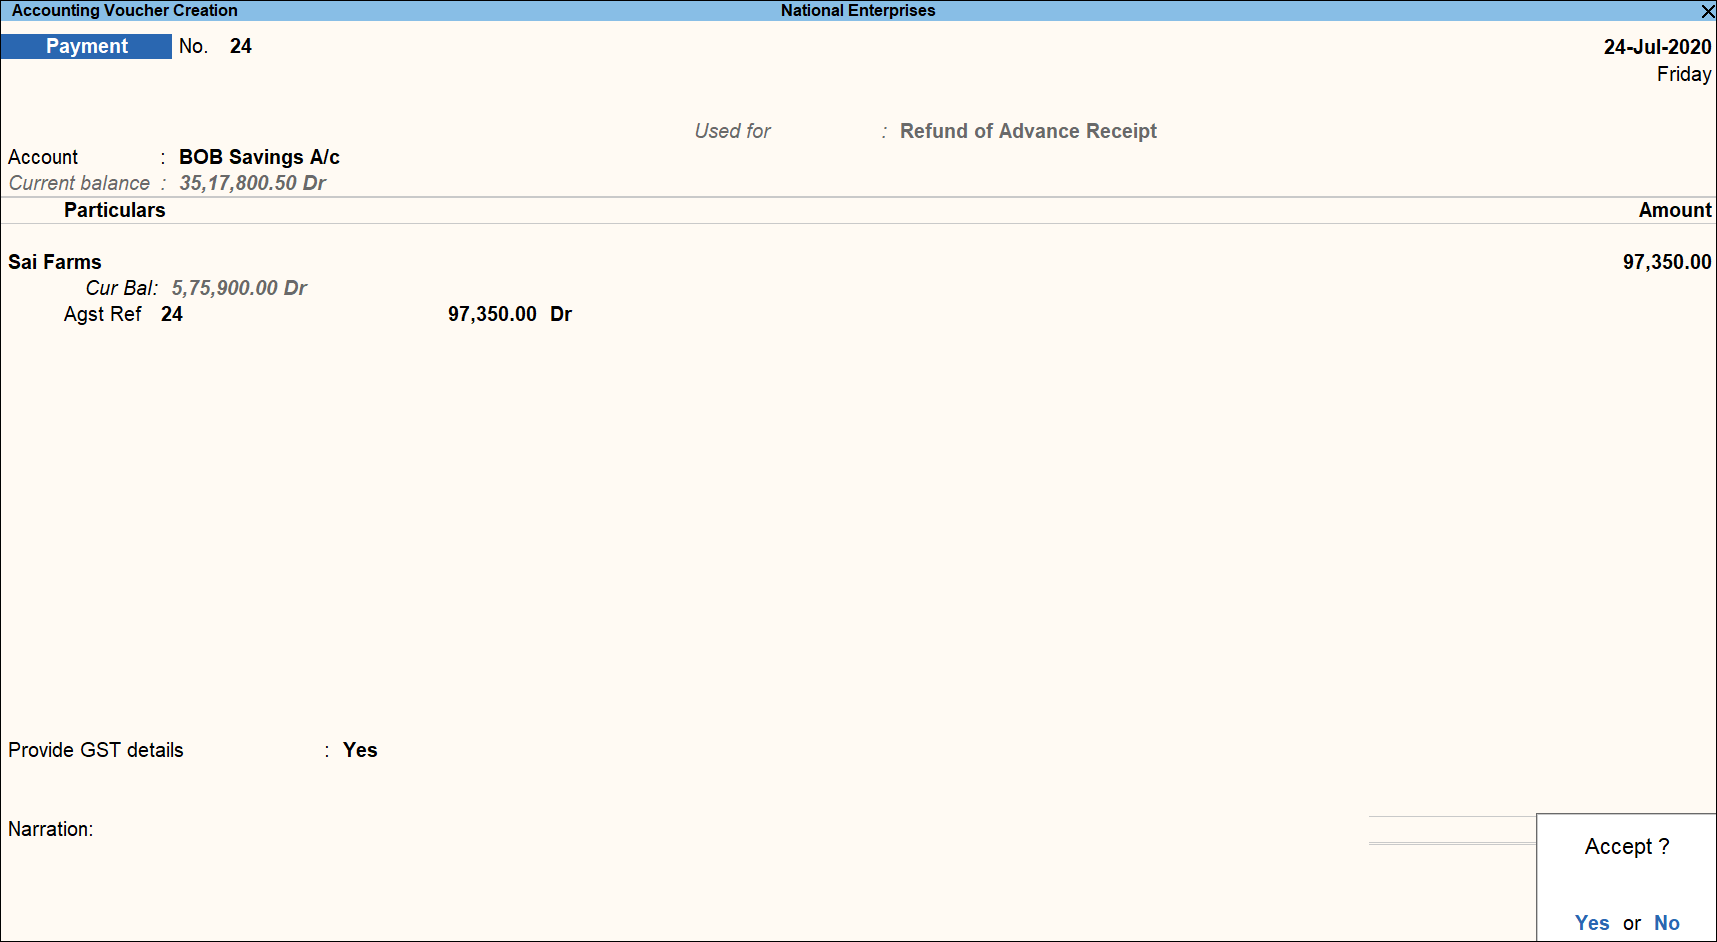
- Press Alt+J (Stat Adjustment) > select Nature of Payment as Refund of Advance Receipt to mark the voucher for advance receipt.

- Select the bank Account.
- Select the party ledger. Ensure the bill-wise details is enabled in the ledger master.
- Press F12 (Configure), set the option Provide Party details for GST to Yes to view the Party Details screen, and provide the relevant details.
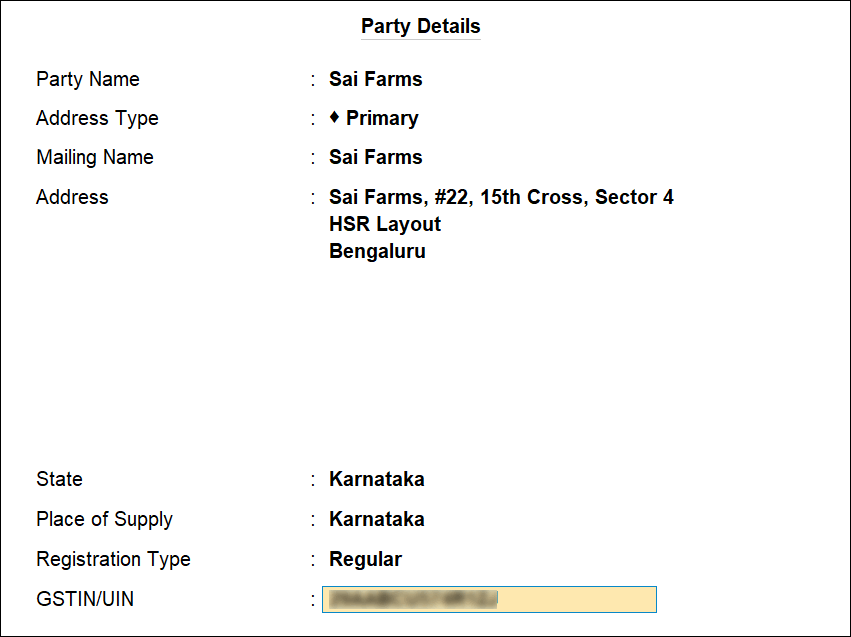
- In the Refund Details section, the list of stock items appears for selection. To select a ledger, press Alt+L (Show Ledgers). Press F12 (Configure) and set the options:
- Allow to provide rate of stock items? to Yes , to enter/alter the slab rate of the stock item.
- Allow to provide quantity for calculation of cess on quantity? to Yes , to enter the cess rate and cess rate per unit.
- Allow modification of tax details? to Yes , to override GST and cess rates in the voucher.
- Select the stock item (goods enabled for GST) or ledger name (services enabled for GST).
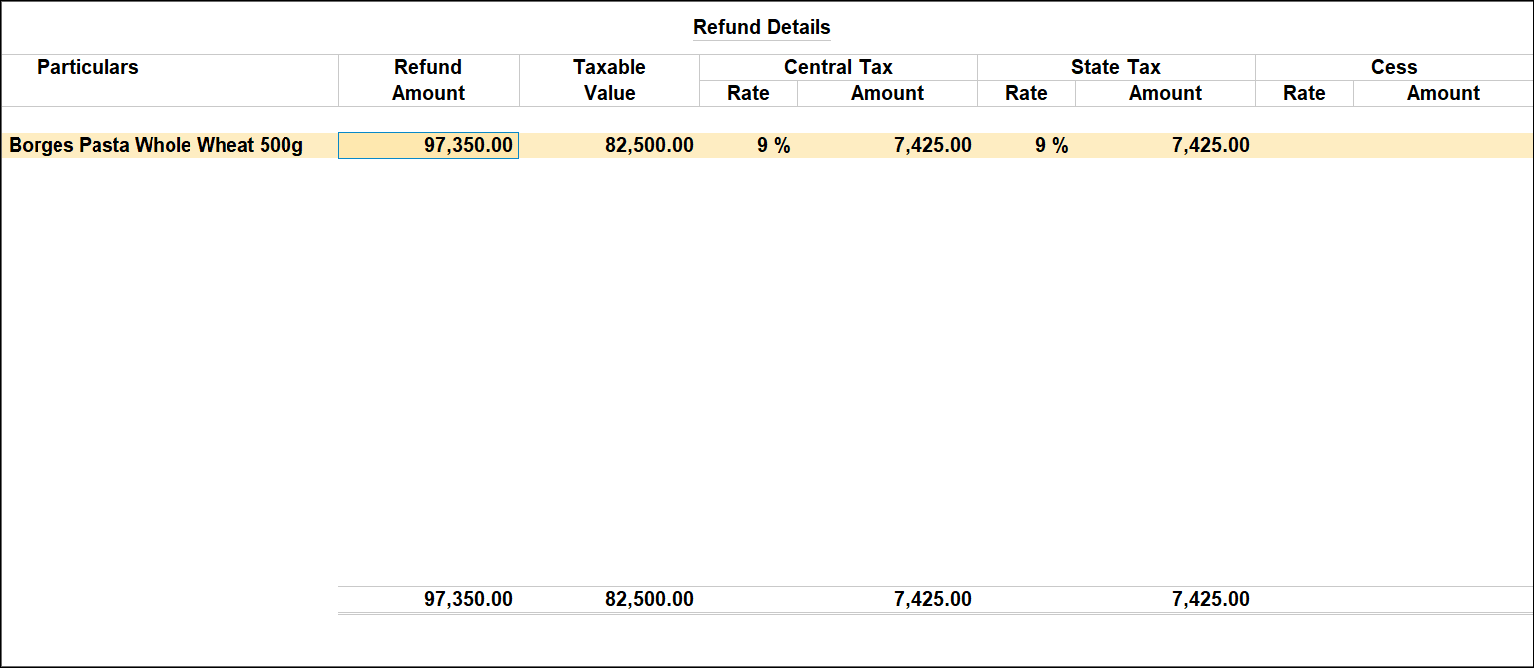
- Enter the Refund Amount , which is inclusive of GST. The break-up of the GST amount gets auto calculated for Central Tax , State Tax , and Cess , if applicable. The Refund Details section appears as shown below:
- Press Ctrl+A to accept and return to the payment voucher.
- Select the type of reference as Agst Ref , and select the reference details in the Bill-wise Details screen.
- Set Provide GST details? to Yes , and enter the Receipt No. and Date of the advance receipt.
- Accept the screen. As always, you can press Ctrl+A to save.
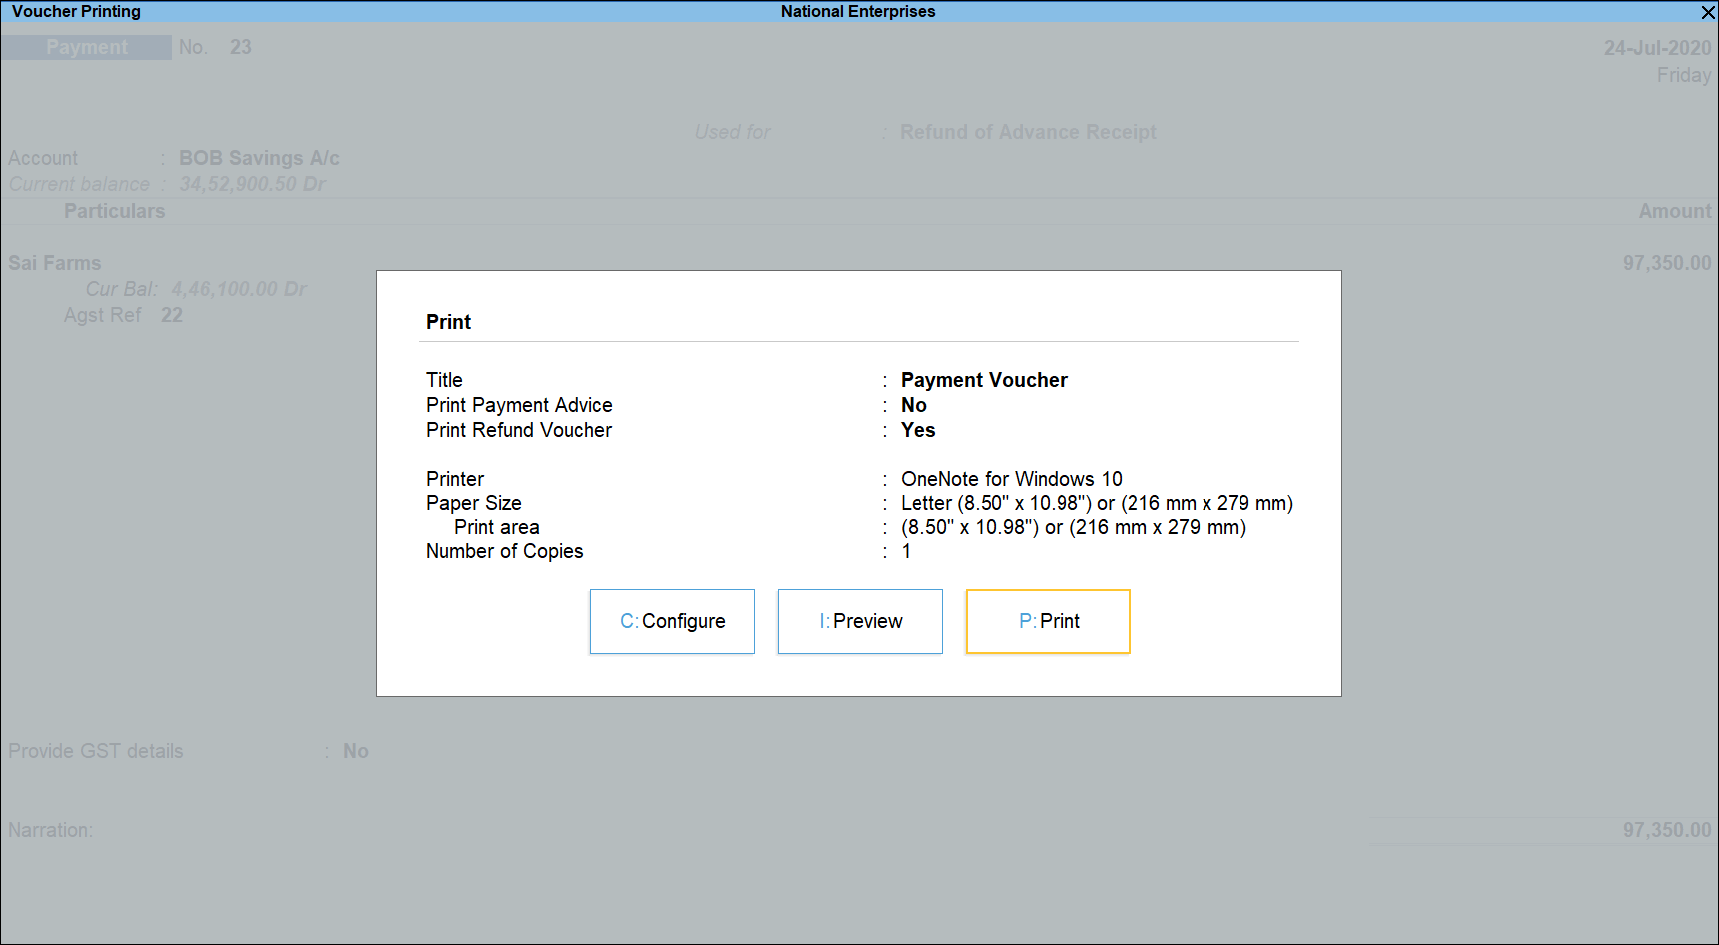
- Press Alt+P (Print) and select configure and set Print Refund Voucher to Yes , as shown below:
- Press Enter to print.
The printed refund voucher appears as shown below: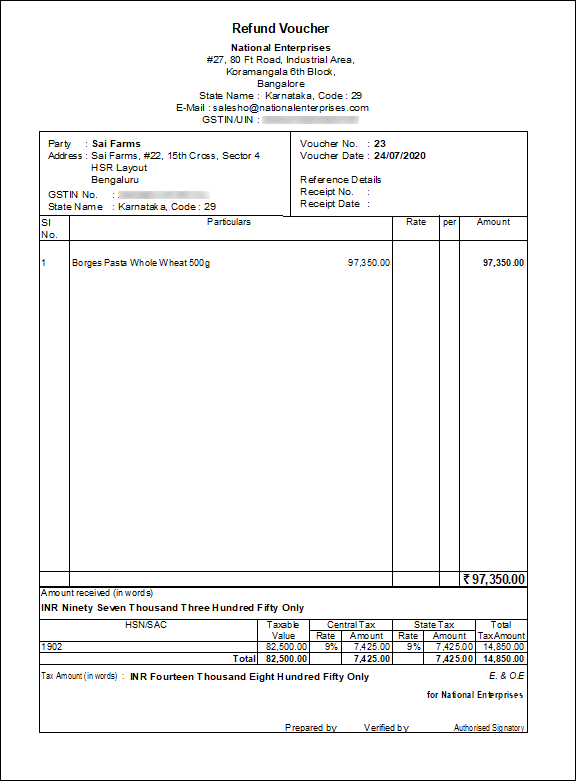
Similarly, record the transactions for the journal voucher adjustments given below:- Increase of Tax Liability > Advance Receipts for Export/SEZ sales – Debit expenses/current assets ledger and credit tax ledgers.
- Decrease of Tax Liability > Cancellation of Advance Receipts for Exports/SEZ sales – Debit tax ledgers and credit expenses/current assets ledger.
- Decrease of Tax Liability > Sales against Advance Receipts for Export/SEZ sales – Debit tax ledgers and credit expenses/current assets ledger.
