When you make a sale or purchase, if your payments and receipts involve transactions through bank, you can use the Banking Utilities in TallyPrime. You can record your bank-related transactions TallyPrime on your business practices. If the payments are deposited to the bank through cash and cheques, or you have set the payment instructions through payment advice, all of these and more can be recorded and managed in TallyPrime.
Manage your post-dated cheques or payments done directly to the supported banks in TallyPrime. End of the month or at any given point, if you do reconciliation of the bank statement with your Books of Accounts, all of these can be done smoothly in TallyPrime.
Bank Ledgers
Bank ledgers contain relevant information about a bank that you use to make or receive payments. You can provide information such as Bank name, Account no., IFS code, and address while creating bank ledgers.
- Gateway of Tally > Create > type or select Ledger > and press Enter.
Alternatively, Alt+G (Go To) > Create Master > type or select Ledger > and press Enter. - Enter the Name of the bank for the bank ledger.
- Select Bank Accounts from the List of Groups, in the Under field.
Three types of bank accounts are supported in TallyPrime, Saving Account (Bank Account), Over Draft account ( Bank OD), Cash Credit account (Bank OCC).Note: The Books Beginning date is pre-filled in Effective Date for Reconciliation field.
- Provide the following details in Bank Accounts details:
- A/c Holder’s Name: It prefills the company name; however, you can alter this name by pressing Backspace.
- A/c No.: Provide the account number of your bank.
- IFS Code: Provide the IFS code for your bank.
If the IFS code in incorrect, the system prompts the warning message, as follows:
- Bank Name – Select the bank name from the List of Banks.
- Branch: Provide the Branch name of the bank.
- BSR code: Provide the BSR code for your bank.
Note: BSR code appears only when TDS module is enabled in the company.
- Client Code: This is a unique code given by the bank to their customer as identifier.
Note: Client Code will be displayed only when Bank Name is selected as Kotak Mahindra Bank (India), Bank of Baroda (India) or Yes Bank and its a mandatory field in payment instruction file.
The Ledger Creation screen appears as shown below:
In case of Yes Bank this is mandatory field in payment instruction file in Delimited (|) format
Note: The List of Banks is displayed only when TSS and internet connectivity is available. Additionally, the Bank Configuration displays options that are applicable for the bank you select.
- Under Bank Configuration:
- Set/Alter range for Cheque Books: Enter the details of the cheque range in the Cheque Range Management screen as shown below:
Note: You can set cheque ranges from the Cheque Register report as well. If you enter a cheque number that already exists in another cheque range, the error message The entered cheque range is overlapping with the existing cheque range is displayed. -
Enable Cheque Printing: Set this options to Yes, to display this option Set/Alter Cheque Printing configuration.
-
Set/Alter Cheque Printing configuration: Yes.
-
Enable Auto Reconciliation: Set this options to Yes to reconcile the bank accounts by importing the bank statements.
-
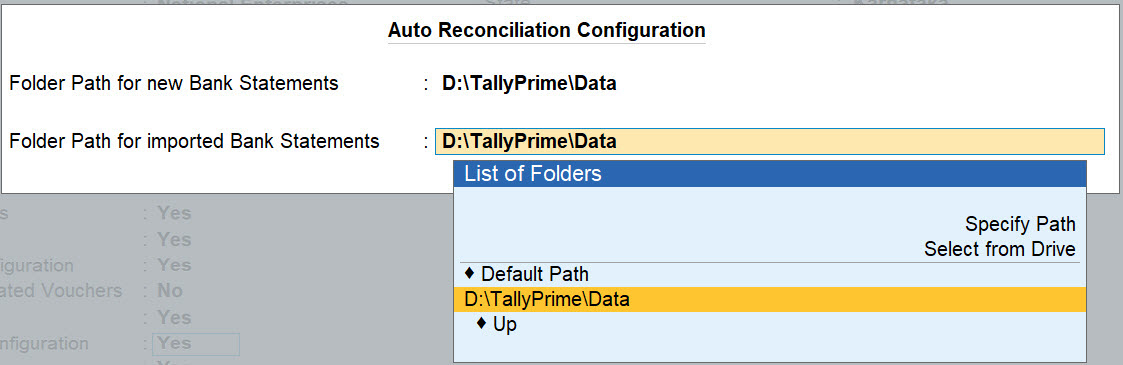
Set/Alter Auto Reconciliation configuration: Set this options to Yes to opens the Auto Reconciliation Configuration screen.
-
-
Specify the path for Folder Path for new Bank Statements and Folder Path for imported Bank Statements as shown below:
- Set/Alter range for Cheque Books: Enter the details of the cheque range in the Cheque Range Management screen as shown below:
-
Enable e-Payments: Set this options to Yes, to display this option Set/Alter e-Payments configuration.
-
Set/Alter e-Payments configuraton: Set this option to Yes, for electronic modes of payment. The following banks are supported for e-payments capability:
-
DBS Bank (India)
-
Standard Chartered Bank (India)
-
Standard Chartered Bank (UAE)
-
YES Bank (India)
-
ICICI Bank (India)
-
Kotak Mahindra Bank (India)
-
HDFC Bank (India)
-
Bank of Baroda (India)
-
Citi Bank (India)
-
The Bank of Tokyo-Mitsubishi UFJ, Ltd. (India)
-
RazorpayX (India)
-
Axis Bank (India)
- Federal Bank (India)
-
-
Mailing Details: Enter the Name, Address, State and Pincode.
-
Accept the screen. As always, you can press Ctrl+A to save the bank ledger.
Configure Your Bank Ledger
To ensure your transactions are assisted with all the necessary banking options, you can configure your bank ledgers by using F12 (Configure). If you need to configure a single bank ledger, you can use Ctrl+I (More Details) to set your bank ledger preferences for that instance.
In this section
Apply cost centres
To apply cost centres for your bank ledger:
- Ledger Creation > F12 (Configure) > set Apply Cost Centres for Ledgers to Yes.
- On the Ledger Creation screen, set Cost centres are applicable to Yes.
In case you need to apply cost centre for this instance of the ledger:
- Ledger Creation > press Ctrl+I (More Details) > set Cost centre applicability to Yes.
- Set Cost centres are applicable to Yes.
Notional bank for post-dated vouchers
A notional bank exhibits the same features as a normal bank account, created under the group Bank Accounts. You can create a notional bank account when you are:
- Unable to decide the bank to which the post-dated cheques received are to be deposited, while creating the post-dated transactions.
- Manually converting the post-dated cheques received.
- Unable to determine the bank to which the post-dated cheque is to be deposited.
- Press F12 (Configure) > Set Bank Ledgers as Notional Bank Ledgers to Yes.
If you do not see this option:- Set Show more configurations to Yes.
- Set Show all configurations to Yes.
- Under Bank Configuration > set the option Use as Notional Bank for Post-Dated Vouchers to Yes.
If you need to use this option only for the current instance of the ledger:
- Ledger Creation > press Ctrl+I (More Details) > Banking configuration.
- Set the option Use as Notional Bank for Post-Dated Vouchers to Yes.
Similarly you can set your preferences for all the bank ledgers through F12 (Configure) or for that instance of the ledger using Ctrl+I (More Details).
Bank-Wise e-Payment Configuration
Different banks have different needs in e-payments, and TallyPrime allows you to configure these specific features in the respective bank ledger. The following options may appear in the configuration depending on the bank ledger selected.
|
Configuration |
Explanation |
Supported Bank |
|
Export/Upload Payment Instructions on voucher creation |
This option will allow you to export the payment instruction immediately after recording a payment voucher. If your bank account belongs to DBS, then this option will allow you to directly upload the payment instruction to the bank portal. If you set this option to No, then you can export the required transactions from the e-Payments report. |
All banks |
| Allow export of transactions with mismatch in Bank Details |
You can maintain the bank account details of a party in the party master. While recording a transaction, these account details will be automatically carried forward. You can also update these details during the transaction, if required. Subsequently,
|
|
|
Export payment file in encrypted format |
This option will provide additional security for your e-payments. The exported files will be encrypted to prevent unauthorised modification. After enabling this option, you will have to specify the folder path where the encryption tool is located. |
Bank of Baroda (TallyPrime release 1.1.3 onwards) SCB (India), ICICI Bank, Citibank, |
|
Generate Payment Instructions in batches |
This option will allow you to export transactions in batches or groups. For example, you can export all your expense-related transactions or your party payments in specific batches, and approve the respective batches on the bank portal. |
Kotak Mahindra Bank |
|
Specify Product Code based on |
This option will allow you to configure the Product Code based on the payment type (for vendor or employee payments) or voucher type/class (for contra, credit note, journal, and so on). |
HDFC Bank, Kotak Mahindra Bank, Bank of Baroda |
|
Set/Alter output file name for Payment Instructions |
This option will allow you to configure the file name of the exported Payment Instructions. The file name consists of details such as the Customer Code and Format Code, which are provided by the bank. You can update these details, if required. |
ICICI Bank |
|
Format of Payment Instruction file for Export |
You can select the format in which the payment instruction file has to be exported from the list of file formats. Note: Existing (old format) is Fixed Width – Corporate Net Banking, and new format is Delimited (|) – Corporate Net Banking. Fixed Width would be set as default when existing users data is migrated. And in the Export Payment Instruction screen, File Format displayed would be Fixed Width for old and Delimited (|) for new. |
Yes Bank |
|
Folder Path for Payment Instructions |
You can update the path where payment instructions will be exported, if required. The default path will be set as per the path provided in Export Configuration. |
All banks |
|
Folder Path for new Intermediate Files |
For all the exported transactions, the bank portal will provide an intermediate (or reverse) file that records the reconciliation status. Accordingly, you can import this intermediate file to TallyPrime to reconcile your e-payment transactions. In Folder Path for new Intermediate Files, you can specify the default path where you want to save the new intermediate files before importing them to TallyPrime. In Folder Path for imported Intermediate Files, you can specify the default path where you want to save the intermediate files after export. |
SCB (India), HDFC Bank, Kotak Mahindra Bank, ICICI Bank, Bank of Baroda, RazorpayX (India), Axis Bank (India) |
| Folder Path for imported Intermediate Files |
Provide Bank Details in a Party Ledger
You need to provide mandatory bank details in the master in order to pass payment instructions, and to render the transactions ready for sending to bank. When the mandatory bank details are not provided in the master, the transaction gets listed under Transactions with incomplete information.
- Enable Provide bank details in the party Ledger Creation screen.
- Select the Transaction Type from the List of Transaction Types in the Bank Details screen.
- Enter all the necessary details for the transaction type that you have selected.
For example, if you select e-Fund Transfer, provide the A/c No., IFS Code, and Bank Name.Note: Depending on the transaction type or the bank you select, the fields change accordingly. For example, if you select Electronic Cheque as the transaction type for ICICI bank, only the print location field is displayed. However, if it is for DBS bank, the delivery mode and print location fields are displayed.
As in case of the party master, you can provide bank details in the employee masters and cost centre masters.Note: TallyPrime can now automatically detect a same bank transfer and inter bank transfer, depending on the bank details you have entered.
Bulk Import of Beneficiary Details
The bulk import feature in TallyPrime provides you with a great experience with banking, especially for e-payments. You can save the required bank details of your vendors or employees in one place, and easily import them to TallyPrime as an one-time activity.
Save Beneficiary Details in MS Excel
Use the MS Excel sample provided by TallyPrime to conveniently save all your beneficiary details. You can download the sample file from the import menu.
- Press Alt+O (Import) > Bank Details.
- Press Alt+B (Payee Sample file), if you want to download the Payee Sample file. Alternatively, if you want to download the Employee Sample file, then press Alt+H (Emp. Sample file).
The Exporting Sample File screen appears:
- Press E (Send) to save the sample file in your desired folder. If you want to change the folder path or other settings, then press C (Configure) before saving the file.
The sample file will open. Enter the details of your beneficiaries.
Note: Ensure that the Ledger Name in the MS Excel sheet matches the name of the ledger in TallyPrime.
A filled-in Payee Sample file will appear as shown below:

A filled-in Employee Sample file will appear as shown below:

Import Beneficiary Details to TallyPrime
Once the MS Excel file is ready with the beneficiary details, you can import it to TallyPrime.
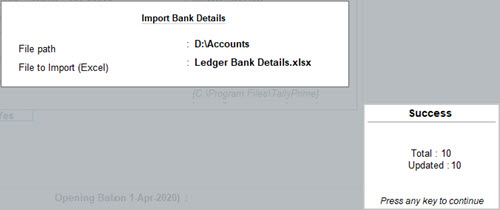
- Press Alt+O (Import)> Bank Details. The Import Bank Details screen opens.
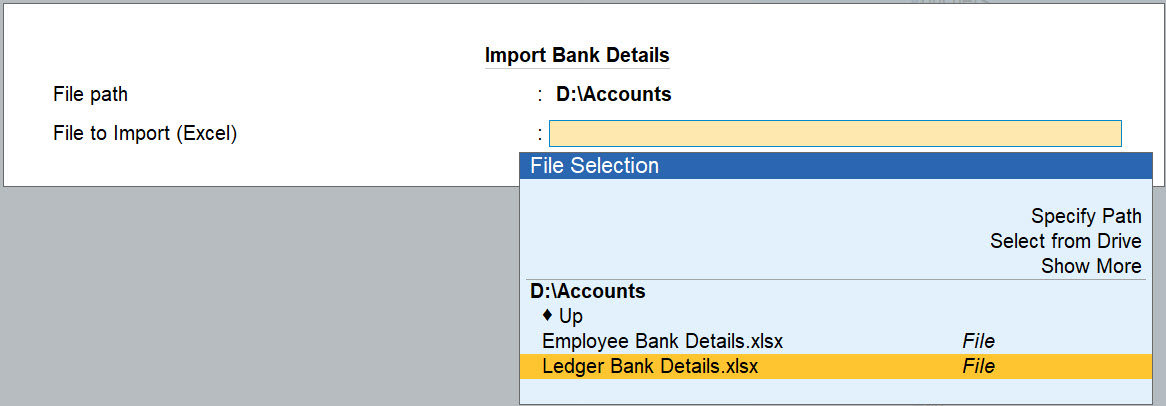
- Specify the File path and the File to Import (Excel).
- Press Enter to import the beneficiary details. The following success message will appear after import:
You can open the respective party/employee ledger if you want to verify the details:
- Gateway of Tally > Alter > type or select Ledger > press Enter.
Alternatively, Alt+G (Go To) > Alter Master > type or select Ledger > press Enter. - Set the option Provide bank details to Yes. The following screen appears:
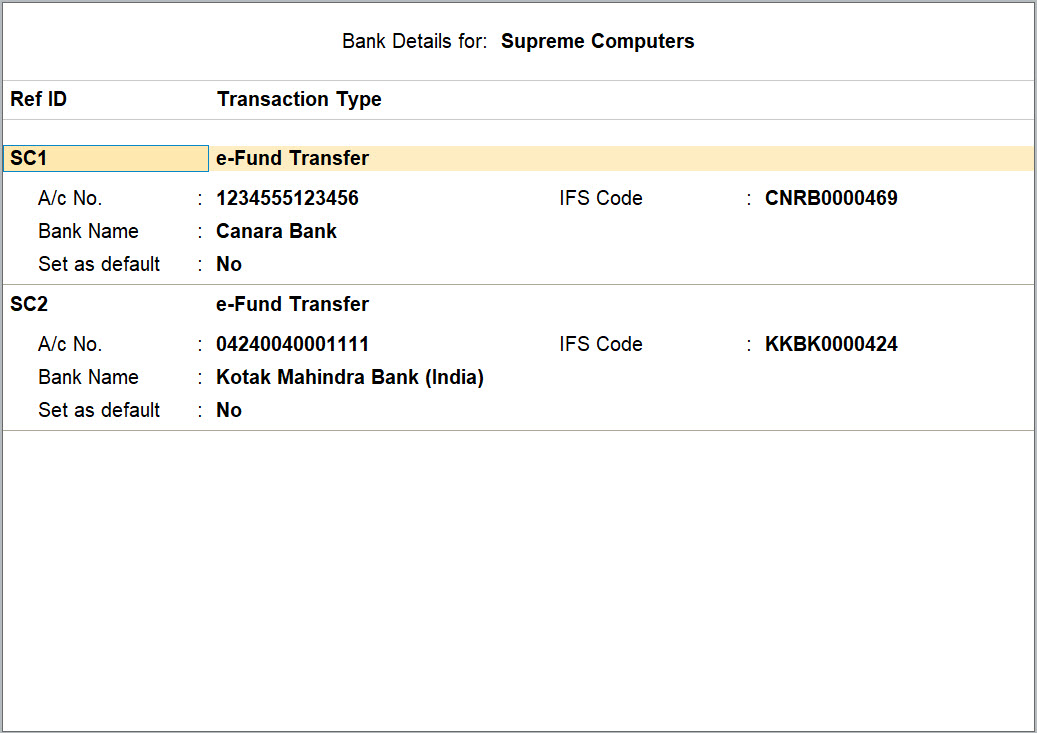
As shown in the screen above, the bank details for the ledger (Supreme Computers) is carried forward from the MS Excel file.
Enter Cheque Number and Cheque Range in Payment Voucher
Auto Cheque Numbering and Selection of Cheque Books during Bank allocation is supported in all Accounting Vouchers in TallyPrime. To know how to provide Cheque Range for auto cheque numbering, click here.
Payment Voucher is taken to explain these two features used for Cheque Management.
In this section
View payment voucher
- Gateway of Tally > Vouchers > press F5 (Payment).
Alternatively, Alt+G (Go To) > Create Voucher > press F5 (Payment).
To pass the Payment voucher in Single Entry or Double Entry mode, press Ctrl+H (Change Mode), and select the required Voucher Mode.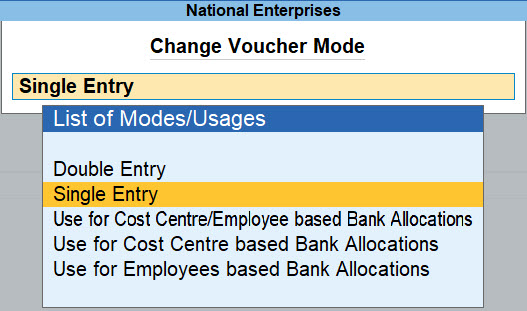
- To use Auto Cheque Numbering during Bank Allocation:
- In Accounting Voucher Creation screen, press F12 (Configure)
- Set Use Auto Cheque Numbering and Select Cheque Range as Yes.
Ensure that Use default Bank Allocations is set to No.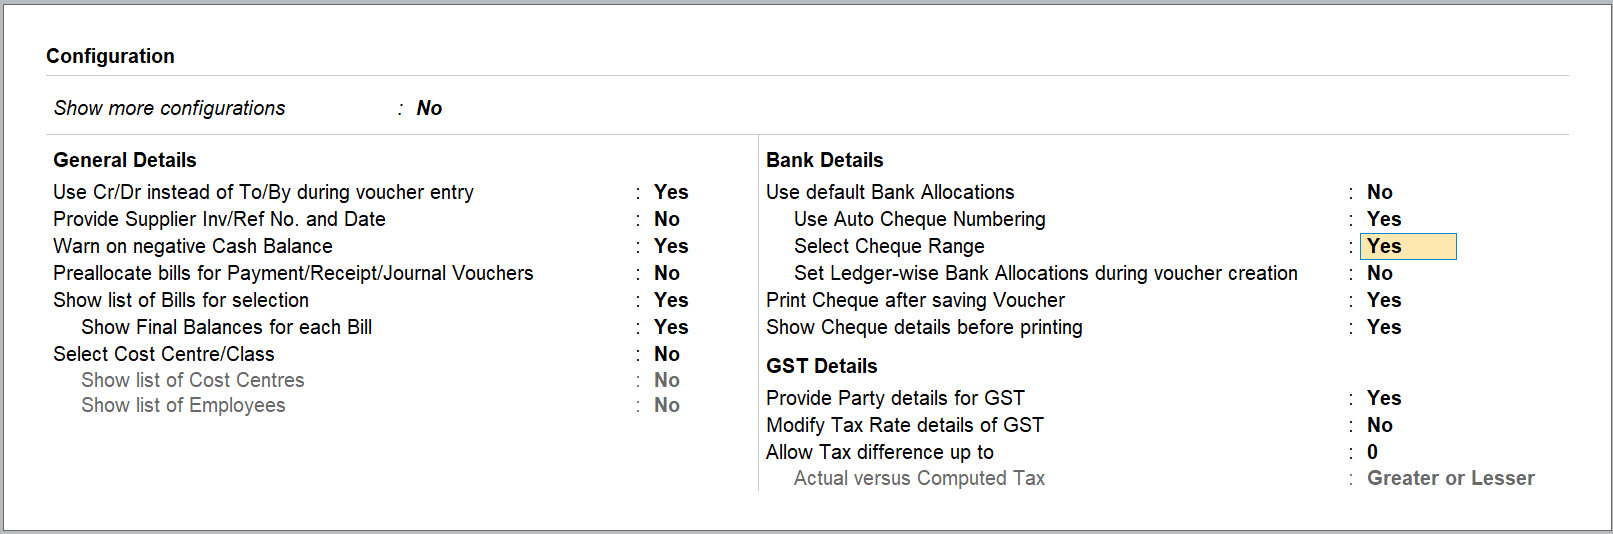
Record a Payment voucher for the following:
The Company settles a Creditor’s bill (Purchase) via Cheque. This entry can be passed in single entry mode where you will be crediting the Bank Ledger (for which Cheque Books has been configured) and debiting the Party Ledger, as shown:
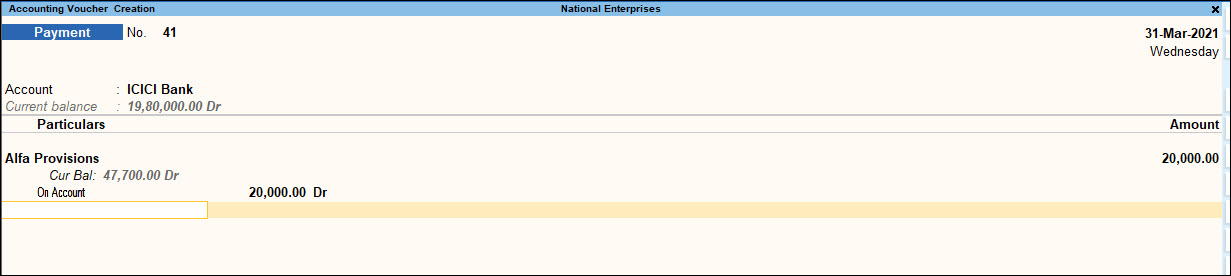
In the Bank Allocations screen
- The name will appear as defined in the Provide Bank Details during the ledger creation.
- The Ledger Name and Amount fields are prefilled on recording the Payment entry.
- The Transaction Type is set to Cheque by default. This can be changed in TallyPrime based on your requirement.
- For Transaction Type – Cheque:
- You can choose a Cheque range from the list of Cheque books defined for the bank, in the Cheque Ranges field.
- The Cheque Number will be automatically filled in the Inst No. field. User still has the option to manually change the Cheque Number, if required.
- If the Cheque number entered does not fall in the selected Cheque Range, the error The cheque number you entered, is not in the selected cheque range will appear, and the cursor will return to the Inst No. field.
Note: When you change the Transaction Type from Cheque to any other type in the voucher creation screen, the instrument number will be removed if a cheque range was used. The instrument number entered without using cheque range, will be retained. This applies to voucher alteration screen as well.
- Multiple allocations can be done in Bank Allocations screen as shown:
For each allocation, a different range can be chosen or the same cheque range can be chosen.
When the same range is chosen, the subsequent cheque numbers will be automatically
filled in Inst No. field.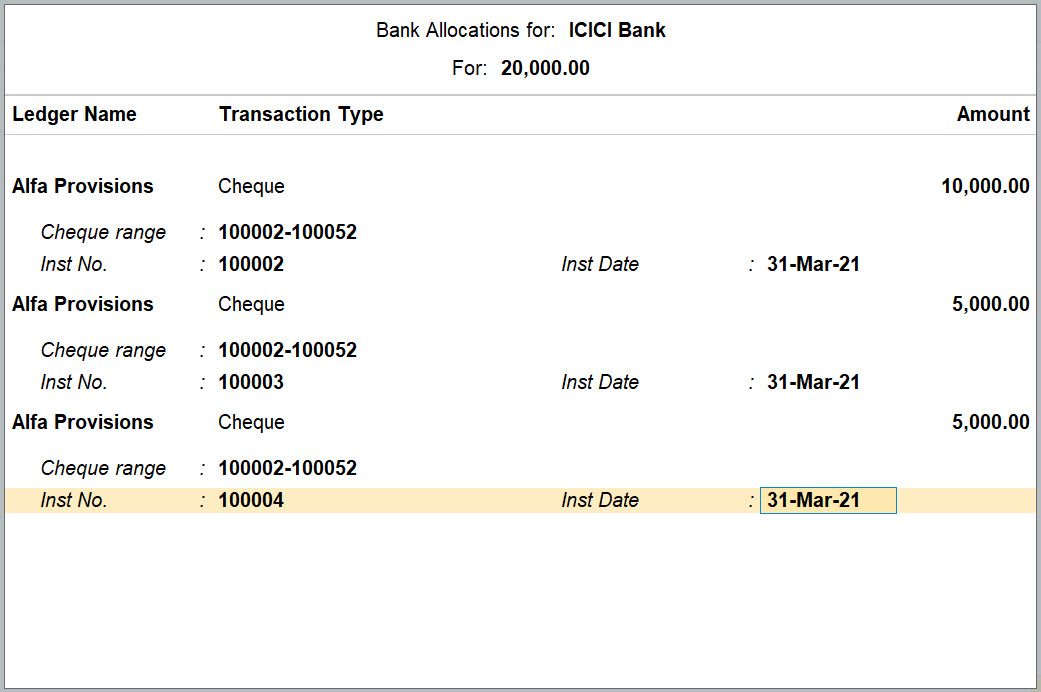
- Once Bank Allocations are done, As always, you can use Ctrl+A to accept.
If the Cheque Printing is enabled for the Bank, once the payment voucher is accepted, the Cheque Printing screen will appear.
- To print the cheque, press Enter.
- To print the cheque later, press Esc.
Secure access to Bank Allocations screen
To avoid mistakes in the Bank Allocation screen, and to have a better control over the operations in the bank transactions, security levels with restricted access to the bank allocations screen can be created.
To do this, in the Security Level screen, allow or disallow access to alter voucher bank allocations, as required.
To know more about assigning security levels, click here.
Cash Deposit Slip
Any cash received has to be deposited in the bank with relevant Cash Deposit Slip attached. You can generate cash deposit slip for depositing cash into a bank on any particular date. You can also print the Cash Deposit Slip Report for all the transactions for the selected period.
The Cash Deposit Slip option in the Banking menu is used to generate cash deposit slips, bank-wise.
The Cash Deposit Slip provided in TallyPrime has all the contents of cash deposit slip – Account Number, Account Holder Name, Bank Name, Branch Name (information is fetched automatically from Bank ledger), Company’s Telephone Number, (information is fetched automatically from Company Creation screen), and Cash Denomination Details (information is fetched automatically from Contra voucher), so that user will not have to manually enter all the details.
In this section
View Cash Deposit Slip Report
- Gateway of Tally > Banking > Deposit Slip.
Alternatively, Alt+G (Go To) > type or select Cash Deposit Slip and press Enter. - Select the required Bank account from the list for whose transaction you want to print Cash Deposit Slip and press Enter.
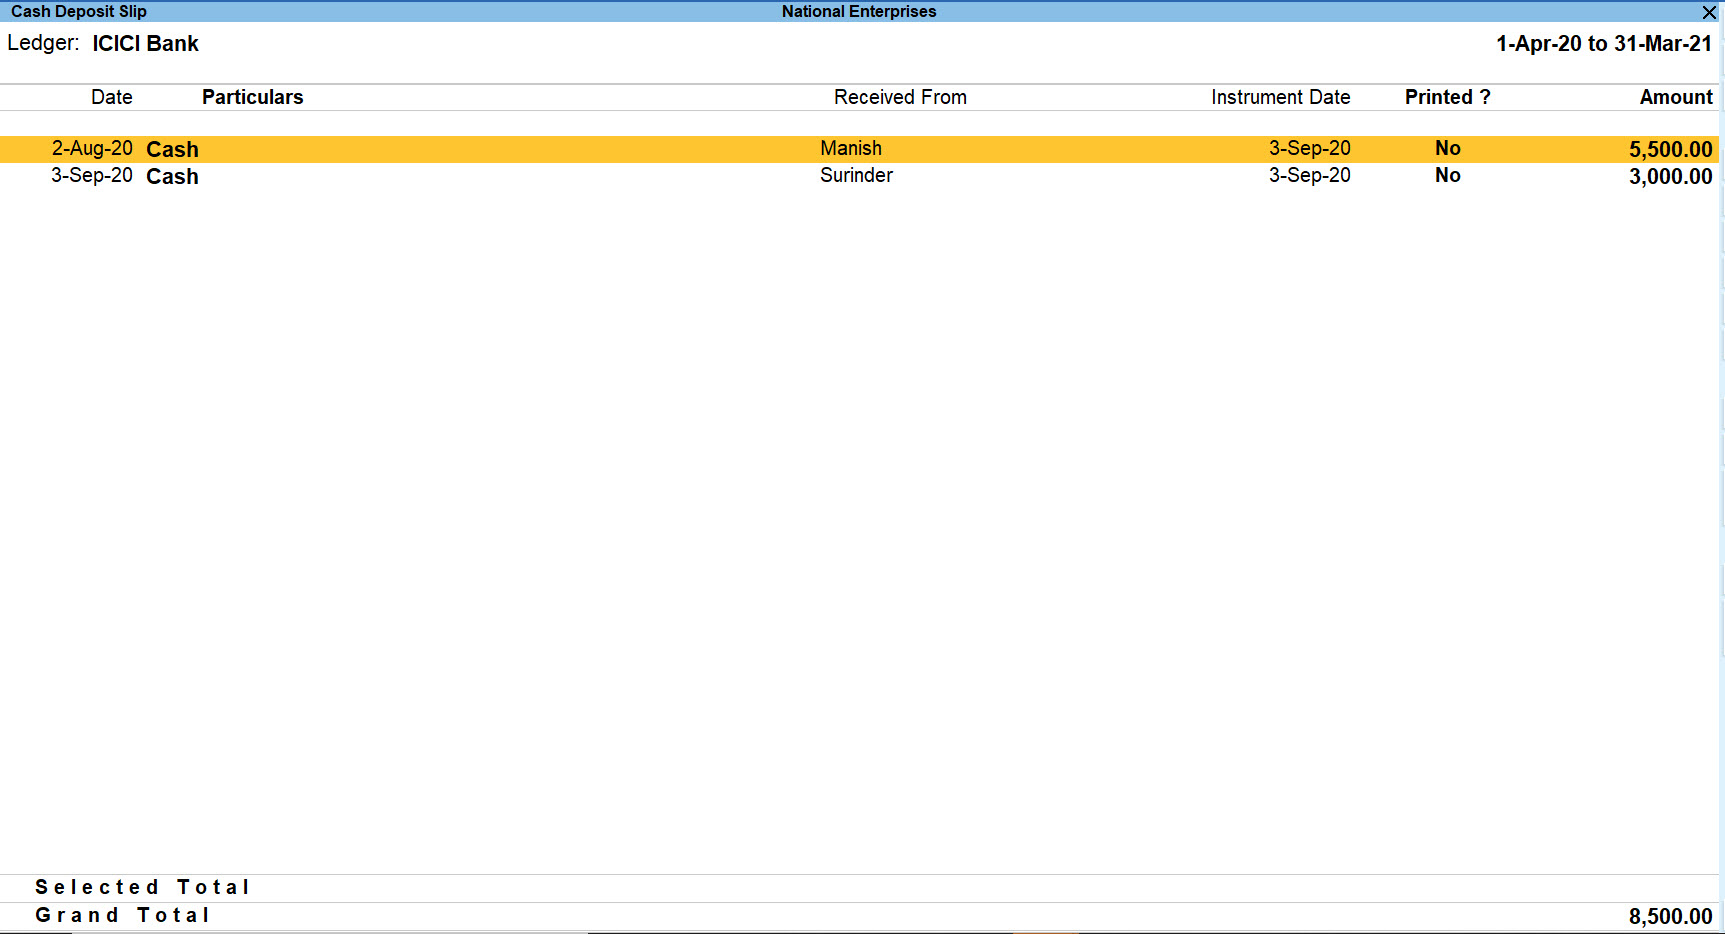
Note: The Cash Deposit Slip screen displays only those transactions which have Cash as Transaction Type allocated in the Bank Allocation screen in the Contra voucher entry.
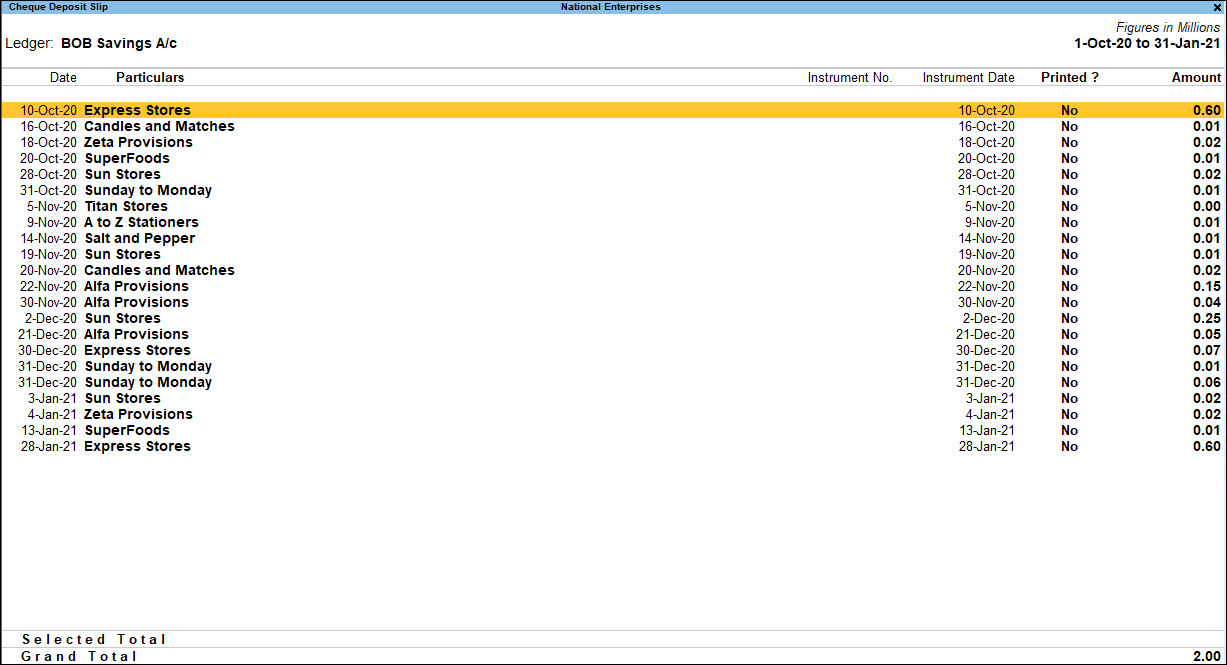
Cheque Deposit Slip
The Cheque Deposit Slip option in the Banking menu allows you to generate deposit slips for payments received through cheque or demand draft which need to be deposited into the bank. You can access, print and configure cheque deposit slips in TallyPrime, as required.
In this section
View Cheque Deposit Slip
- Gateway of Tally > Banking > Deposit Slip.
Alternatively, Alt+G (Go To) > type or select Cheque Deposit Slip and press Enter. - Select the required Bank account from the list for whose transaction you want to print Cheque Deposit Slip and press Enter.
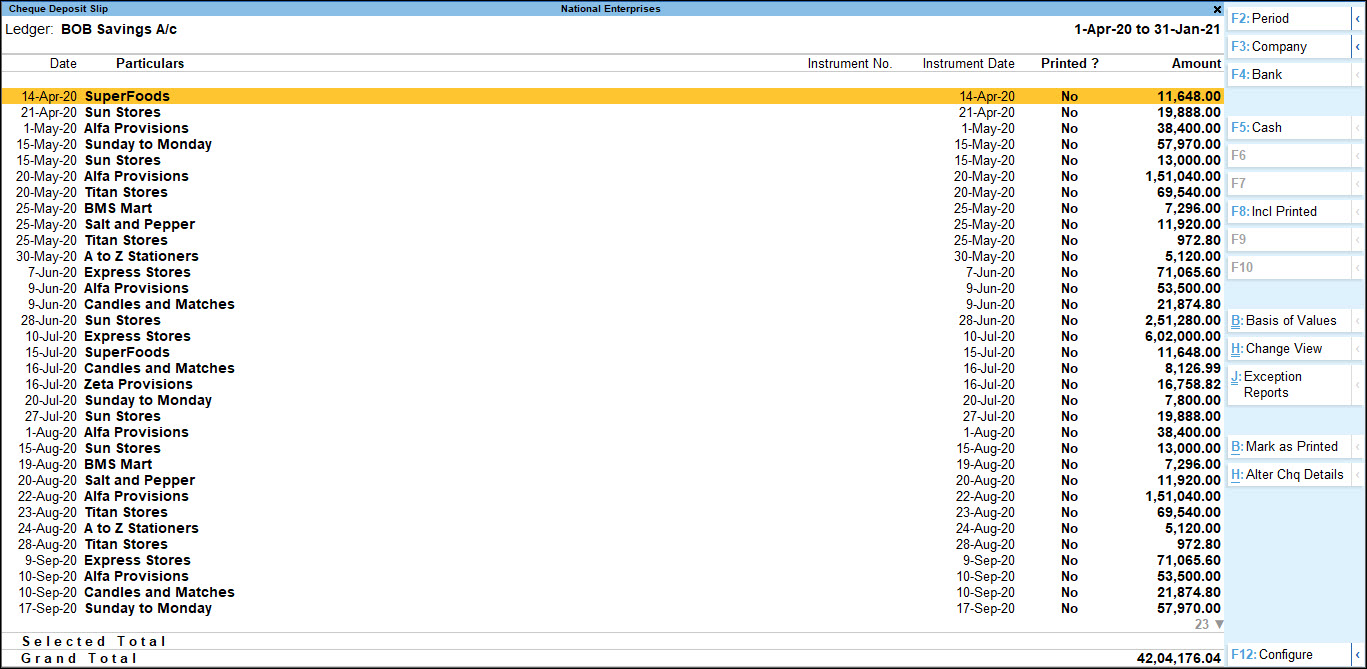
Note: The Cheque Deposit Slip screen displays only transactions which have Cheque/DD as Transaction type allocated in the Bank Allocation table in the receipt voucher entry.
- Select the required row from the Cheque Deposit Slip list, and press Enter to open the voucher in alteration mode.
Configure Deposit Slips
Filter Deposit Slip reports to view specific details
- Press F2 (Period): To view cash transactions for a particular period.
- Press F3 (Company):
- Press F4 (Bank): To select a bank and view the cash deposit slip details for the selected banks. This will reduce navigation time.
- Press F5 (Cheque/Cash): To view transactions for which Cheques/DDs have been received (for the same bank), and print Cheque Deposit Slip/Cash Deposit Slip for the same. Press F5 button key will toggle between for Cash or Cheque.
- Press F8 (Incl Printed) to view the list of deposit slips which are already printed. You can toggle between Incl Printed and Excl Printed by pressing F8.
Configure Deposit Slip reports
Ctrl+B (Basis of Values)
You can configure the values in your report for that instance, based on different business needs.
In the Cheque Deposit Slip report, you can display the amounts in reports in Millions or Hundreds. Press Ctrl+B (Basis of Values) > Scale Factor > select Millions. Press Esc to view the default values.
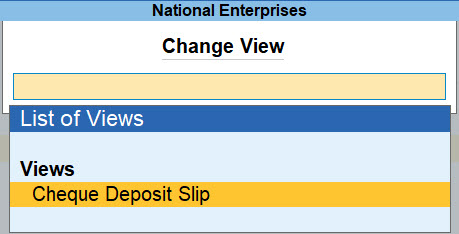
Ctrl+H (Change View)
You can display the details of a report in different views with additional details or for a specific period. You can also view other reports related to the current report.
To view the Cheque Deposit Slip for Cash Deposit Slip, press Ctrl+H (Change View) > type or select Cheque Deposit Slip > press Enter. Press Esc to view the default report.
Ctrl+J (Exception Reports)
You can view the exceptions related to the data displayed in the current report by pressing Ctrl+J (Exception Reports), without closing the report.
To view the Optional Vouchers for Cash Deposit Slip, press Ctrl+J (Exception Reports) > type or select Optional Vouchers > and press Enter. Press Esc to view the default report.
F12 (Configure)
To configure your report and view necessary details, based on your business requirements.
- Show Received From: Enable this option to view from whom the cash is received.
- Show Remarks: Enable this option to view the remarks entered in the Contra voucher. A Remarks column will appear in the Cash Deposit Slip screen. By default, this option is set to No.
- Display name for Ledgers: In the Cash Deposit Slip screen, you can choose the Display Style of the name under Particulars column; Alias (Name), Alias Only, Name (Alias) or Name Only, using this option.
- Show Base Currency: Enable this option to display the base currency in Cash Deposit Slip.
- Sorting Method: List of transactions can be sorted by user by selecting any of the Sorting Methods from the list. The transactions can be sorted in ascending or descending order TallyPrime on – Amount-wise, Date, Instrument Date, Instrument Number, Party-wise. By default, the transactions are sorted in ascending order TallyPrime on Date.
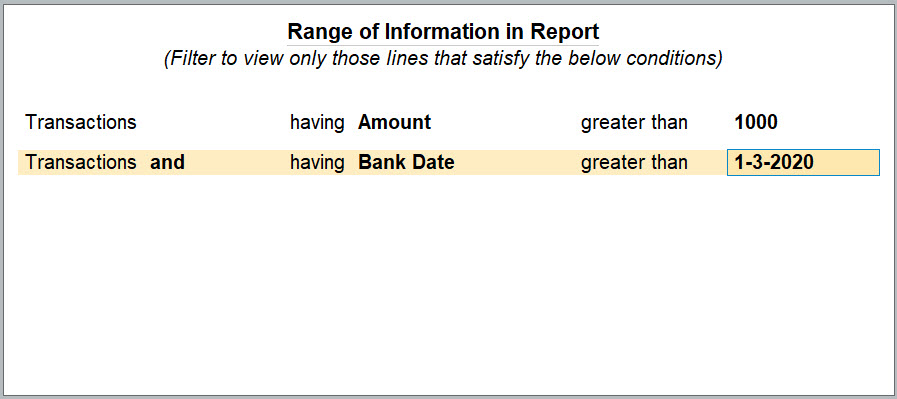
Alt+F12 (Range)
To filter the Cash Deposit Slip screen. You may filter the transactions TallyPrime on the Amount, Date, Bank Date, Instrument Date and so on as shown:
Note: Cash Deposit Slip can be printed for all or just selected transactions.
Print Deposit Slip Reports
As in the case of all reports, press Ctrl+P (Print) to print the current screen. Before printing your deposit slips, you can set the print configurations based on the details you want to print. For example:
- In case of Cash Deposit Slip, you can include the printed deposit slips. Set Print Cash Deposit Slip to Yes. Similarly, in case of Cheque Deposit Slip, you can print the bank or branch name. Set Show Bank/Branch name to Yes.
- Date of Print: The date that has to be printed on the Cash Deposit Slip has to be specified in this field. By default, the current system date is displayed. Usually, this date will be the date on which the actual deposit of the cash into the bank will be made.
- Show Telephone No.: Set this option to Yes to print the Company’s Telephone Number. The Telephone Number specified in the Company Creation screen will be captured.
- Show Mobile No.: Set this option to Yes to print the Company’s Mobile Number. The Telephone Number specified in the Company Creation screen will be captured.
- Show PAN/Income Tax No.: The PAN or IT Number specified in the F11 (Features). By default, this option is set to No.
In this section
- Print deposit slip with cash denomination
- Print Cash Deposit Slip report
- Print Cheque Deposit Slip report
Print deposit slip with cash denominations
- Ctrl+P (Print) > set all the necessary details and press Enter. This will display the screen to enter the Cash Denominations details. The cash denomination details can be specified for individual transaction, as shown.
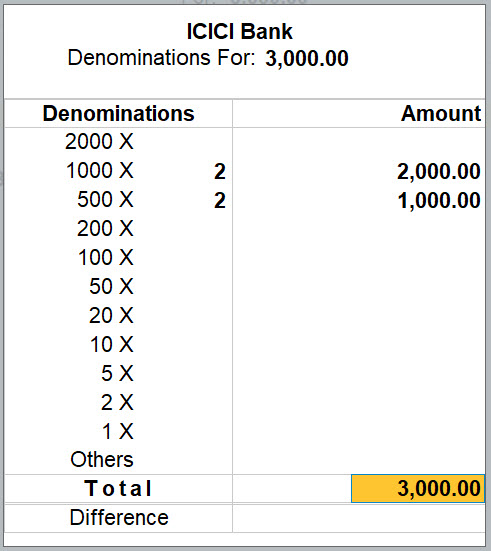
Note: By default, it will take the cash denominations specified in the Contra voucher. If the cash denominations are different during actual cash deposit in bank, press N or Esc and enter the cash denomination details.
- Press Enter to print the Cash Deposit Slip.
If A/c Holder Name is not mentioned in the Bank ledger master, then the name of the company as mentioned in the Company Creation screen will be printed as Account Holder Name of the Cash Deposit Slip.
When printing multiple cash deposit slip, the Cash Deposit Slip for the first transaction will be printed. For the next selected transaction, a new Cash Denomination details screen appears. you can specify the details and print the Cash Deposit Slip. Separate Cash Deposit Slip will be printed for all the selected transactions.
Note: If the option Print Consolidated Cash Deposit Slip is set to Yes, then a blank Cash Denomination details screen is displayed and a combined cash deposit slip is printed for all the transactions selected.


On filling in the details in this screen and pressing Enter at the end, a notification is displayed – Details entered here will not get updated in the vouchers.
- You can select required row from the Cash Deposit Slip list and press Enter to open the voucher in alteration mode.
Print Cash Deposit Slip report
- Gateway of Tally > Banking > Deposit Slip.
Alternatively, Alt+G (Go To) > type or select Cash Deposit Slip and press Enter. - Select the required Bank account from List of Bank.
- Press Ctrl+P. The Print screen for Cash Deposit Slip appears as shown below.

- Press Esc to set the other options as follows:
- Print Cash Deposit Slip: Set this option to Yes to print the Cash Deposit Slip report.
- Show consolidated Cash Deposit Slip: Enable this option, to print one consolidated Cash Deposit Slip for all selected transaction. By default, this is set to No.
- Date of Print: The date that has to be printed on the Cash Deposit Slip has to be specified in this field. By default, the current system date is displayed. Usually, this date will be the date on which the actual deposit of the cash into the bank will be made.
- Print Voucher Type/No.: Print the voucher type and number.
- Show Remarks: Enable this option to view the remarks entered in the Contra voucher. A Remarks column will appear in the Cash Deposit Slip screen. By default, this option is set to No.
- Press Enter to print the Cash Deposit Slip report.
Print Cheque Deposit Slip report
You can select All or the required receipts to be included in the Cheque Deposit Slip. The Cheque Deposit Slip report prints all the receipts for the selected period.
- Gateway of Tally > Banking > Deposit Slip.
Alternatively, Alt+G (Go To) > type or select Cheque Deposit Slip and press Enter. - Select the required bank account from List of Banks. The Cheque Deposit Slip screen appears displaying the list of receipts.
- To include all the receipts in the Cheque Deposit Slip, press Ctrl+P to Print.
- To include selected receipts in the Cheque Deposit Slip, press Spacebar on the required receipt rows, and press Ctrl+P to print.
The Print Cheque Deposit Slip screen appears.
Configuring Cheque Deposit Slip
- Press C (Configure) to set the other options as follows:
- Print Cheque Deposit Slip: By default, this option is set to Yes.
- Date of Print: By default, the system displays the current date. Specify the required date to be printed in the Cheque Deposit Slip.
- Top Margin (in Inches): Set the required space.
- Show Received From: Set this option to Yes to print the Received From details in the deposit slip.
- Show Telephone No.: Set this option to Yes to print the company’s telephone number.
- Show Mobile No: Set this option to Yes to print the company’s mobile number.
- Show PAN/Income Tax No.: By default, this option is set to Yes.
Note: The option Show Forex transactions only will skip when you are opting to print the Cheque Deposit Slip.
- Accept to print. The Cheque Deposit Slip appears as shown below:
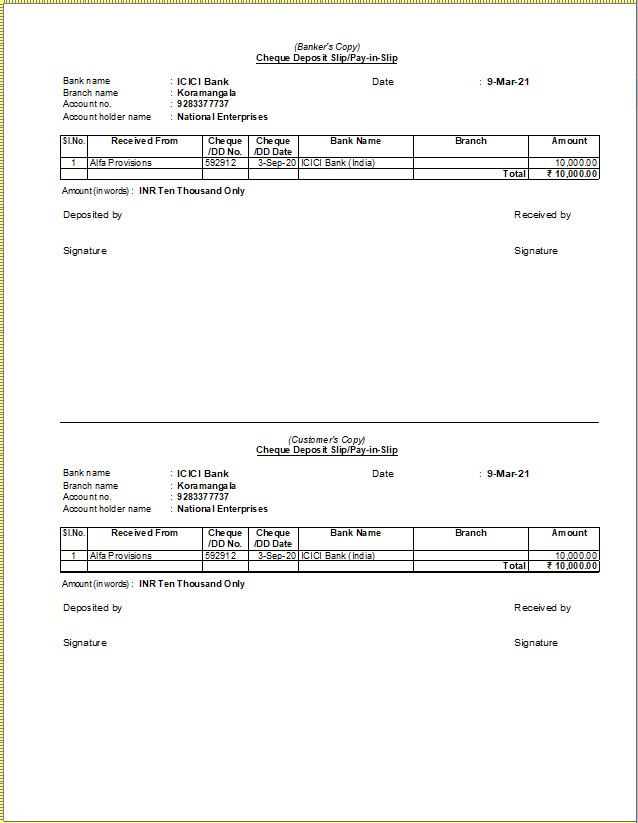
Similarly, you can set your printing preferences for the other configurations, while printing the cheque deposit slip.
Payment Advice
The Payment Advice option in the Banking menu is used to generate the payment advice to be sent to suppliers or other parties along with the cheques or other instruments.
In this section
- View Payment Advice
- Print the Payment Advice when a single ledger is selected
- Print each transaction or Payment Advice on a separate page
- Printing Payment Advice
View Payment Advice
- Gateway of Tally > Banking > Payment Advice.
Alternatively, Alt+G (Go To) > type or select Payment AdviceDid you find this article useful?