Reconcile Bank Books – An Overview
Reconciling the company’s bank books with the banker’s statement is a regular task of accounting. In TallyPrime, Reconciliation of Bank Books facilitates the following:
In this section
- Check correctness of reconciliation
- Recover reconciliation of any date
- Auto Bank Reconciliation
- Reconcile manually
Check correctness of reconciliation
TallyPrime uses Bank Date to mark the voucher. For instance, if a cheque is issued on 8th April and the bank clears it on 19th April, the Bank Date for the voucher can be set to 19th April. This means that when there is a need to check back later, whether the entry made is correct or not, the bank statement of 19th April needs to be viewed for verification.
Recover the reconciliation of any date
This is of crucial importance in Auditing. The Bank Reconciliation is one of the pre-requisites of auditing and verification of the correctness of accounts at the year end. However, it is not a real-time task, meaning auditors do not do it on the first day of the next year.
Note: For example, a reconciliation made on 31st March, should be viewable even in August, by when almost all the cheques would have subsequently been marked Reconciled. The Bank Reconciliation feature provides facilitates this also.
Bank accounts may have a different Starting Date for reconciliation purposes. When a bank account is created, user is prompted to give an Effective Date for Reconciliation. Normally, this would be the Books Beginning from date itself.
If the data is imported from a previous version of Tally or from any other system (where the reconciliation process was not available or was different), the reconciliation of bank account with the bank statements need to be done from the very beginning. To reconcile, give the date from which the reconciliation is to be done. Once this is done, entries made earlier than this date will not appear for reconciliation, but appears as a reconciled Opening Balance.
A quick experiment with Reconciliation will show what it all means.
- Bring up the monthly summary of any bank book.
(Choose a bank book from any of the following: Balance Sheet, Trial Balance or Display More Reports > Account Books > Cash/Bank Book(s). - Select the required Bank Account and press Enter.
- Bring the cursor to the first month (typically April), and press Enter. This brings up the vouchers for the month of April. Since this is a bank account, there is an additional button Alt+R (Reconcile) on the button bar, press Alt+R (Reconcile) to view Bank Reconciliation screen.
- The display goes to the Reconciliation mode, which can be edited. The primary component of the current screen is the column for Bank Date.
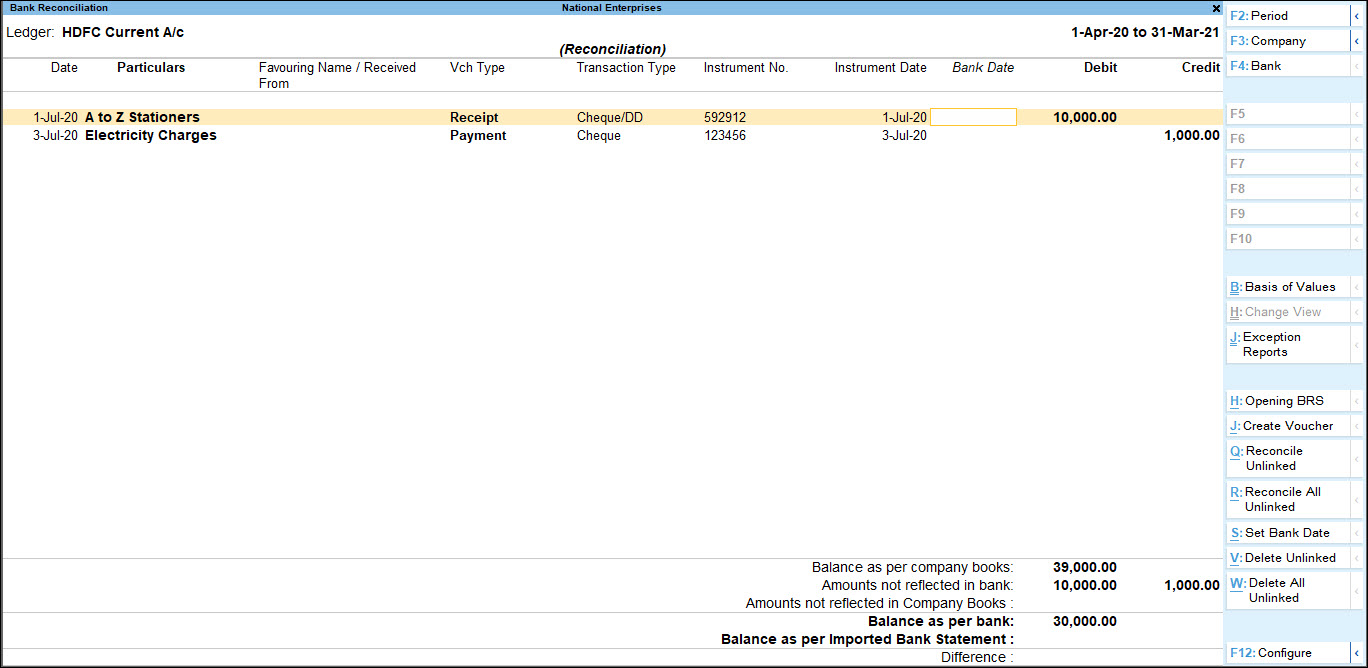
The Reconciliation found at the bottom of the screen shows:- The Balance as per company books reflects the balance as on the last date (in the example, it is 30th April).
- The Amount not reflected in bank are the debit and credit sums of all those vouchers, whose Bank Date is either BLANK, or LATER than 30-Apr (i.e. these vouchers have not yet been reflected in the bank statement).
- The Amount not reflected in Company Books are entries which are present in the bank statement but are not recorded in company’s books.
- The Balance as per bank is the net effect of the Book Balance offset by the amounts not reflected in the Bank – which must be equal to the balance in the bank statement.
- The Balance as per Imported Bank Statement refers to the balance displayed on importing the bank statement for reconciliation.
- The Difference in Bank Balance (difference in Balance as per Bank and Balance as per Imported Bank Statement) will be shown here.
Note: Some discrepancies may persist due to entries made in the bank statement, which may not have been entered in the books of accounts.
Auto Bank Reconciliation
For banks enabled with the feature of auto reconciliation in ledger master, the buttons:
- Alt+Q (Reconcile Unlinked) and Alt+R (Reconcile All Unlinked) appear on the right side button bar.
- Alt+V (Delete Unlinked) and Alt+W (Delete All Unlinked) appears on the button bar above Info Panel.
Since e-Banking is enabled for many banks, Import and View Bank Statements options will get enabled only if these banks are predefined for auto reconciliation while creating or altering the Bank Ledger.
Note: Download the bank statement and save it in a separate folder. In case where the savings/current accounts are maintained in multiple banks, the downloaded bank statement have to be saved in separate folders. This will ensure proper import of data in the supported format for reconciliation of data present in bank statement and the company’s books of accounts.
The Excel, MT940 or .CSV files can be imported using Alt+O (Import) > Bank Statement.
The Bank Statement File screen displays the Directory which was specified as the Location of Bank Statements in Bank Ledger > Set/alter auto BRS configuration.
Select the File Type as per the bank statement format.
Press Alt+H (Show Imported) to view the bank statements which are already imported. You can select and re-import the statements. The files will be listed in alphabetical order with details of file type and import status (showing whether it is already imported or not).
The Bank Statement which would be imported can be previewed using Alt+B (With View) and then imported using Alt+O (Import). It can also be imported even before generating the preview. Users must ensure that the bank statements being imported haven’t been edited or altered in any way. If any changes are made, the error message – Not a valid format will be displayed while importing the statement.
During import, the Import progress bar gets displayed followed by the Success message with Count of Total Entries in bank Statement, transactions Reconciled and Additional Bank Entries. The imported statements can be hidden from the list of files displayed for selection using
After import, bank dates will get filled in Bank Dates field automatically in Bank Reconciliation statement.
The transactions which have been executed at the bank’s end (example, bank charges, interest credit etc.) but not yet reflected in the books of accounts will appear under the Amount Not Reflected in Company Books.
The unlinked transactions can be reconciled to existing transactions or new vouchers can be created to link it (to create vouchers press Alt+J using this information or delete them.
Note: It is suggested to save the Bank Reconciliation before reconciling the Unlinked Transactions to avoid mistakes.
Reconcile manually
As the individual vouchers are marked for reconciliation by setting the Bank Date, the Reconciled value at the bottom of the screen keeps updating the changes.
Set Allow back dated Reconciliation to Yes to enter bank dates which are lesser than the Voucher date.
Once this reconciliation process is complete, accept the screen. As always, you can press Ctrl+A to save.
Press Ctrl+P to print your Bank Reconciliation report.
Auto Bank Reconciliation
You need to enable the option provided for auto bank reconciliation in the bank ledger to reconcile the transactions made with that bank.
In this section
- Enable auto reconciliation in bank ledger
- Auto Reconciliation of the Bank Statement with the Company Books
Enable auto reconciliation in bank ledger
- Open the bank ledger, if it already exists. Alternatively create a bank ledger.
- Set the option Enable auto reconciliation? to Yes .
- Enable the option Set/alter auto BRS configuration? as shown below:
The Location of bank statements screen appears. Enter the details as shown below:
- In the above screen,
- Enter the Location of new bank statements downloaded from your bank account to your local system.
- Enter the Location of imported bank statements where the output file generated after importing the bank statement in TallyPrime has to be saved.
Note: Once the downloaded file is imported, the same gets deleted from the Location path and creates another file suffixed with imp in the Location of imported bank statements path.
- Press Enter to return to the Ledger Creation screen.
- Press Ctrl+A to accept.
Auto Reconciliation of the Bank Statement with the Company Books
- Go to Gateway of Tally > Banking > Bank Reconciliation.
- Select the required ledger from the List of Bank Ledgers as shown below:
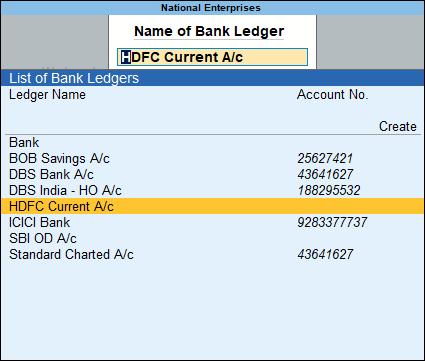
Note: The List of Bank Ledgers displays only those banks for which the auto bank reconciliation option is enabled.
The Bank Reconciliation screen for the selected bank appears as shown below:
- Click Alt+O (Import) > Bank Statement to import the bank statement.
- Select the File Name (bank statement downloaded from the bank) in the Import Bank Statement screen, as shown below:
Note: If you want to change the File Type, press Backspace to make the required selection as shown below:
- Press Enter. A confirmation message with the Total Entries in Bank Statement, number of Reconciled transactions, and Additional Bank Entries appears as shown below:

- Press any key to view the Bank Reconciliation screen with the reconciled and additional transactions.
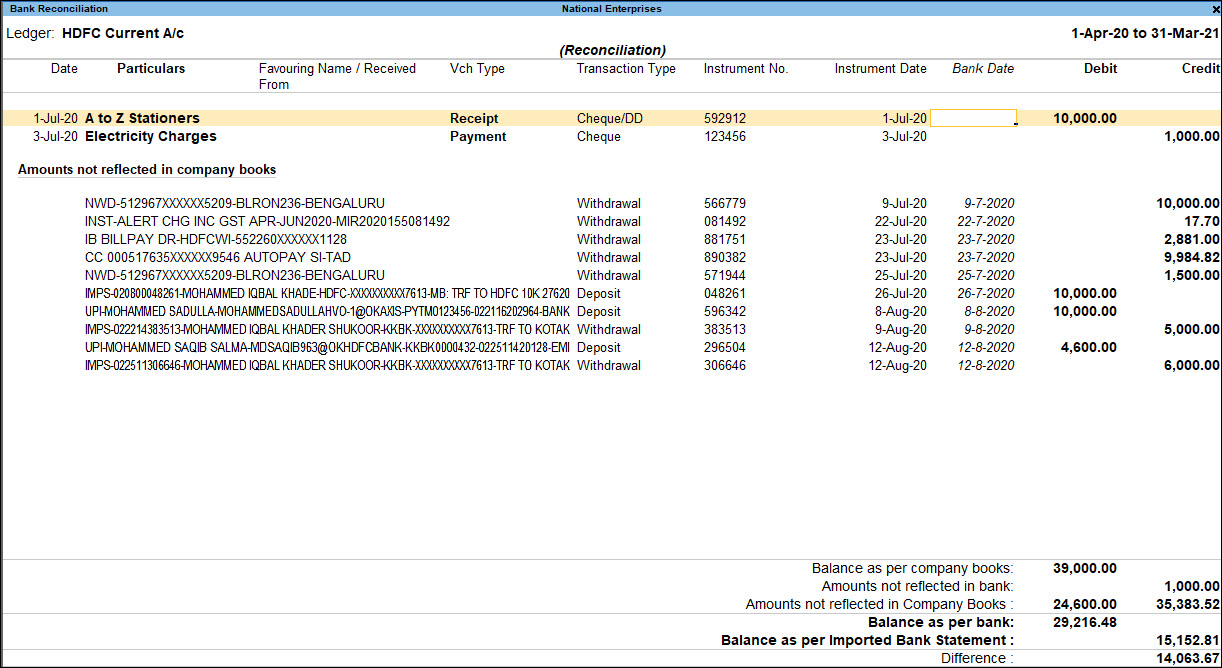
On importing the bank statement, the Bank Date appears for the reconciled transactions. The additional entries present in the bank statement appear under Amounts not Reflected in Company Books, as shown below:
Reconciliation of Transactions not Reflected in Company Books
Transactions not reflected in company books can be reconciled by clicking R : Reconcile Unlinked or C : Create Voucher .
Reconcile Unlinked
- Select the required transaction and click R : Reconcile Unlinked , as shown below:
The Unreconciled Amounts screen appears, displaying all the transactions for which auto reconciliation has not been done.
- Select the required transaction and press Enter . The selected transaction under Amounts not Reflected in Company Books and the transaction chosen from Unreconciled Amounts will get reconciled as shown below:
Create Voucher
You can create entries for bank charges which appear in the bank statement but not in the company books, from the Bank Reconciliation screen.
- Select the required transaction, and press Alt+J (Create Voucher).
The voucher creation screen appears.
- The amount and narration appear automatically with details captured from the bank statement.
- Select the required ledger.
- The instrument number from the bank statement is automatically captured in the Bank Allocations screen.
- Press Enter to accept.
Manual Bank Reconciliation
The Bank Reconciliation option in the Banking menu enables you to reconcile bank accounts. You can access bank reconciliation to print or configure the reconciliation statements, according to your requirements.
With Bank Reconciliation, you can:
- Create vouchers from the Bank Reconciliation screen itself.
- Provide opening BRS for unreconciled transactions.
- Alter the voucher by selecting the required transaction from the Bank Reconciliation screen.
- Filter the report to display transactions based on Amount, Bank Date, Instrument No, Instrument Date, Party ledger, and so on.
In this section
- Access Bank Reconciliation
- Button Options in Bank Reconciliation screen
- Configure Bank Reconciliation screen
- Print Bank Reconciliation Statement
- Alter Reconciled Voucher
Access Bank Reconciliation
- Gateway of Tally > Banking > Bank Reconciliation > and press Enter.
Alternatively, Alt+G (Go To) > type or select Bank Reconciliation > and press Enter. - Select the required Bank account from the List of Bank Ledgers and press Enter. The Bank Reconciliation screen of the selected Bank appears. By default the details in the Bank Reconciliation screen are sorted based on Bank Date (if bank date is already specified for the transaction). Or else, such sorting will be based on the Instrument Date.
Note: The Bank Reconciliation screen can also be accessed from Gateway of Tally > Display More Reports > Accounts Books > Cash/Bank Book(s) > Select Bank Ledger > Select a month > press Alt+R (Reconcile). By default, the screen displays the period range from date specified in the Effective Date for Reconciliation in the Bank ledger master till the date of last entry. The Bank Date has be to be provided based on the Instrument Date and not on Voucher Date.
Button options in Bank Reconciliation screen
- F2 (Period): To specify a period for which the Bank Reconciliation screen is to be displayed.
- F3 (Company): Set this option to yes, if required to change the company from Reconciliation screen.
- F4 (Bank): To select the bank ledger for which the Bank Reconciliation screen is to be displayed.
- Ctrl+B (Basis of Values): To configure the report values based on your business needs. For example, in the Bank Reconciliation report, you can view the report values by including reconciled transactions along with the default details. Press Ctrl+B (Basis of Values) > set Include Reconciled transactions to Yes.
- Ctrl+H (Change View): You can display the details of a report in different views with additional details or for a specific period. You can also view other reports related to the current report.
- Ctrl+J (Exception Reports): You can view the exceptions related to the data displayed in the current report by pressing Ctrl+J (Exception Reports), without closing the report.
To view the Negative Stock, press Ctrl+J (Exception Reports) > type or select Negative Stock Items > and press Enter. Press Esc to view the default report. - Press Alt+H (Opening BRS): To provide opening BRS to the unreconciled transactions. The Opening Bank Allocations screen for the selected Bank appears.
- Provide the unreconciled transaction details based on the nature of transactions (Deposit/Withdrawal) as shown:
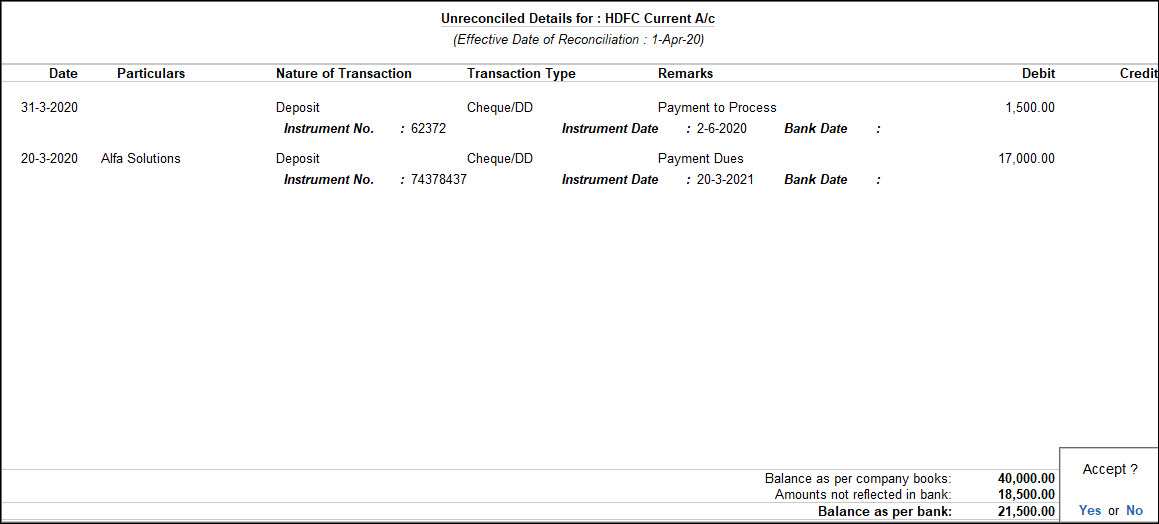
- Accept the screen. As always, you can press Ctrl+A to save. The Bank Reconciliation screen with opening BRS appears.
Note: When the company data is split, the unreconciled transactions will automatically get updated in the Opening BRS details. You can remove those details, if required.
- Provide the date of the realised transactions (the amount reflecting in the bank passbook) in the Bank Date field provided.
- Press Ctrl+Enter on the required transaction row to open the voucher in alteration mode.
- Press Alt+Enter from Bank Date field on required transactions to view the Voucher Display screen.
- Press Alt+J (Create Voucher): To create a voucher from the Bank Reconciliation screen itself.
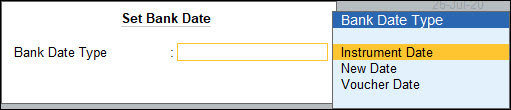
- Press Alt+S (Set Bank Date): To set a bank date for all the transactions for reconciliation, press Alt+S. The Set Bank Date sub-screen appears as shown:
-
- Instrument Date: On selecting Instrument Date as the Bank Date Type, the Bank Date field for all the transactions in the Bank Reconciliation screen is filled with the instrument date entered for that transaction in the Bank Allocations screen.
- New Date: On selecting New Date as the Bank Date Type, a new field Date appears in the Set Bank Date sub-screen.

-
- Specify the required bank date that is to be filled for all the transactions in the Bank Reconciliation screen.
- Voucher Date: On selecting Voucher Date as the Bank Date Type, the Bank Date field for all the transactions in the Bank Reconciliation screen is filled with the Date of Voucher.
- Press Alt+F12 (Range): Allows to filter the Bank Reconciliation screen. The user may filter the transactions based on the Amount, Bank Date, Date, Favouring Name, and so on.
Configure Bank Reconciliation screen
You can configure the Bank Reconciliation screen based on his requirement. Press F12 (Configure). The Configuration screen appears as follows:
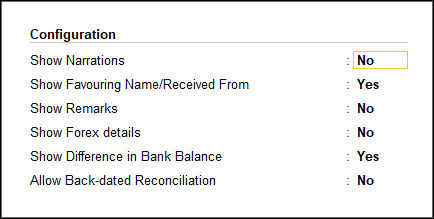
- Show Narrations: Set this option to Yes to display the narration in the Bank Reconciliation screen.
- Show Favouring Name/Received From: Set this option to Yes to display the Payment Favouring/Received From details in the Bank Reconciliation screen.
Note: The Favouring Name column displays only those names which are different from the Party/Ledger account names. - Show Remarks: Set this option to Yes to display the remarks in the Bank Reconciliation screen.
The Bank Reconciliation screen with Narration, Remarks and Payment Favouring/Received From details is displayed. - Show Forex details: Set this option to Yes to display the forex details also in the report.
Note: The options Show Forex details appear only in case multiple currencies feature is enabled for the company.
- Show Difference in Bank Balance: Set this option to Yes to display the difference of balance as per balance as per bank and balance as per imported bank statement.
- Allow Back-dated Reconciliation: Set this option to Yes to allow reconciling back dated transactions also.
Print Bank Reconciliation Statement
You can print the Bank Reconciliation statement for the required Bank.
- Gateway of Tally > Banking > Bank Reconciliation > and press Enter.
Alternatively, Alt+G (Go To) > type or select Bank Reconciliation > and press Enter. - Select the required Bank account from List of Bank Ledgers.
- The Bank Reconciliation screen is displayed.
- Press Ctrl+P. The Print Report screen appears.

- Press C (Configure) to set the following options:
- Show Narrations: Set this option to Yes to display the narration in the report.
- Show Favouring Name/Received From: Set this option to Yes to display the Payment Favouring/Received From details in the report.
- Show Remarks: Set this option to Yes to display the remarks in the report.
- Show Forex details: Set this option to Yes to display the forex details in the report.
- Type of Voucher entries: By default this is selected as All Vouchers, select the required option from the Ledger Entries list.
- Include Reconciled transactions: Set this option to Yes to display the reconciled transactions also in the report.
- Show all Unreconciled transactions till date: Set this option to Yes to display all the Unreconciled Transactions till the given date, irrespective of the From date set in the Bank Reconciliation Statement.
- Allow Back-dated Reconciliation: Set this option to Yes to allow reconciling back dated transactions also.
- Press Esc to return to print screen, Press P (Print) to Print or I (Preview) to view the print preview.
Alter reconciled vouchers
In some cases users may alter the reconciled vouchers by changing/splitting the amount, in such cases TallyPrime will display the message asking the confirmation to continue with the alteration. Users can later a reconciled voucher from Day Book, Bank Conciliation or from voucher reports.
Here National Enterprises is altering the voucher dated 1-7-2020 (already reconciled) where the company has issued the cheque for Rs. 10,000 to A to Z Computers.
Note: To alter a voucher from Bank Reconciliation report, from Bank Date field press Ctrl+Enter.
The amount of 10000 has been split into 6000 & 4000. On saving this voucher TallyPrime displays the message indicating the reconciled voucher is altered and bank balance in BRS will not Match, hence Bank Date will be removed.
Reconcile Transactions
You can import the bank statement for all the transactions you have made and reconcile them with your book of accounts.
View Bank Reconciliation report
The Auto Bank Reconciliation option helps to view bank statements, import bank statements, and reconcile transactions.
- Gateway of Tally > Banking > Bank Reconciliation > and press Enter.
Alternatively, Alt+G (Go To) > type or select Bank Reconciliation > and press Enter. - Select the bank. The Bank Reconciliation screen appears.
Note: Valid TSS and internet connectivity are required for performing auto reconciliation. The facility to import and view bank statements will be available only for banks enabled with auto reconciliation feature in bank ledger.
Import Bank Statement
The bank statement can be imported for bank reconciliation. Depending on the bank that is selected, the supported formats will appear, for example, Excel, MT940 and .CSV.
- Gateway of Tally > Banking > Bank Reconciliation > and press Enter.
- Alternatively, Alt+G (Go To) > type or select Bank Reconciliation > and press Enter.
- Select the required bank.
- Press Alt+O (Import) > and select Bank Statement.
The Select File screen appears, as shown: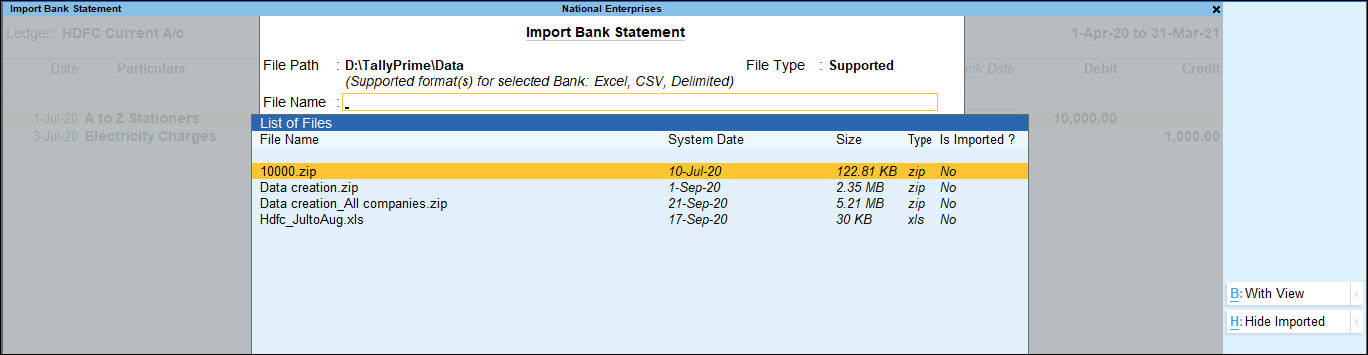
The Select File screen displays the Directory which is specified as the Location of new bank statement files in F12 (Configuration) > Banking Configuration. - Select the required file format in File Type field. Based on the format selected the bank statements are displayed under List of Files.
- Select the file to be viewed.
- Press Alt+B (With View). The Bank Statement appears as shown below:

- Press Esc if you do not intend to import the bank statement.
- Press Alt+H (Import) to import the bank statement.
The import progress bar is displayed followed by the Success message with count of Total Entries in Bank Statement, Reconciled transactions and Additional Bank Entries. The Bank Statement appears as shown below: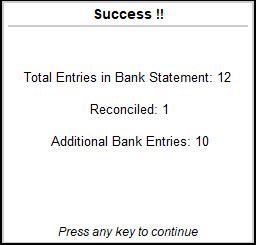
Note: Ensure that the bank statements which is being imported is not edited or altered. If any changes are made, the error message Not a valid format will be displayed while importing the statement.
- Press any key.
After importing the bank statement, the bank dates are filled in the Bank Date column automatically in the Bank Reconciliation screen. - Press F12 (Configure) from the Bank Reconciliation screen. Set Show Difference in Bank Balance to Yes.
- Accept the Configuration screen.
The Bank Reconciliation screen with imported bank statement details appears as shown below: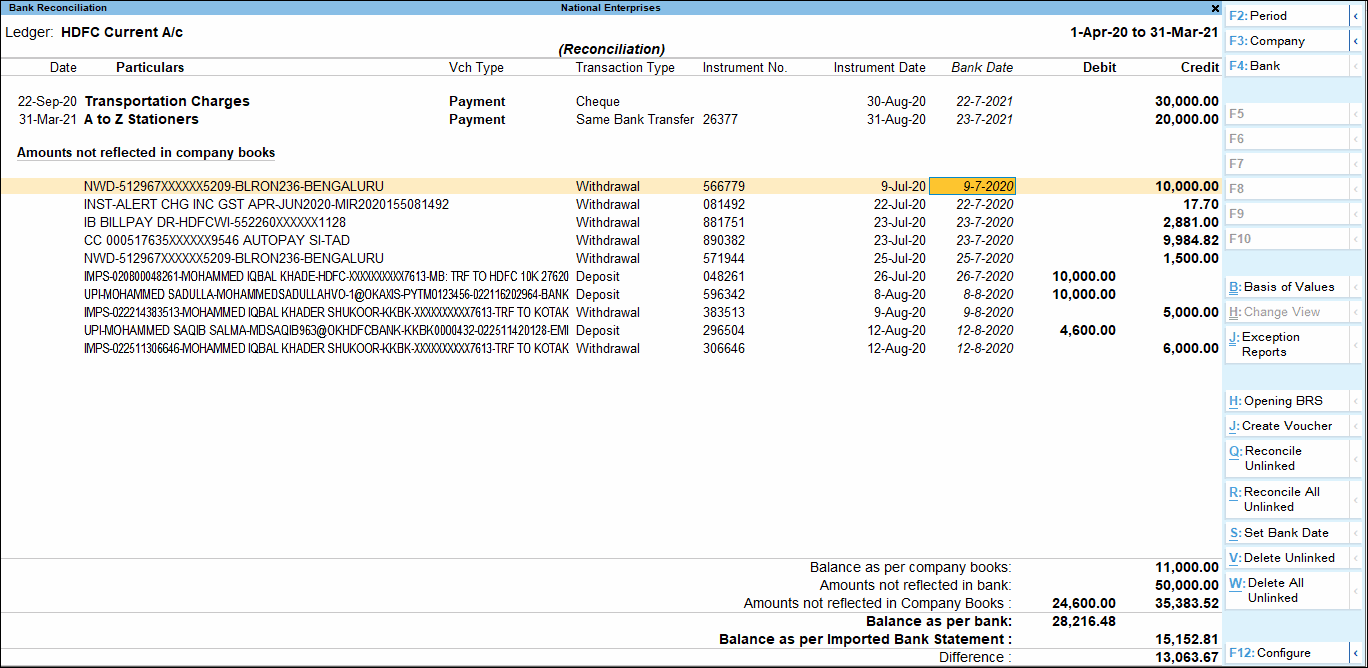
There may be transactions which have been executed at the bank’s end (for example, bank charges, interest credit, and so on) but not yet reflected in the books of accounts. The details of such transactions will appear under the Amount Not Reflected in Company Books in Bank Reconciliation screen. You can reconcile them with existing transactions or create new vouchers.
Note: To avoid errors, save the Bank Reconciliation before reconciling the unlinked transactions.
The reconciliation details at the bottom of the screen displays:
- Balance as per Company Books: The balance as per company books, as on the last date is displayed.
- Amounts not reflected in bank: The debit and credit sums of all those vouchers, whose bank date is either blank or later than the defined period is displayed. (I.e. these vouchers are not reflected in the bank statement).
- Amount not reflected in Company Books: The total value of the entries which are present in the bank statement but are not recorded in company’s books is displayed.
- Balance as per Bank: The net value of the book balance offset by the amounts not reflected in the bank is displayed. This should be equal to the balance in the bank statement unless there are some discrepancies.
- Balance as per imported Bank statement: The Balance as per Imported Bank Statement refers to the balance displayed on importing the bank statement for reconciliation.
- Difference: The Difference in Bank Balance (difference in Balance as per Bank and Balance as per Imported Bank Statement) will be shown here.
Note: Some discrepancies may persist due to entries made in the bank statement, which may not have been entered in the books of accounts.
Reconcile the unlinked transactions one-by-one, with existing transactions
- In the Bank Reconciliation screen, select the transaction to be reconciled displayed under Amount Not Reflected in Company Books.
- Press Alt+Q (Reconcile Unlinked).
The transaction(s) from the company books matching the unlinked transaction amount are displayed for selection in the Unreconciled Transactions screen. - Select the appropriate transaction using spacebar.
- Press Enter.
- The status Reconciled Successfully is displayed.
Reconcile all unlinked transaction in one-go
You can reconcile transactions from the imported bank statement and the company’s book from a single screen in one-go. The transactions need not be matched manually.
- Press Alt+R (Reconcile All Unlinked). The Unreconciled Transactions screen appears as shown below:
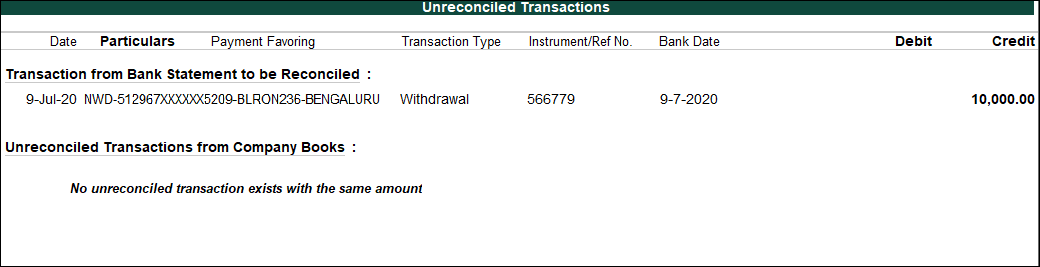
The Unreconciled Transactions screen displays the matching transactions. The amount not reconciled in the bank statement is displayed under Transaction from Bank Statements to be Reconciled. - Press Enter to link the selected transaction and to reconcile.
- The status Reconciled Successfully is displayed.
- Press [Esc] to skip the current transaction and proceed to the next for reconciliation.
- Press S: Stop to stop the reconciliation process.
If there are no matching transactions, the values pending for reconciliation is displayed under Transaction from Bank Statements to be Reconciled section.
In case, there are no transaction to link, a message No unreconciled transaction exists with same amount is displayed as in the image shown under step 1.
Reconcile the unlinked transactions by creating new vouchers
- In the Bank Reconciliation screen, select the transaction to be reconciled displayed under Amount Not Reflected in Company Books.
- Press Alt+J (Create Voucher). The Voucher Creation screen appears.
- Enter and accept the transaction according to the transaction displayed in the Amount Not Reflected in Company Books section.
The details displayed under the Amount Not Reflected in Company Books section is removed indicating that the corresponding entry is found in the books of accounts.
Note: Payment/receipt/journal voucher can be created to account for the entries that are not reflected in company books.
Re-import the Bank Statement
While selecting the bank statement for importing, all the statement including the ones which is already imported is displayed. To hide the already imported statement:
- Press Alt+I (Import) > Bank Statement from the Bank Reconciliation screen. The Select File screen appears as shown.
- Press Alt+H (Hide Imported) to display only the statement which is not yet imported.
The Alt+H is a toggle button which can also be used to Show Imported statements.
If an attempt is made to re-import the bank statement, a message Bank Statement already imported. Continue? is displayed as shown below:
Remove Opening BRS After Splitting the Company Data
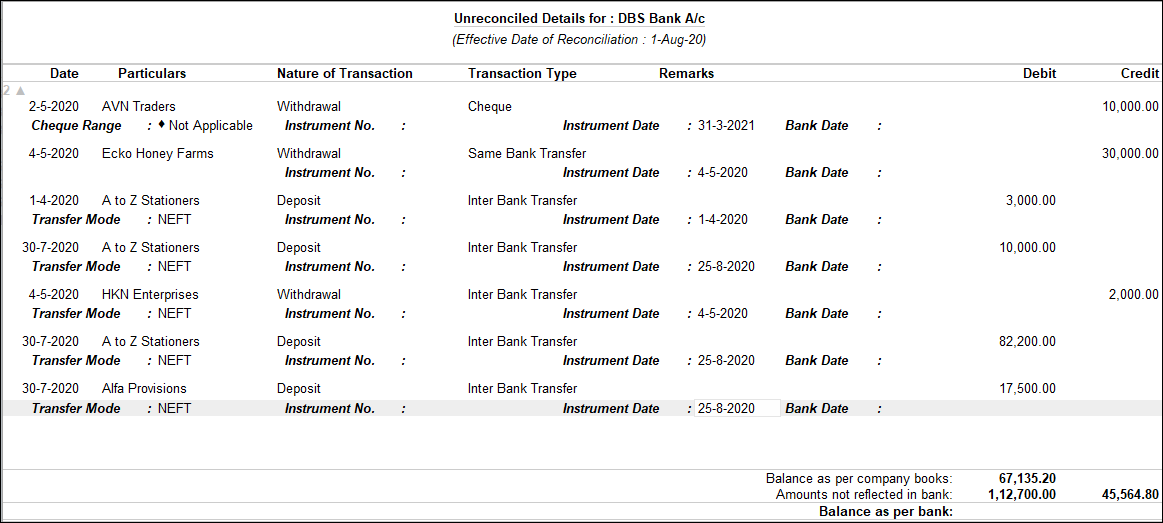
When the company data is split, the unreconciled transactions are automatically updated in the opening BRS details of the second child company. You can remove all or selected unreconciled transactions listed in opening BRS.
- Open the second child company.
- Gateway of Tally > Banking > Bank Reconciliation > and press Enter.
Alternatively, Alt+G (Go To) > type or select Bank Reconciliation > and press Enter. - Select the desired bank from the List of Bank Ledgers screen.
The Bank Reconciliation screen appears. - Press Alt+H (Opening BRS) to view the Opening Bank Allocations screen. The list of all unreconciled transactions of the particular bank ledger appears in the Opening Bank Allocations screen.
- Press Spacebar in the Date field to remove the transaction from unreconciled list.
- Accept the screen. As always, you can press Ctrl+A to save.
Note: The button Alt+J (Delete All) is provided in the Opening Bank Allocations screen. Click the button to delete all the transaction from unreconciled list.
For amounts added and deducted in Interest Parameters of Interest Calculation
The option Include transaction date for interest calculations > For amounts added, For amounts deducted is provided in the Interest Parameters screen. This option allows you to exclude or include the transaction date for amounts added and deducted.
Amounts added refers to additions to a ledger, based on the nature of the ledger (i.e., Assets or Liabilities, Expenses and Incomes).
For example:
- For a Creditor, all the credits (through purchases and other transaction types) are additions.
- For a Debtor, all the debits (through sales and other transaction types) are additions.
- For an Expense head, all debits are additions
- For an Income head, all credits are additions.
- Similarly, for the user borrowing money (Loans Payable) would be additions.
Amounts deducted refers to deductions to a ledger, based on the nature of the ledger (i.e., Assets or Liabilities, Expenses and Incomes).
For example:
- For a Creditor, all debits (through payments and other transaction types) are deductions.
- For a Debtor, all credits (through receipt and other transaction types) are deductions.
- For an Expense head, all credits are deductions
- For an Income head, all debits are deductions.
- Similarly, for the user receiving money back from borrower (Loans Payable) would be deductions.
Include or Exclude date of transaction with Bank/Recon date and date specified during entry
The option Include transaction date for interest calculations: For amounts added, For amounts deducted is provided in the Interest Parameters screen. This option allows you to exclude or include the transaction date for amounts added and deducted.
For example, a payment transaction is recorded on 1st April’16 and ‘Bank/Recon date is 03-04-16. post-migration, interest is calculated from 4th April’16.
Solution: To calculate interest based on the Bank/Recon Date, enable the following options in Interest Parameters screen,
Alter the bank ledger, set the options Include transaction date for interest calculation:
For amounts added set to Yes
For amounts deducted set to Yes
To calculate interest based on the Date Specified During Entry
For example, in the transaction, when the date is specified against Date Specified During Entry, interest is calculated from the next day.
Solution: Alter the bank ledger, set the options Include transaction date for interest calculation.
For amounts added set to Yes