Cheque Printing
The Cheque Printing option in the Banking menu enables you to print the pending, already printed or the required cheques continuously from a single screen. You can also update the cheque details and have track of cheques to be printed, of a selected or all banks.
Print a Self Cheque
A self cheque is a cheque issued by a drawer to himself or herself. It can be presented for collection at the bank on which it was drawn.
In order to print a self cheque in TallyPrime, cheque printing has to be configured. Then you have to pass a contra entry by entering Self as the Favouring Name in the Bank Allocation screen.
- Gateway of Tally > Vouchers > press F4 (Contra).
Alternatively, Alt+G (Go To) > Create Voucher > press F4 (Contra). - Credit the bank account.
- Enter the amount in the Credit column.
- Press Enter to go to the Bank Allocations screen.
- Press F12 (Configure) > set Show favouring name as Yes, to enter Self as the Favouring name.
The Bank Allocations screen appears as shown below: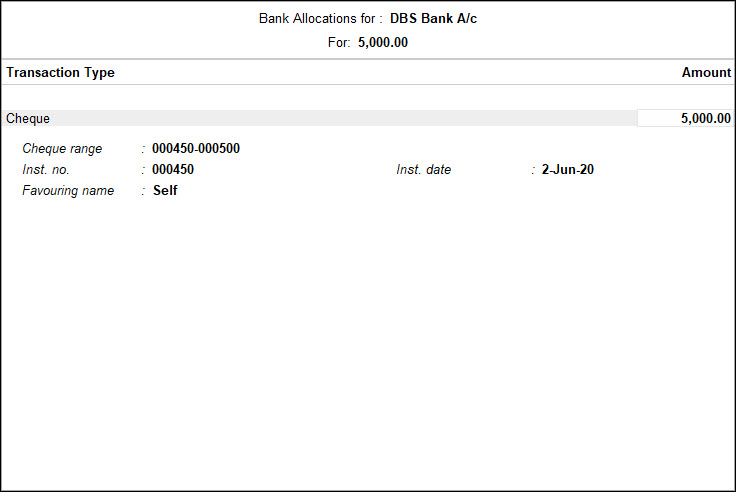
- Press Ctrl+A to accept and return to the Accounting Voucher Creation screen.
- Debit the cash account. The Accounting Voucher Creation screen appears as shown below:
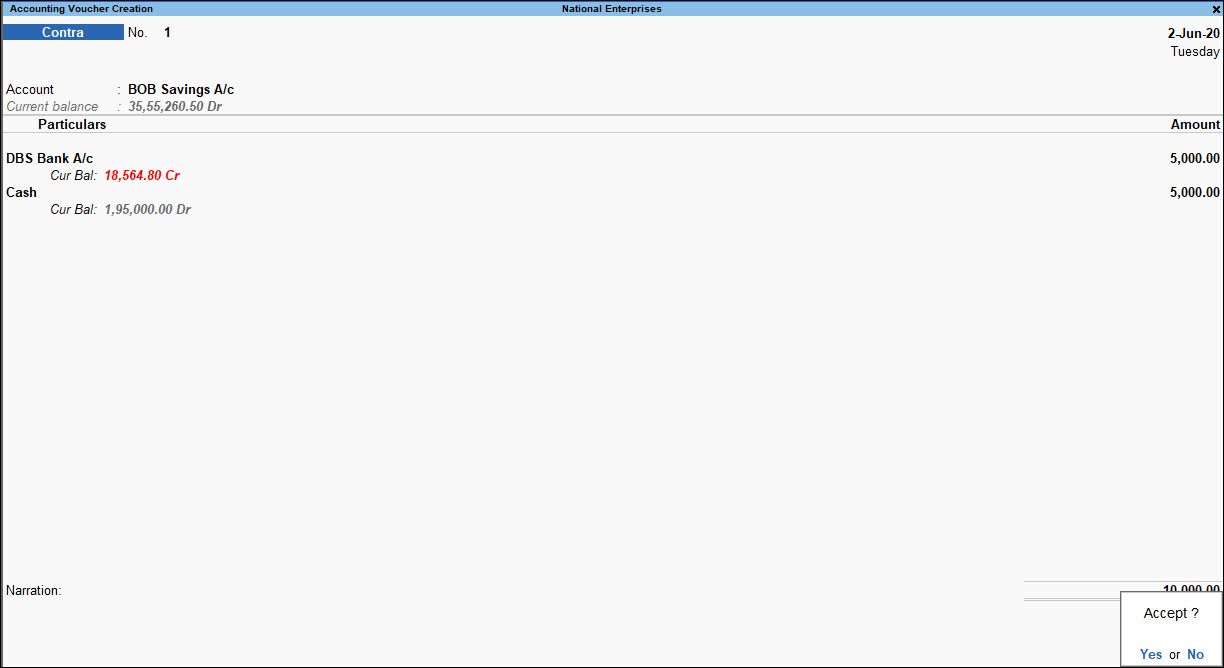
- Press Enter to go to the Cheque Printing screen.
- Press P (Print) to print the self cheque.
Configure Bank Ledgers and Cheque Formats
Organisations choose banks to maintain the current/overdraft/savings accounts based on their business needs and the facilities offered by each bank. Each bank maintains a unique design of cheque for India (as prescribed by the NPCI – National Payment Corporation of India) and for other countries. These formats have to be taken into consideration in the process of cheque printing configuration wherein the dimensions in “mm” are provided. Based on the same, the cheque can be printed.
For the benefit of business entities and users, TallyPrime has provided the convenience of pre-configuring the dimensions for ease in configuring and printing of cheques. The Cheques can be printed at the time of making payments to vendors during voucher entry, that is, directly from the Payment Vouchers or from cheque printing reports.
In this section
- Provide cheque details in bank ledger
- Alter predefined cheque format
- Alter user defined cheque format
- Print Cheques from Voucher
- Print amount in Lakhs/Millions on Cheques
Provide cheque details in bank ledger
If there are changes in the cheque format (predefined and user defined), you can configure your cheque accordingly by going to the bank ledger.
- Gateway of Tally > Create > type or select Ledger > and press Enter.
Alternatively, Alt+G (Go To) > Create Master > type or select Ledger > and press Enter. - Enter the name of the ledger.
- Select Bank Accounts or Bank OD A/C in the field Under.
- Enter the A/c holder’s name, A/c no, IFS Code.
- Select the Bank name.
Note: To display the list of banks, TSS validity and internet connectivity are required. When you are creating a bank ledger for the first time, it is recommended that you are connected to the Internet to be able to view all the bank names while selecting the bank. - Enter the Branch.
- Enable the field Set cheque books to provide the cheque range.
Note: If you want to alter the cheque range, open the bank ledger in alteration screen, and enable the option Set/alter Cheque books.
- In the Cheque Book Management screen, enter the cheque number in the fields From Number and To Number. The Number of Cheques appear automatically.
Alternatively, you can enter the From Number and the Number of Cheques. The To Number will appear automatically.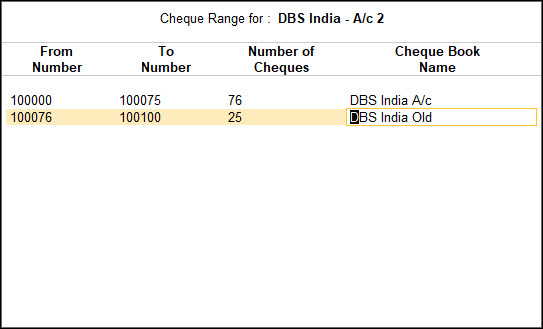
- Enter the Cheque Book Name, and press Enter.
- Enable the option Set cheque printing configuration.
Note: If you want to alter the cheque dimensions, open the bank ledger in alteration screen, and enable the option Set/alter cheque printing configuration.
- The Cheque Dimensions supported for the bank selected in the Bank name field, will be displayed.
- Select the Cheque Format and press Enter to view/modify the pre-configured dimensions.
- Press Ctrl+P (Print) > P (Print) to print and I (Preview) to preview the settings. The Sample Cheque Printing screen appears.
- Press C (Configure) and set the Cheque Alignment.
The Cheque Printing Orientation screen displays the following options:
|
Option |
Description |
|
Horizontal |
This option prints the cheque horizontally (oriented as landscape). |
|
Vertical -Centre |
This option prints the cheque vertically at the centre of the paper. |
|
Vertical -Left |
This option prints the cheque vertically on the left hand side of the paper. |
|
Vertical -Right |
This option prints the cheque vertically on the right hand side of the paper. |
15. Press Esc and press I (Preview) to generate the preview.
16. Press Esc to return to the ledger master.
17. Accept the screen. As always, you can press Ctrl+A to save.
Alter predefined cheque format
- Gateway of Tally > Alter > type or select Ledger > and press Enter.
Alternatively, Alt+G (Go To) > Alter Master > type or select Ledger > and press Enter. - Select the bank ledger. For example, Standard Chartered Bank.
- Select the Bank Name as Standard Chartered Bank (India) from the List of Banks.
- Enable the option Set cheque printing configuration.
The Cheque Format Selection screen appears as shown below: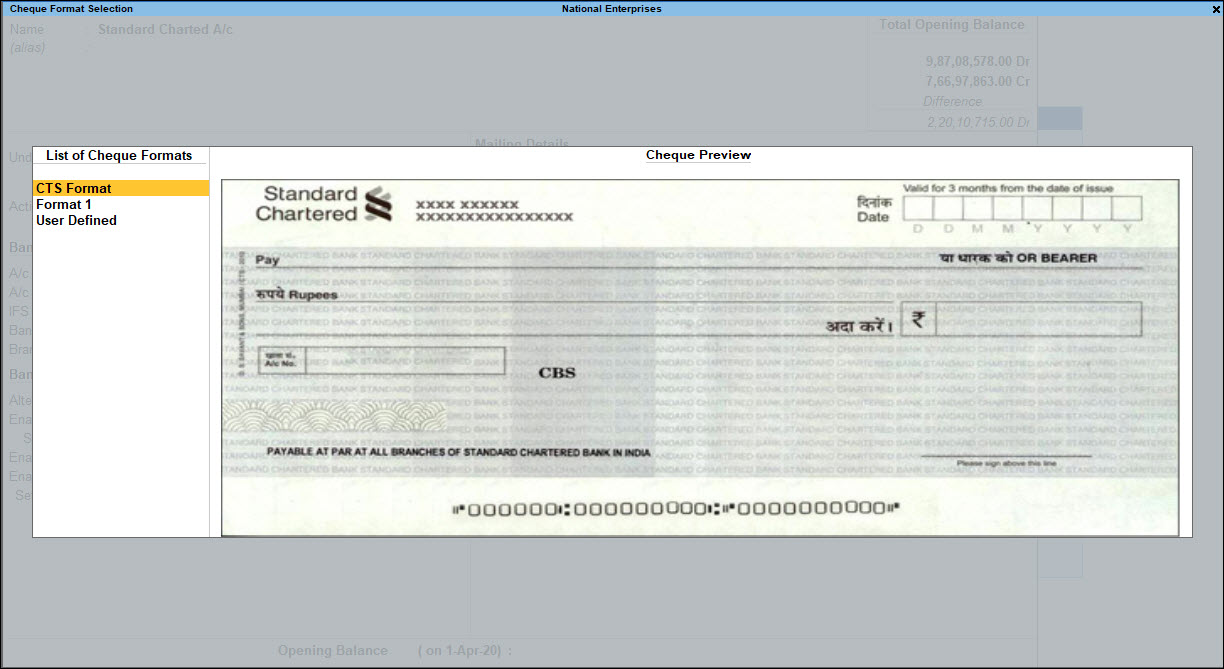
- Select the required format from the list. The Cheque Dimensions screen appears.
- Enter the cheque dimensions manually or Ctrl+C (Copy From) to copy the predefined dimensions.
- Press Ctrl+A to accept the Cheque Dimensions screen to view the Sample Cheque Printing screen.
- Press I (Preview) to generate the preview.
- Press Esc to return to the Ledger Alteration screen.
- Accept the screen. As always, you can press Ctrl+A to save.
Note: To download new cheque formats introduced for the selected bank, you need internet connection.
Alter user defined cheque format
- Select User Defined from the List of Cheque Formats or Press Alt+U (User defined) to define the cheque dimensions in the Cheque Format Selection screen.
- The Cheque Dimensions screen appears.
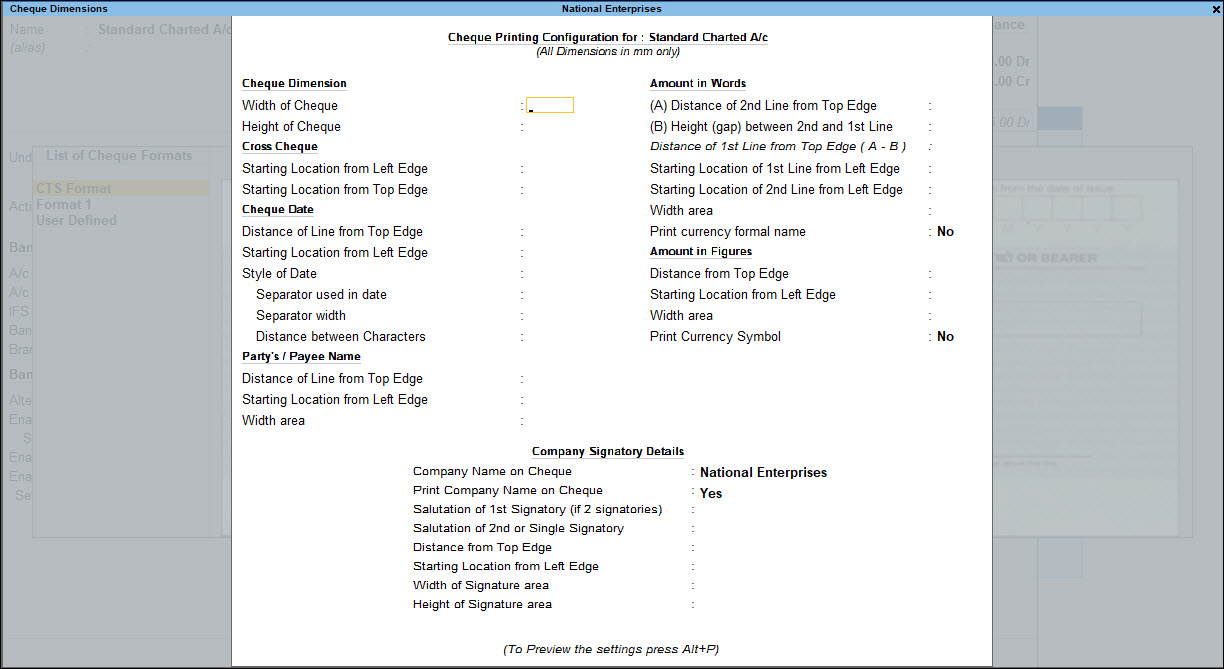
Note: All the dimensions are filled in millimeters. If the Style of Date selected is dd-mm-yyyy, the cursor skips the field Separator used in date. If Style of Date used is other than dd-mm-yyyy, users can use '-' or '/' as a separator. Press Alt+255 in the Separator used in date field to use space as separator. You can specify two signatories, for example, one could be Managing Director and the other could be Director, etc.
- If you have defined cheque dimensions for other bank, you can press Ctrl+C (Copy From) the saved configurations.
- Select the format of the required bank from the List of Configured Banks.

The completed Cheque Dimensions screen appears as shown below: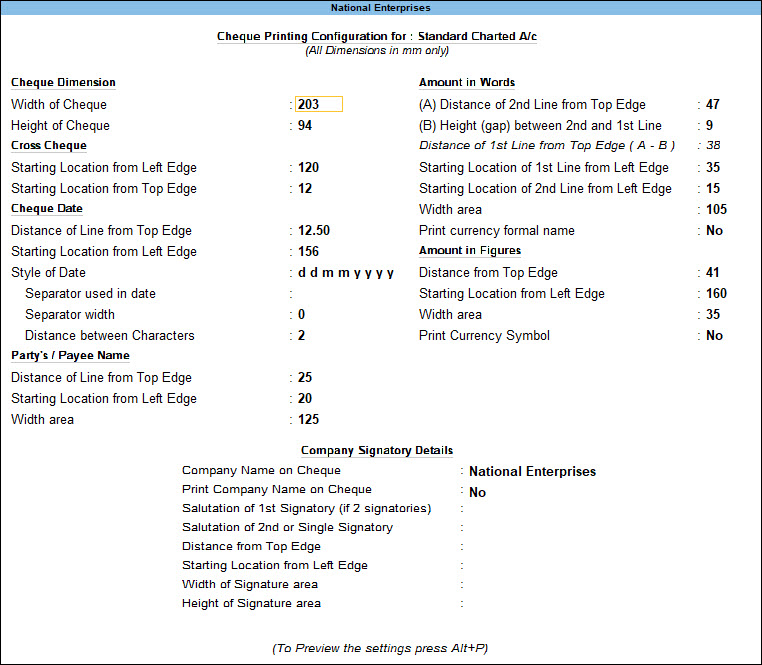
Note: In the Cheque Printing Configuration screen, no field other than salutations should be blank.
- Press Enter to accept the Cheque Dimensions screen.
- The Sample Cheque Printing screen appears. You can I (Preview) and P (Print) the cheque.
Print Cheques from Vouchers
In this section
- Print cheque from payment voucher
- Print bank details in payment voucher
- Print amount in lakhs/millions on cheques
Print cheque from payment voucher
- Gateway of Tally > Vouchers > press F5 (Payment) > and press Enter.
Alternatively, Alt+G (Go To) > Create Voucher > press F5 (Payment) and press Enter. - Debit the Party Ledger.
- Enter the Amount and give the bill reference details, if any.
- Credit the Bank Account for which the cheque printing is enabled.
- Enter the Amount and press Enter.
- The Bank Allocations screen appears.
- Enter the cheque number in the Inst. no. field.
- Enter the Inst. date. The voucher date is displayed by default.
The Bank Allocation screen appears as shown below: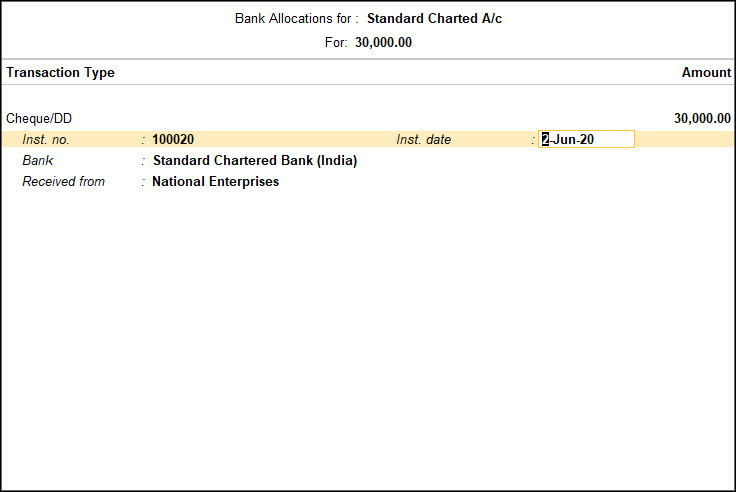
- Press Enter to return to Accounting Voucher Creation screen.
- Enter Narration.
- Accept the screen. As always, you can press Ctrl+A to save.
- Press Esc from the Print screen. The Cheque Printing screen appears as shown below:
- Press I (Preview) to preview and P (print) to print. The cheque print preview appears.
Print bank details in a payment voucher
- In the Voucher Printing screen, press C (Configure) > Set Show Bank Transaction Details to Yes to print the bank transaction details in Payment Voucher.
- Accept the screen. As always, you can press Ctrl+A to save.
Print amount in lakhs/millions on cheques
You can print the value in the cheque in both lakh and crore units, by changing the settings for display of amounts.
- Press Alt+K (Company) > select Alter.
- Select the company from List of Companies to view the Company Alteration screen.
- Press F12 (Configure) > set Provide Additional Base Currency details as Yes, to enable additional base currency options.
- Set the option Show amount in millions? to Yes.

- Accept the screen. As always, you can press Ctrl+A to save.
During cheque printing, the amount will now be printed in lakhs and crores.
Print Cheques from Cheque Printing report
The Cheque Printing option in the Banking menu enables you to print the pending, already printed or the required cheques continuously from a single screen. You can also update the cheque details and have track of cheques to be printed, of a selected or all banks.
Note: The bank ledger needs to be enabled for cheque printing from ledger creation/alteration mode.
In this section
- View Cheque Printing
- Print Cheques/Cheque Printing Reports
- Bank not configured for Cheque Printing
- Select printer
- Change the cheque alignment
- Configure overall adjustment
- Print selected cheques
- Print cheques without date
- Disable company name while printing cheque
- Print all bank cheques at once
View Cheque Printing
- Gateway of Tally > Banking > Cheque Printing > and press Enter.
Alternatively, Alt+G (Go To) > type or select Cheque Printing > and press Enter.
The Select Bank screen displaying the List of Banks appears as shown:
- Select All Items or the required Bank account from the List of Banks.
- Press Enter.

Print cheques | Cheque printing reports
The Cheque Printing screen of the selected Bank is displayed as shown:
- By default, this screen displays list of pending cheques of the current date’s month.
- Press F8 (Incl Printed) to display all the cheques.
Note: On pressing F8 (Incl Printed), you can toggle to F8 (Excl Printed).
Bank not configured for Cheque Printing
If the bank ledger is not configure for cheque printing, the Cheque Printing screen will prompt with a message Bank not configured for Cheque Printing.
The bank needs to be enabled for cheque printing from ledger alteration screen.
In the Cheque Printing screen of the ledgers configured for it:
- Select the required row from the Cheque Printing list to open the voucher in alteration mode.
- F2 (Period): Allows to change the period.
- F4 (Bank): Allows to select All / Other required Bank from the list.
- Alt+B (Alter Ledger): Allows to alter Bank ledger and enable cheque printing in the Bank ledger.
- Alt+H (Alter Chq Details): Allows to edit/update the Favouring Name, Instrument No and Instrument Date columns, as shown:

- Accept the screen. As always, you can press Ctrl+A to save.
- F12: Range: Allows to filter the Cheque printing screen. The user can filter the transactions based on the Amount, Bank Date, Date, Favouring Name, Instrument Date, Instrument No., Ledgers, Narration, Remarks and Transaction Type.
- F12 (Configure): Allows to configure the details you want to view on Cheque Printing screen. The Configuration screen appears as shown below:
Enable the options, as required:
-
- Show Payment Favouring: To display the Favouring Name in the report.
- Show Remarks: To display the remarks.
- Display Name for ledgers: Select the required display name style.
- Show Base Currency: Enable this to display the base currency.
- Sorting Method: Select the required Sorting Method from the list.
The cheque printing report screen will be displayed according to the configurations defined.
Select printer
- From Cheque Printing screen, press Ctrl+P (Print) > press C (Configure).
- Select the Printer from the List of Printers.
Change the cheque alignment
- Press C (Configure) to set Cheque Alignment.
- Select the Cheque Printing Orientation, as required.
- On selecting Horizontal the cheque gets printed horizontally (oriented as landscape).
- On selecting Vertical – centre/left/right the cheque gets printed in vertically (oriented as portrait). Using these options, the cheque can be printed by setting the orientation to:
- Vertical Left: On inserting the paper in the printer tray, the cheque gets printed vertically on the left hand side of the paper.
- Vertical Centre: On inserting the paper in the printer tray, the cheque gets printed vertically at the centre of the paper.
- Vertical Right: On inserting the paper in the printer tray, the cheque gets printed vertically on the right hand side of the paper.
- If the alignment selected is Vertical, then select Front/ Rear in the field Print From (for Vertical Only).

Configure overall adjustment
- Press C (Configure).
- Enter the dimensions as required.
- Space from Top Edge for printing (in mm): To adjust the distance from top edge such that the overall measurements defined in Cheque Dimensions screen get shifted as per the ‘mm’ entered here.
- Space from Left Edge for printing (in mm): To adjust the distance from left edge such that the overall measurements defined in Cheque Dimensions screen get shifted as per the ‘mm’ entered here.
- Cheque Alignment: To set the cheque printing orientation.
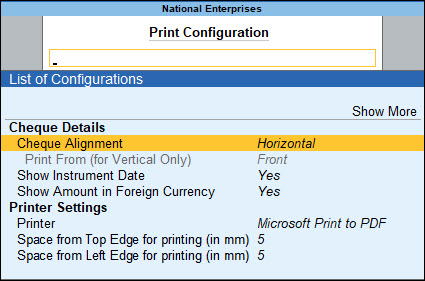
- Show Instrument Date: By default the date gets printed on the cheque. If the date is not to be printed on the cheque set this field to No.
- Show Amount in Foreign Currency: Set this option to Yes, to print cheques for foreign currency transactions in the respective currency.
- The Cheque Printing Configuration screen appears as shown below:
Note: The adjustments done for overall adjustment using C (Print Configuration) of cheque printing screen does not affect the settings of cheque dimensions pre-configured for the selected cheque format.
Print selected cheques
- Gateway of Tally > Banking > Cheque Printing > and press Enter.
Alternatively, Alt+G (Go To) > type or select Cheque Printing > and press Enter. - Select All Items or required Bank account from List of Banks to view the Cheque Printing screen.
- Press spacebar to select the required row(s).
- Press Ctrl+P (Print) to view the Cheque Printing Print screen.
- Press P (Print) to print. Only the selected cheques will be printed.
Print Cheques without date
If you do not want the date to appear on the cheque when printed, you can disable it in the cheque printing configuration in TallyPrime.
- Gateway of Tally > Alter > type or select Ledger > and press Enter.
Alternatively, Alt+G (Go To) > Alter Masters > type or select Ledger > and press Enter. - Select the bank ledger from the List of Ledgers.
- Set Alter Cheque Printing Configuration to Yes, to view the Cheque Format Selection page.
- Select the required format from the List of Cheque Formats, to view the Cheque Dimensions page.
- Press Ctrl+P to view the Sample Cheque Printing.
- Press C (Configure).
- Set Show Instrument Date to No. The Cheque Printing Configuration page appears as shown below:
- Accept the screen. As always, you can press Ctrl+A to save.
Now, the date will not appear on the cheque during printing.
Disable company name while printing cheque
If the company name is not required during cheque printing, you can disable it in cheque printing configuration.
- Gateway of Tally > Alter > type or select Ledger and press Enter.
Alternatively, Alt+G (Go To) > Alter Master > type or select Ledger and press Enter. - Select the bank ledger from the List of Ledgers.
- Set Alter cheque printing configuration to Yes, to view the Cheque Format Selection screen.
- Select the required format from the List of Cheque Formats, to view the Cheque Dimensions screen.
- Set Print Company Name on Cheque to No. The Cheque Dimensions page appears.
- Accept the screen. As always, you can press Ctrl+A to save.
Now, the company name will not appear on the cheque during printing.
Print all cheques of a bank at once
You can print all or selected cheques of a particular bank using the Cheque Printing feature.
- Gateway of Tally > Banking > Cheque Printing and press Enter.
Alternatively, Alt+G (Go To) > type or select Cheque Printing and press Enter. - Select the required bank from the List of Banks in the Select Bank screen.
The Cheque Printing report appears as shown below:
Note: If you do not want to print all the cheques, you can press Spacebar to select the cheques you want to print in the Cheque Printing report.
- Press Ctrl+P (Print) to print.
- Set the option Print Cheque to Yes in the Printing screen as shown below:
Note: If you select All Items in the Select Bank screen, the option Print Cheque will not appear in the Printing screen, as the cheque format of each bank is different.
- Press P (Print) to cheque print.
The Cheque Printing screen with Cheque Details appears as shown below: - Press Enter. The printed cheque appears as shown below:
- Press Esc. The Cheque Printing screen appears with Cheque Details for the next cheque
- Press Enter. The printed cheque appears.
Similarly, you can print all the other cheques one after another.
Note: If you do not want to print a particular cheque, press Esc to view the Cheque Printing screen for the next cheque.
View, Search, Track Your Cheque Details | Cheque Register
Cheques are still the most preferred payment instrument across businesses. Easy management of this form of payment adds significant value in day to day operations, and hence, effective Cheque Management system is essential in any business. You can view and search for the details of your cheques, along with setting cheque ranges and tracking cheque statuses – all from the Cheque Register report. Also, find details of post-dated cheques and cheques issued in a different period (out of period), as per your business needs.
TallyPrime provides effective cheque management systems by allowing creation of multiple cheque books with unique ranges for every bank in Bank Ledger creation and Cheque Register. It also allows use to keep track of post-dated cheques.
To view the Cheque Register report.
- Gateway of Tally > Banking > Cheque Register and press Enter.
Alternatively, Alt+G (Go To) > type or select Cheque Register and press Enter.
In this section
- Bank-wise details of cheques
- Range-wise view of cheques
- Status-wise view of cheques
- Easily manage your cheques with Cheque Register
Bank-wise details of cheques
Get a consolidated view of all your cheques from the default bank-wise screen of the Cheque Register report.
- Available Cheques – View the cheques available if you have set a cheque range while creating your bank ledger.
- Alternatively, set a cheque range by pressing Alt+B (Alter Chq Book) > Cheque Book Management.
- Unreconciled and Reconciled – Drill down into these columns to view the cheque details, including the related payment details.
- Blank and Cancelled – Drill down to view details of all your blank and cancelled cheques.
- Issue a blank cheque to your party from this report.
- Cancel an available cheque or a cheque that is already issued.
Note: Press Alt+F2 or F2 (Period) to change the period for which you want to view the cheque details.
- Out of Period: Displays the number of cheques that do not belong to the current period chosen. The cheques may be
- Issued in the previous financial year
- Post dated and not part of the current financial year
Range-wise view of cheques
View cheques based on the different cheque ranges you have set, depending on the business requirements.
For example, you can set cheque ranges for cheques to be issued from different departments or for cheques to be issued to different parties.
Drill down from the Cheque Register report to view all the cheque ranges in the Cheque Range Register screen.
-
- Press F4 (Bank) to toggle between banks.
- Further drill down to each cheque range to view the cheque details.
- View the cheque range set for the selected bank, press F4 (Cheque Range) to toggle between different cheque ranges.
- Not in range – Drill down to view details of the cheques that are issued but not set as part of any cheque range.

Status-wise view of cheques
- Press F8 (Transaction) to open the Instrument-wise report.
- Press F8 (Cheque Status) to view the list of cheques statuses.
- Select the cheque status for which you need to view the report.
Easily manage your cheques with Cheque Register
Cheque Register also enables you to effectively manage your cheques and do a few other business activities quickly.
You can use a cheque from this report directly in a payment transaction.
- Gateway of Tally > Banking > Cheque Register > and press Enter.
Alternatively, Alt+G (Go To) > type or select Cheque Register > and press Enter. - Drill down to enter Cheque Range Register and press enter to view Instrument wise screen.
- Press Spacebar to select a cheque, and then press Alt+J (Create Voucher) to record your payment.
- You can filter and search for a cheque quickly by using the cheque number, bank name, or party name.
- Press Alt+Q (Quick Search) and enter a matching bank name, cheque number, or instrument number.

- Press Alt+Q (Quick Search) and enter a matching bank name, cheque number, or instrument number.
You can set a range for cheques that are issued but not part of any cheque range. Count of such cheques is displayed as Not in range.
- Open the bank ledger used for the cheque not in the range and set the cheque range.
- Press Alt+B (Assign Chq Range) in Cheque Register to update the cheque range on this report.
- You can reconcile your cheques either cheque-range-wise or bank-wise.
- In the Bank-wise Register screen, select the bank, and press Alt+R (Reconcile) to reconcile the unreconciled cheques in that bank.
- In the Cheque Range Register screen, select the cheque range, and press Alt+R (Reconcile) to reconcile the unreconciled cheques in that range.
- From this report, you can choose to exclude cheques that do not belong to any cheque range.
- Press F12 (Configure) and set Include Not in Range Cheques to No. Next time you go to the Cheque Register report, you will not view cheques that are not part of the cheque range.
- You can choose to see only those cheque books that are not completely used yet and ignore completed cheque books.
- Click F12: Configure and enable the Ignore the Completed Cheque Ranges option. The Cheque Register report will display only cheque ranges that are not used.