Post-Dated Cheque (PDC) Management
A post-dated cheque is one that the recipient can encash on a future date. Such cheques are not payable until the date mentioned on the face of the cheque. In the accounting books of both the issuer and the recipient, the transaction will not be recorded until the date provided on the cheque.
Post-Dated Cheques (PDC) – An Overview
The features of PDC that are supported in Tally are listed in this topic.
- You can manage all the receivables/payables considering the impact of receipt/ issue of post-dated cheques along with real time accounts. This will aid you to plan your cash flows.
- You can eliminate the need for additional transactions at the time of realisation.
- Avoid delay in revenue realisation by presenting the PDCs in time.
Post-Dated Cheque Entry
A post-dated cheque is one that the recipient can encash on a future date. Such cheques are not payable until the date written on the face of the cheque. In the accounting books of both the issuer and the recipient, the transaction will not be recorded until the date provided on the cheque.
TallyPrime facilitates smooth management of post-dated cheques and the underlying transactions:
- You can mark an entry as post-dated and specify the date on which the cheque was received/issued.
- The transaction will automatically affect the accounting books on the date of the post-dates cheque.
- You can obtain a comprehensive summary of all transactions involving post-dated cheques, using the Post-dated Summary report.
- You can include post-dated transactions in other accounting reports such as Ledger Vouchers, Group Summary, Outstandings reports, and so on.
In this section
Create a post-dated voucher
- Gateway of Tally > Vouchers > press F5 (Payment).
Alternatively, Alt+G (Go To) > Create Voucher > press F5 (Payment). - In the Voucher Creation screen, press Ctrl+T (Post-Dated). The voucher will be marked with the status as Post-Dated as shown below:

- Press F2 (Date) to provide the date of the cheque.
- Select a bank ledger in the Account field.
- Under Particulars, select the ledger of the party to whom the post-dated cheque has been issued.
- Provide the Amount and Bill-wise Details for the payment.
- Press Enter. The Bank Allocations screen appears.
The fields PDC Issue Date and PDC note will be available in the screen. These fields are available for post-dated transactions only and to mention the post-dated notes. Fill in the date on which the post-dated cheque was issued to the party and fill the PDC note.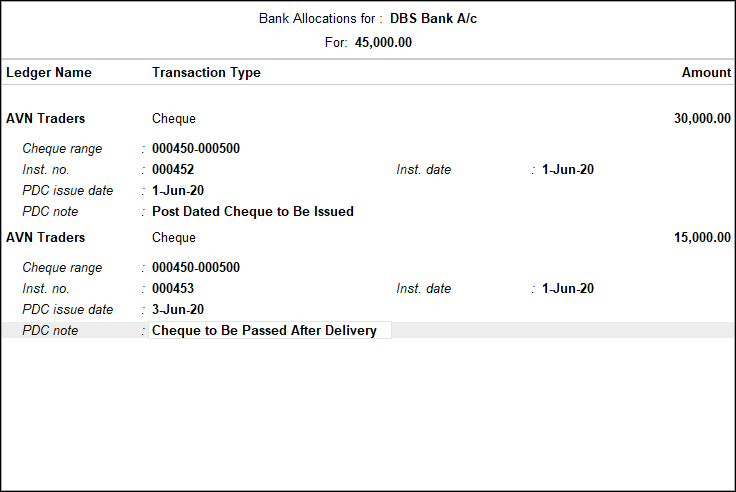
As always, press Ctrl+A to save the Bank Allocation screen details. - Provide Narration if required. Accept the screen. As always, you can press Ctrl+A to save.
Note: Receipt and Contra entries can also be recorded for post-dated cheques using the same procedure as above. The procedure uses the Payment Voucher for illustrative purposes.
View current and final balances of a party ledger
You and configure the Voucher Creation/Alteration screen to consider post-dated transactions while ascertaining the balances of party ledgers.
- Show Final Balances for each bill: Enabling this option will display the amount that remains due, if any post allocation, in the Bill-wise Details screen.
- Show Ledger Final Balances: Enabling this option will display the party ledger’s balance after including the post-dated transactions for the party ledger, in the Voucher Creation/Alteration screen.
If you do not see this option, set Show more configurations to Yes.
Create a Payment Voucher with Voucher Class for Employee Payments
To automate the allocation while making payments, you can create a voucher class by altering the existing voucher types.
- Gateway of Tally > Alter > Voucher Types > type or select Payment and press Enter.
Alternatively, Alt+G (Go To) > Alter Master > Voucher Types > type or select Payment and press Enter. - Select Payment from the List of Voucher Types.
- Enter Employee Payments in Name of Class.
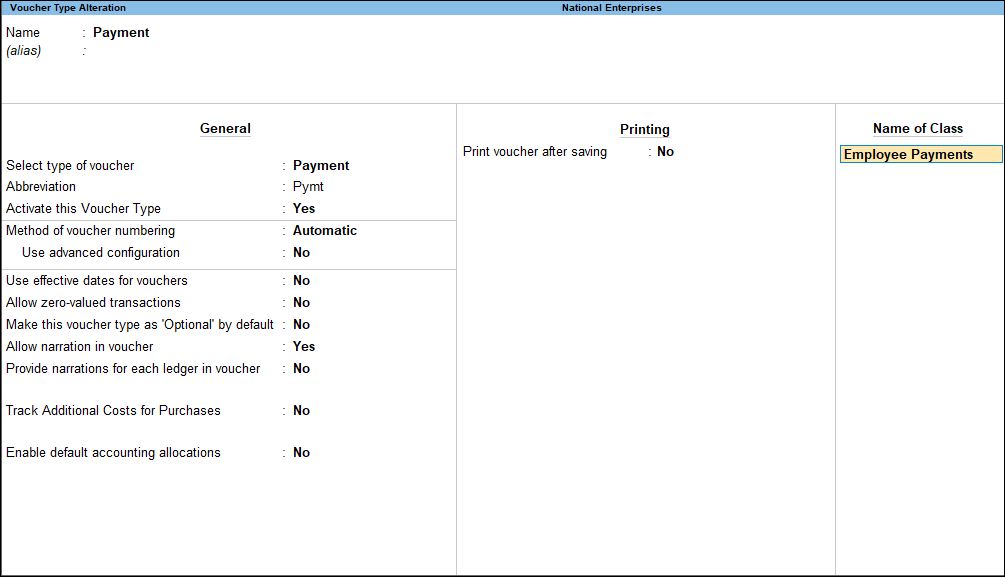
- Press Enter and the Voucher Type Class screen will appear as shown below:
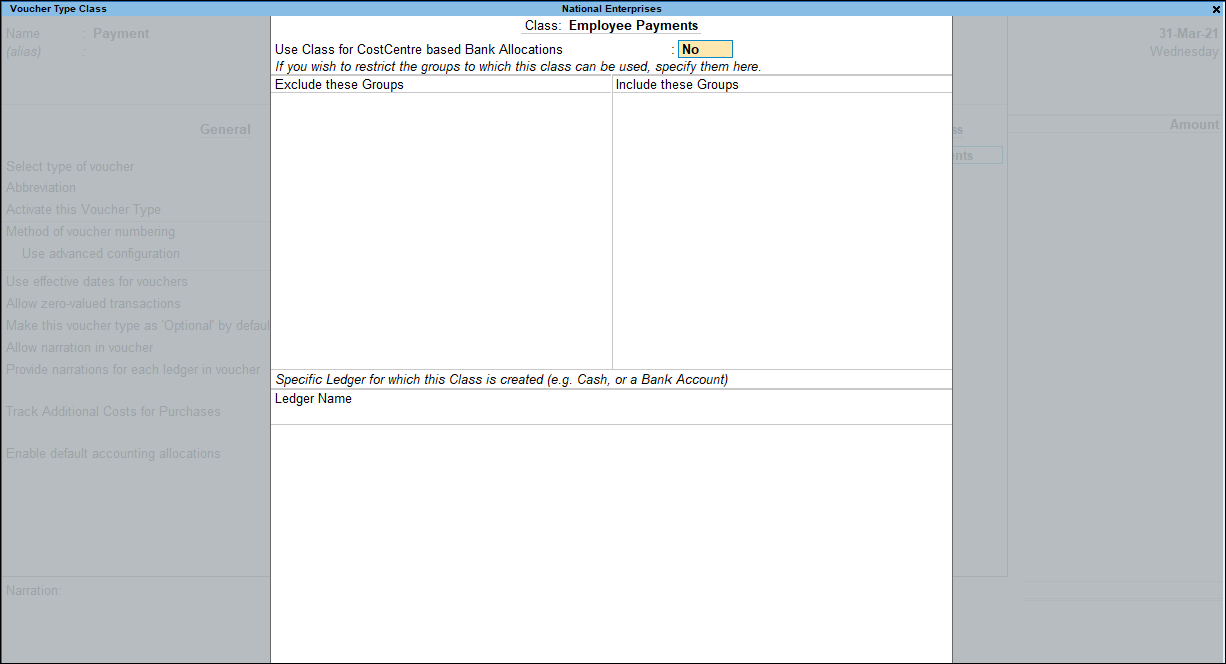
- Set Use Class for Cost Centre/Employees based Bank Allocations to Yes and the option Allow Selection of option will be displayed.
- Select Both in Allow Selection of option.
Note: When Use Class for Cost Centre/Employees based Bank Allocations to Yes and if both Cost Centre and Employee are enabled, then only the second option Allow selection of will be displayed.
Based on the selection, filter of items will happen in cost centre allocation table during payment voucher entry. - As always, you can press Ctrl+A to save the Voucher Type Class screen.
- As always, you can press Ctrl+A to save the Voucher Type Alteration screen.
Post-dated Transactions Report
The Post-dated Summary report provides a month-wise breakup of transactions for which post-dated cheques have been received or issued.
In this section
Post-dated transactions Monthly Summary
- Press Alt+G (Go To) > type or select Post-Dated Transactions > and press Enter.
- Select the required bank from the List of Banks. The Post-dated transactions Monthly Summary report will appear as shown below:
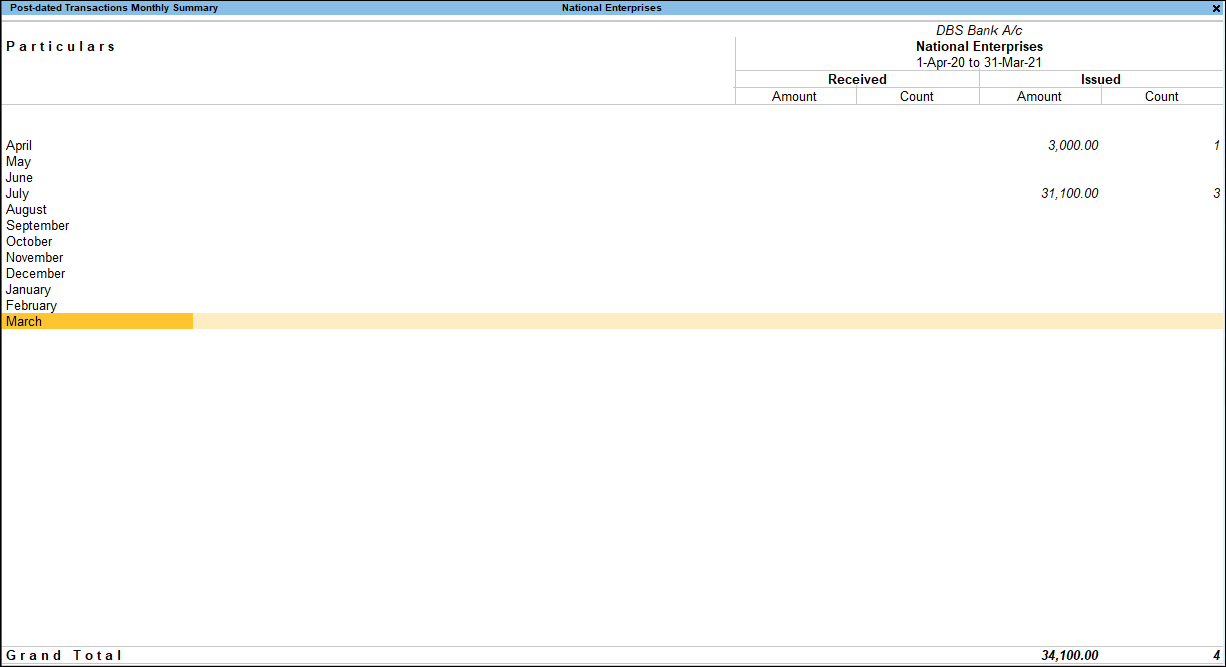
The report displays the number of post-dated cheques that have been received and issued for each month, and their aggregate values.
The information appears as follows:
- Particulars: This column lists the months of the company’s financial year. That is, if the company’s financial year begins on 1-Apr-2015, the months displayed will be from April 2015 to March 2016. If the PDC has been issued /received beyond the company’s financial year, those months will also be listed.
- Received: This column is divided into two sub-columns, Amount and Count. The Amount column displays the total value of the post-dated cheques received, for the corresponding month. The Count column displays the total number of post-dated cheques received for the corresponding month.
- Issued: This column is also divided into two sub-columns, Amount and Count. The Amount column displays the total value of the post-dated cheques issued, for the corresponding month. The Count column displays the total number of post-dated cheques issued for the corresponding month.
Post-dated transactions report
Drill down from one of the months in the Particulars column. The Post-dated Transactions report appears as shown:
![]()
The report displays information as follows:
- Date: This column displays the date provided in the voucher while recording the post-dated transaction in TallyPrime.
- Type: This column will indicate if a post-dated cheque has been issued or received.
- Bank: This column displays the bank ledger that has been used to record the transaction.
- Particulars: This column displays the name of the party ledger that has been used to record the transaction.
- Instrument no: This column displays the instrument number entered in the Bank Allocations screen while recording the transaction.
- Instrument Date: This column displays the instrument date entered in the Bank Allocations screen while recording the transaction. That is, the date provided on the face of the cheque.
- Status: This column indicates if the current status of the cheque. There are two types of status for a cheque:
- Regularized, if the date of the cheque is equal or more than the Date of Last Entry indicated in the Gateway of Tally.(This line need to check with latest build and with license)
- Pending, when the cheque date is lesser than the Date of Last Entry.
- Amount: This column displays the value of the post-dated cheque issued/received.
Post-dated Issued Report
The Post-dated Issued report in TallyPrime displays particulars of all the post-dated cheques issued to vendors and suppliers against business transactions.
- Gateway of Tally > Banking > Post-dated Summary > and press Enter.
Alternatively, Alternatively, Alt+G (Go To) > type or select Post-dated Summary> and press Enter. - Select the required Bank or All Items, and press Enter.
- Place the cursor on the Amount and Count values displayed under the Issued column, and press Enter. The Post-dated Issued report appears as shown:
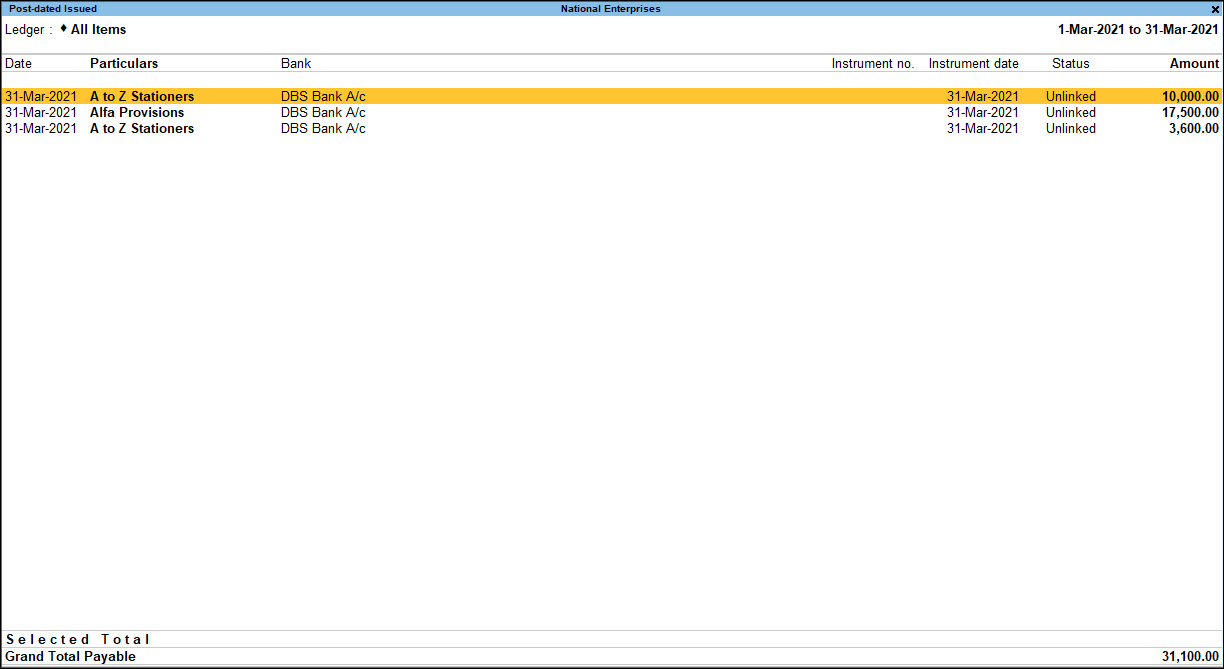
The report displays information as follows:
- Date: This column displays the date provided in the voucher while recording the post-dated transaction in TallyPrime.
- Particulars: This column displays the name of the party ledger that has been used to record the transaction.
- Bank: This column displays the name of the bank whose cheque has been issued.(This line need to check with latest build and with license)
- Instrument no: This column displays the instrument number entered in the Bank Allocations screen while recording the transaction.
- Instrument date: This column displays the instrument date entered in the Bank Allocations screen while recording the transaction. That is, the date provided on the face of the cheque.
- Status: This column indicates if the current status of the cheque. There are two types of status for a cheque:
-
- Regularized, if the date of the cheque is equal or more than the Date of Last Entry indicated in the Gateway of Tally.(This line need to check with latest build and with license)
- Pending, when the cheque date is lesser than the Date of Last Entry.
- Amount: This column displays the value of the post-dated cheque issued.
Button options in the Post-Dated Issued report
|
Button |
Key Combination |
Usage |
Reports |
|
F5: Detailed |
Alt+F5 |
To view the bill details for the transactions displayed |
Post-dated Summary, Post-dated Transactions, Post-dated Received, Post-dated Issued |
|
F2: Period |
F2 |
To change the period of the report |
Post-dated Summary, Post-dated Transactions, Post-dated Received, Post-dated Issued |
|
F3: Company |
F3 |
To change the Company for which the report is being displayed |
Post-dated Summary, Post-dated Transactions, Post-dated Received, Post-dated Issued |
|
F4: Ledger |
F4 |
To change the ledger for which the report is being displayed |
Transactions, Post-dated Received, Post-dated Issued |
|
F8: Show All |
F8 |
To view both Regularized and Pending transactions; the report displays only those transaction with the status Pending, by default |
Post-dated Transactions, Post-dated Received, Post-dated Issued |
|
B Alter Bank |
Alt+B |
To change the bank ledger that has been selected for the transaction. Place the cursor on the required voucher entry, and press Spacebar to select the same. Click the button to change the bank selected for the voucher |
Post-dated Transactions, Post-dated Received, Post-dated Issued |
|
J: Create Voucher |
Alt+J |
To create a Post-dated Payment/Receipt voucher |
Post-dated Received, Post-dated Issued |
|
H: Alter Date |
Alt+H |
To change the date of the voucher. Select the transaction using Spacebar, and click the button |
Post-dated Transactions, Post-dated Received, Post-dated Issued |
|
R: Note |
Alt+R |
To provide Note for a transaction. Select the transaction using Spacebar, and click the button |
Post-dated Transactions, Post-dated Received, Post-dated Issued |
|
Q: Quick Search |
Alt+Q |
To filter for a specific transaction, using the instrument number, voucher date, bank name, party name, or amount |
Post-dated Transactions, Post-dated Received, Post-dated Issued |
|
F12: Configure |
F12 |
To configure the report to include or exclude specific information |
Post-dated Received, Post-dated Issued |
|
F12: Range |
Alt+F12 |
To filter for specific transactions based on the Amount, Bank, Instrument Date, etc. |
Post-dated Received, Post-dated Issued |
Ctrl+B (Basis of Values): Press Ctrl+B (Basis of Values) > Scale Factor > selectMillions. Press Esc to view the default values.
Ctrl+H (Change View): You can display the details of a report in different views with additional details or for a specific period. You can also view other reports related to the current report.
To view the Post-dated Issued or Post-dated Received for Post-Dated Transactions, press Ctrl+H (Change View) > type or select Post-dated Issued or Post-dated Received > and press Enter. Press Esc to view the default report.
Ctrl+J (Exception Reports): You can view the exceptions related to the data displayed in the current report by pressing Ctrl+J (Exception Reports), without closing the report.
To view the optional Vouchers for Post-Dated Transactions, press Ctrl+J (Exception Reports) > type or select optional Vouchers > and press Enter. Press Esc to view the default report.
F12 configurations for Post-Dated Issued report
- Show Favoring Name/Received From: Set this option to Yes to view the name of the payee. This is the name provided in the Favouring Name field of the Bank Allocations screen.
- Show Notes for Post-dated Cheques: Set this option to Yes to view the remarks provided using the K: Enter Notes button.
- Show Issue/Receipt Date: Set this option to Yes to view the date on which the cheque was issued. This is the date provided in PDC Issue Date field of the Bank Allocations screen.
- Format of Report: Select Detailed to view the report in the detailed format.
- Display name for Ledgers: You can select the display name for the ledgers, based on the details you have provided for the ledgers. For example, if you have provided aliases in the ledger, you can select Name (Alias) for the display name. The report will display all the ledgers with the name followed by the alias.[/expand]
Post-dated Received Report
The Post-dated Received report in TallyPrime displays all the post-dated cheques received from parties and vendors against business transactions.
In this section
View Post-Dated Received report
- Gateway of Tally > Banking > Post-dated Summary > and press Enter.
- Alternatively, Alt+G (Go To) > type or select Post-dated Summary > and press Enter.
- Select the required Bank or All Items, and press Enter.
- Place the cursor on the Amount and Count values displayed under the Received column, and press Enter. The Post-dated Received report appears as shown:

Details of the report
The report displays the following details.
- Date: This column displays the date provided in the voucher while recording the post-dated transaction in TallyPrime.
- Particulars: This column displays the name of the party ledger that has been used to record the transaction.
- Bank: This column displays the name of the bank whose cheque has been received.
- Instrument no: This column displays the instrument number entered in the Bank Allocations screen while recording the transaction.
- Instrument date: This column displays the instrument date entered in the Bank Allocations screen while recording the transaction. That is, the date provided on the face of the cheque.
- Issuing Bank: This column displays the name of the payer’s bank.
- Status: This column indicates if the current status of the cheque. There are four types of status for a cheque:
- Regularized: if the date of the cheque is equal or more than the Date of Last Entry indicated in the Gateway of Tally.
- Pending: when the cheque date is lesser than the Date of Last Entry.
- Reconciled: if the cheque is reconciled.
- Unlinked: if the cheque is deposited in a notional bank.
A notional bank exhibits the same features as a normal bank account, created under the group Bank Accounts. You can create a notional bank account when you are:- Unable to decide the bank to which the post-dated cheques received are to be deposited, while creating the post-dated transactions.
- Manually converting the post-dated cheques received.
- Unable to determine the bank to which the post-dated cheque is to be deposited.
- Amount: This column displays the value of the post-dated cheque received.
F12 Configurations
- Show received from/payment to: Set this option to Yes to view the name of the payer. This is the name provided in the Received From field of the Bank Allocations screen.
- Show PDC Notes: Set this option to Yes to view the remarks provided using the K: Enter Notes button.
- Show issue/receipt date: Set this option to Yes to view the date on which the cheque was received. This is the date provided in PDC Receipt Date field of the Bank Allocations screen.
Reporting Capabilities/Features Using Post-Dated Cheque
You can obtain a comprehensive summary of all transactions involving post-dated cheques using the Post-dated Summary report.
- Gateway of Tally > Banking > Post-Dated Summary > press Enter.
Alternatively, Alt+G (Go To) > type or select Post-Dated Summary > press Enter. - You can also track the post-dated cheques from the cheque register.
Gateway of Tally > Banking > Cheque Register > press Enter.
Alternatively, Alt+G (Go To) > type or select Cheque Register > press Enter.
You can link the PDC to a generic bank ledger, and then manually select the required bank after the cheque has been presented from the Post-dated Issued/Post-dated Received report. The transaction will not be regularized until you have linked it to a bank, though its date of presentation has been reached. - You can opt to include post-dated transactions in MIS reports such as Cash Flow and Funds Flow Statements, and other reports such as Ledger Vouchers, Group Summary, Outstanding reports, etc.
- You can opt to view reports with actual values, or values that include post-dated cheques, using the New Column option.
- You can generate party-wise as well as consolidated PDC outstanding reports.
- You can view all PDC specific information including instrument no, instrument date, the bank and branch of the payee/issuer.
- You can also opt to record the PDC receipts to a notional bank, in case you are not sure about the bank to which it should be deposited, at the time of receiving the cheques.
- Gateway of Tally > Display More Reports > Accounts Book > Ledger.
Alternatively, Alt+G (Go To) > type or select Ledger Voucher > and press Enter. - Select Party A/c (by default the balances shows based on Date of Last Entry).
- Press Alt+F8 (Include Post-Dated) to see final balance of the ledger.
Now balances of ledger shows including PDC transaction (which is projected balance).
Pass PDC Transaction for Notional Bank
Usually PDC receipts can be recorded through Notional Bank. Whenever users receive PDC from their party, on the date of PDC receipt, as they are not sure to which bank they are going to deposit, they can put it under Notional Bank. This will not get regularized automatically. Users need to regularize manually.
When PDC is received, pass a Receipt Voucher marking with Post-Dated.
- Gateway of Tally > Vouchers > press F6 (Receipt).
Alternatively, Alt+G (Go To) > Create Voucher > press F6 (Receipt). - Debit Notional Bank and enter the amount.
- Mark the voucher as Post-dated by Ctrl+T (Post-Dated) as shown below:

In the Bank Allocations screen, Voucher Date will be captured in Inst. Date field. Also PDC Receipt date captures the Current/System Date (on which PDC was received, this field can be editable), as shown below: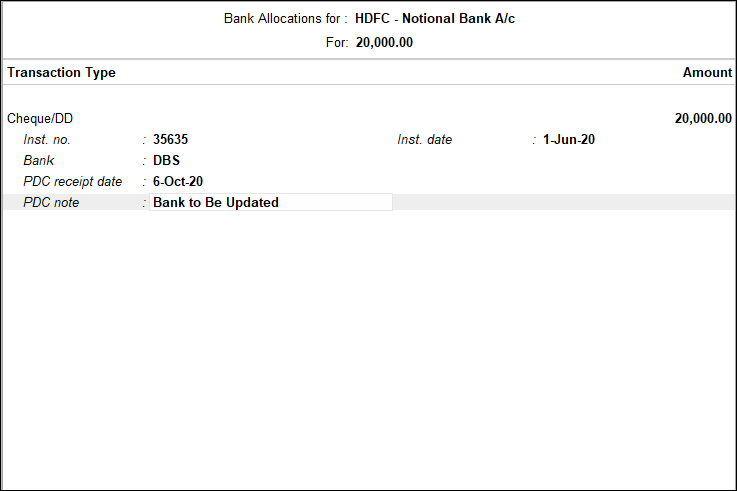
When on specific date, user have option to view PDC Report by pressing Ctrl+H (Change View) > Post-Dated Transactions from Day Book.
Here you need to take action on status of the Cheque.
By changing the period, user can even view PDC transactions of future dates: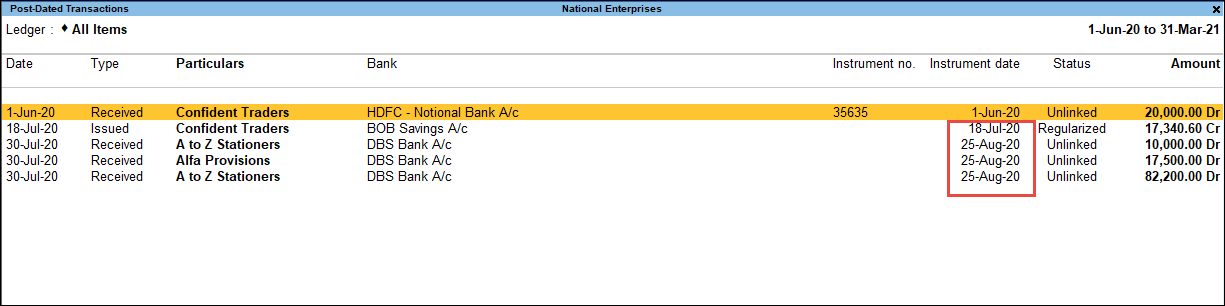
Regularized:
These cheques (issued/received) have got regularized today, however user need to ensure:
- Cheques which were issued from bank has sufficient balance to clear the cheques.
- Cheques which were received need to deposit to respective bank.
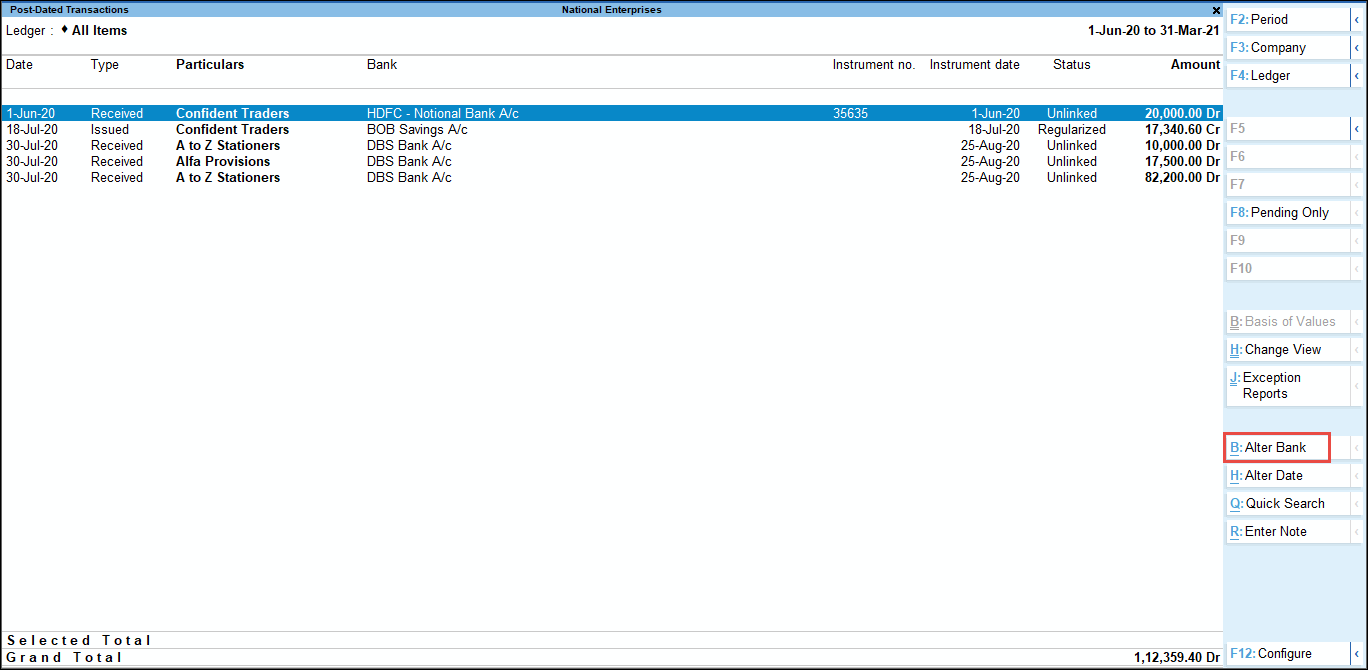
Unlinked:
If received cheques are under Notional bank, then user need to move those to regular bank. Then status of cheques will get changed to Regularized.
Pending:
These are the cheques for which Date is yet to occur. Pending status transactions will get be Regularized based on Date of Last Entry.
PDC Note can be viewed by enabling fromF12: Configuration. Here the transaction status ‘Unlinked’ need to be actioned. Therefore, user has to move ledger from Notional Bank to regular bank.
Keep a cursor on Unlinked transaction> press Spacebar to select the transactions > press Alt+B (Alter Bank) as shown below:
Select the regular bank from the list of banks and press Enter to save changes:
Now the status will get changed to Regularized.
Note: User can even change the Voucher Date (Alt+A Alter Date) of issued/received PDC based on business scenarios. For example, if party is requested to deposit Cheque after 2 days or you may request your vendor to deposit Cheque after a week. However Date written on Cheque will not be affected.