VAT in GCC
You can easily comply with VAT in GCC using TallyPrime. Refer to the following sections for details.
Activate VAT for Your Company in GCC
To use TallyPrime for VAT compliance in GCC, you need to activate the VAT feature. Once activated, VAT-related features are available in ledgers, stock items, and transactions. You can also generate VAT returns (for countries where Returns are made available by their VAT department).
You can activate VAT in the company master and set the options as needed.
UAE VAT
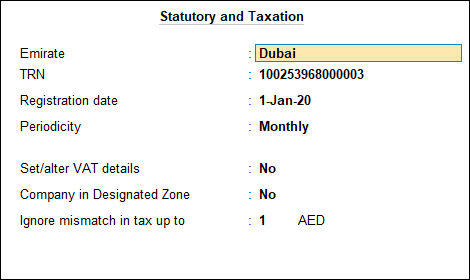
Activate UAE VAT in the company master
- Open the company for which you need to activate VAT.
- Press F11 (Features) > set Enable Value added Tax (VAT) to Yes.
If you do not see this option: - Select your business location in Emirate field.
- Specify the TRN for the business. This can be printed in the invoices as required. You can specify this later.
- Specify the Registration date.
UAE VAT will be applicable for your transactions from this date onwards. - Select the Periodicity as Monthly or Quarterly.
UAE VAT returns will be generated based on the periodicity selected. If you select Quarterly, enter the date from which you have to file the returns for the first quarter. - Enable the option Set/alter VAT details to specify tax rate details.
- If your company is located in a designated zone, set the option Company in Designated Zone to Yes.
- In the Ignore mismatch in tax up to field, specify the value up to which the mismatch in tax amount can be ignored.
Note: Currently a single VAT rate of 5% is applicable for all taxable supplies. You can set the same in the VAT Details screen by enabling the option Set/alter VAT details, in the Company Statutory Returns screen to apply to all masters.
Configure the data to view the mailing details in local language
- Press F12 (Configure) in Company Statutory Returns screen.
- Set the option Show mailing details in local language to Yes.
- Press Enter to accept.
- In the Company Statutory Returns screen, set the option Show mailing details in local language to Yes to record company address in Arabic.

- Accept the screen. As always, you can press Ctrl+A to save.
You can create new ledgers or update the existing ledgers and start doing UAE VAT compliant transactions.
Kingdom of Saudi Arabia (KSA) VAT
Activate KSA VAT in the company master
- Open the company for which you need to activate VAT.
- Press F11 (Features) > set Enable Value added Tax (VAT) to Yes.
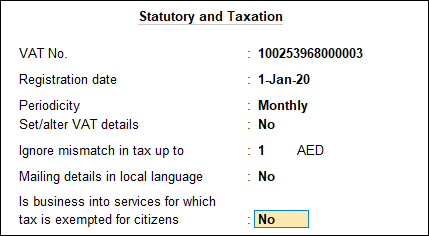
- Specify the VAT No. for the business. This can be printed in the invoices as required. You can specify this later.
- Specify the Registration date.
KSA VAT will be applicable for your transactions from this date onwards. - Select the Periodicity as Monthly or Quarterly.
KSA VAT returns will be generated based on the periodicity selected. - Enable the option Set/alter VAT details to specify tax rate details.
- In the Ignore mismatch in tax up to field, specify the value up to which the mismatch in tax amount can be ignored.
- Set the option Is business into services for which tax is exempted for citizens to Yes, if you are a private sector institution providing healthcare, education and real estate services to Saudi citizens.
Note: You can set the standard VAT rate of 5% by enabling the option Set/alter VAT details. This rate will apply to all the masters.
Configure the data to view the mailing details in local language
- Press F12 (Configure) in Company Statutory Returns screen.
- Set the option Show mailing details in local language to Yes.
- Press Enter to accept.
- In the Company Statutory Returns screen, set the option Mailing details in local language to Yes to record company address in Arabic.

- Accept the screen. As always, you can press Ctrl+A to save.
You can create new ledgers or update the existing ledgers and start recording KSA VAT compliant transactions.
Kingdom of Bahrain VAT
Activate Bahrain VAT in the company master
- Open the company for which you need to activate VAT.
- Press F11 (Features) > set Enable Value added Tax (VAT) to Yes.

- Specify the TRN for the business. This can be printed in the invoices as required. You can specify this later.
- Specify the Registration date.
Bahrain VAT will be applicable for your transactions from this date onwards. - Select the Periodicity as Monthly or Quarterly.
Bahrain VAT returns will be generated based on the periodicity selected.
If you select Quarterly return, the Registration date gets prefilled in First quarterly tax period starts from field. You have to change it to 1-Jul-2019. - Enable the option Set/alter VAT details to specify tax rate details.
Note: You can set the standard VAT rate of 5% by enabling the option Set/alter VAT details. This rate will apply to all the masters.
- In the Ignore mismatch in tax up to field, specify the value up to which the mismatch in tax amount can be ignored.
Configure the data to view the mailing details in local language
- Press F12 (Configure) in Company Statutory Returns screen.
- Set the option Show mailing details in local language to Yes.
- Press Enter to accept.
- In the Company Statutory Returns screen, set the option Mailing details in local language to Yes to record company address in Arabic.

- Accept the screen. As always, you can press Ctrl+A to save.
You can create new ledgers or update the existing ledgers and start recording Bahrain VAT compliant transactions.
Sultanate of Oman VAT
Activate Sultanate of Oman VAT in the company master
- Open the company for which you need to activate VAT.
- Press F11 (Features) > set Enable Value added Tax (VAT) to Yes.
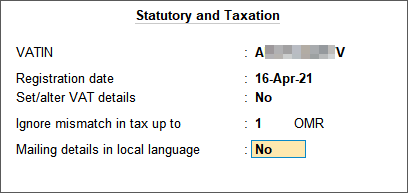
- Specify the VATIN for the business. This can be printed in the invoices as required. You can specify this later.
Note: As per the validation required by Oman VAT department, one of the following messages will appear on providing an incorrect VATIN:
- VATIN entered is less than 12 characters
- VATIN is not specified
- VATIN entered should be alpha numeric
- VATIN entered is more than 12 characters
- Specify the Registration date.
Oman VAT will be applicable for your transactions from this date onwards. - Enable the option Set/alter VAT details to specify tax rate details.
Note: You can set the standard VAT rate of 5% by enabling the option Set/alter VAT details. This rate will apply to all the masters.
- In the Ignore mismatch in tax up to field, specify the value up to which the mismatch in tax amount can be ignored.
Configure the data to view the mailing details in local language
- Press F12 (Configure) in Company Statutory Returns screen.
- Set the option Show mailing details in local language to Yes.
- Press Enter to accept.
- In the Company Statutory Returns screen, set the option Mailing details in local language to Yes to record company address in Arabic.

- Accept the screen. As always, you can press Ctrl+A to save.
You can create new ledgers or update the existing ledgers and start recording Oman VAT compliant transactions.
Stock Items and Stock Groups for VAT in GCC
If the items that you sell have different tax rates, update your stock items with the applicable VAT rates in GCC, and select the type of supply, as applicable. In case you need the same tax rate for the items in a stock group, modify the group to include tax applicability and rate.
In this section
Update stock items
- Gateway of Tally > Alter > type or select Stock Item > and press Enter.
Alternatively, press Alt+G (Go To) > Alter Master > Stock Item > and press Enter.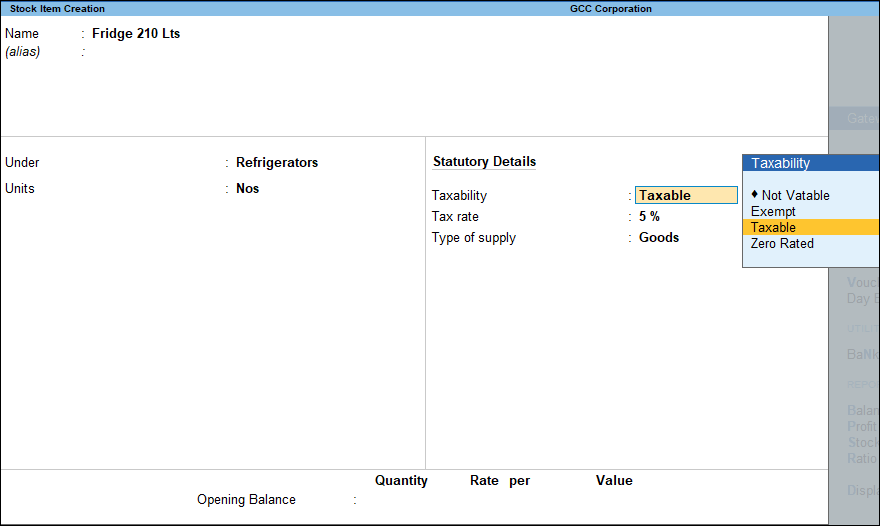
- Select the Stock Item.
- Select the Taxability of the item in Statutory Details Field.
- Taxable – for goods and services that are classified as taxable
- Exempt – for goods and services that are exempted from tax
- Zero Rated – for goods and services that have 0% tax
- Specify the Tax rate.
Note: If you have modified the tax rates before, press Alt+W (Details) to view the history of tax rate changes.
- Select the Type of supply. For stock items, Type of supply is set to Goods by default.
- Accept the screen. As always, you can press Ctrl+A to save.
The type of supply selected for a stock item is applicable only for that item.
You can record sales of stock items and print tax invoices.
- Gateway of Tally > Alter > type or select Stock Group> and press Enter.
Alternatively, press Alt+G (Go To) > Alter Master > Stock Group> and press Enter.
- Select the Stock Group.
- Enable Set/Alter VAT details to specify the details in the VAT Details screen, and save.

- Select the Taxability of the item.
- Taxable – for goods and services that are classified as taxable
- Exempt – for goods and services that are exempted from tax
- Zero Rated – for goods and services that have 0% tax
- Specify the Tax rate.
- Accept the screen. As always, you can press Ctrl+A to save.
Service Ledgers for VAT in GCC
To update taxes and other details of VAT in GCC for your service items, you need to modify your service ledgers.
- Gateway of Tally > Alter > type or select Ledger > and press Enter.
Alternatively, press Alt+G (Go To) > Alter Master > Ledger > and press Enter.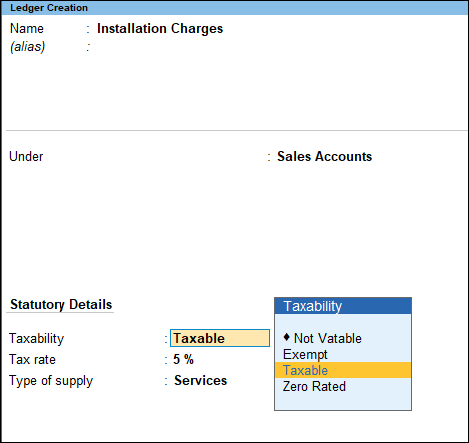
- Select Service Ledger from List of Ledgers.
- Select the Taxability of the Ledger.
- Taxable – for goods and services that are classified as taxable.
- Exempt – for goods and services that are exempted from tax.
- Zero Rated – for goods and services that have 0% tax
- Specify the Tax rate, if Taxable is selected in the Taxability field.
- Select the Type of supply – Services.
- Accept the screen. As always, you can press Ctrl+A to save.
You can use this ledger to bill the services rendered by your business, in the Accounting Invoice mode.
Sales and Purchase Ledgers for VAT in GCC
If many items you sell have the same tax rate, specify the tax rate and other details of VAT in GCC in your sales ledger. Similarly, if the items you purchase have the same tax rates, update your purchase ledger.
The taxability, tax rate, and type of supply specified in sales and purchase ledgers will be applicable to all items or services selected in the transactions where these ledgers are applied. The details specified in the sales or purchase ledger overrides the values set in the stock items or stock groups.
If you sell items with multiple tax rates, you can maintain a single sales ledger and record all details of VAT in GCC at the stock item or stock group level. Similarly, you can create a single purchase ledger.
In this section
- Gateway of Tally > Alter > type or select Ledger > and press Enter.
Alternatively, press Alt+G (Go To) > Alter Master > Ledger > and press Enter. - Select Sales Ledger from List of Ledgers.
Note: While creating the sales ledger for UAE, KSA, Bahrain or Oman VAT, the relevant Nature of Transaction will appear for selection.
- Select the required Nature of transaction. This field will appear after you enable the option Set Nature of transaction for ledger in F12 (Configure).
- Select the Taxability of the item.
- Taxable – for goods and services that are classified as taxable.
- Exempt – for goods and services that are exempted from tax.
- Zero Rated – for goods and services that have 0% tax.
- Specify the Tax rate.
- Select the Type of supply.
- Accept the screen. As always, you can press Ctrl+A to save.
Follow the steps used for updating the sales ledger, with the nature of transaction and rates for purchase.
Note: While creating the purchase ledger for UAE, KSA, Bahrain or Oman VAT, the relevant Nature of Transaction will appear for selection.
While recording a sale or purchase transaction, you can select the respective ledger.
Party Ledgers for VAT in GCC
To specify the relevant details of VAT for your suppliers and customers in GCC, you need to create or modify your party ledgers.
In this section
Create Party Ledgers
When creating supplier ledger and customer ledger, you need to provide the necessary VAT registration details. You can use the supplier ledger in purchase transactions, and customer ledger in sales transactions.
UAE VAT
- Gateway of Tally > Create > type or select Ledger > and press Enter.
Alternatively, press Alt+G (Go To) > Create Master > Ledger > and press Enter. - Press F12 (Configure), enable the option Select Type of Party and press Ctrl+A to accept. This option is provided only for UAE VAT, as per the return filing requirements.
- Enter the Name of the supplier’s ledger.
- Select Sundry Creditors from the List of Groups in the Under field.
- Set the option Maintain balances bill-by-bill to Yes.
- Enter the Default credit period, if any.
- Enter the Address, and select Country and Emirate or Region of the supplier.
- Set the option Mailing details in local language to Yes, and enter the relevant details in Arabic, if required.
- Select the relevant Registration Type from the List of registration Types.
- Specify the Date of VAT registration.
- Enter the TIN or TRN.
- Accept the screen. As always, you can press Ctrl+A to save.
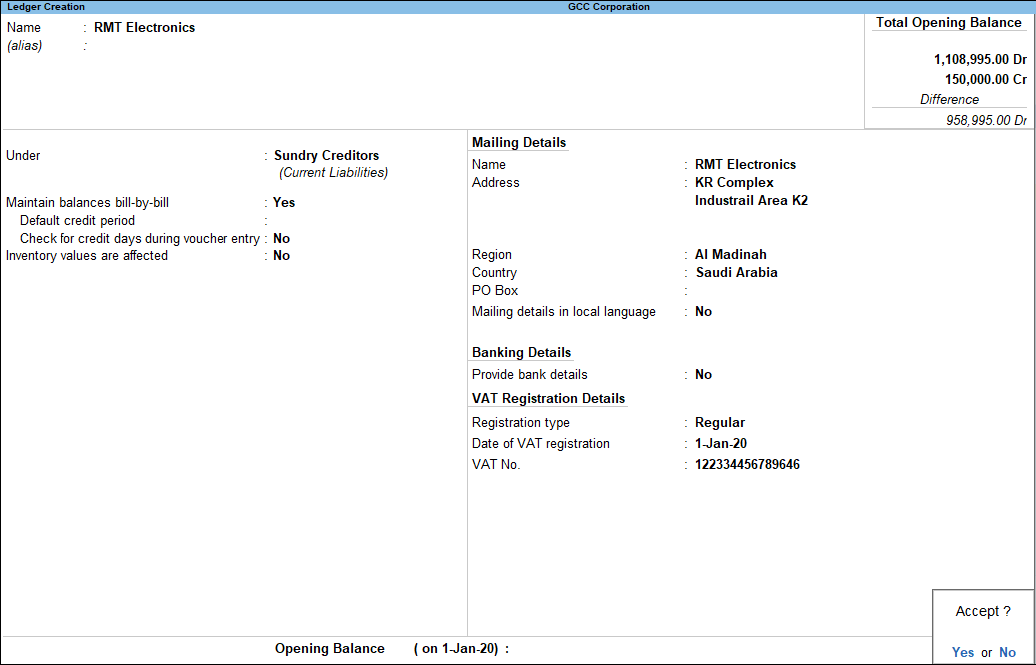
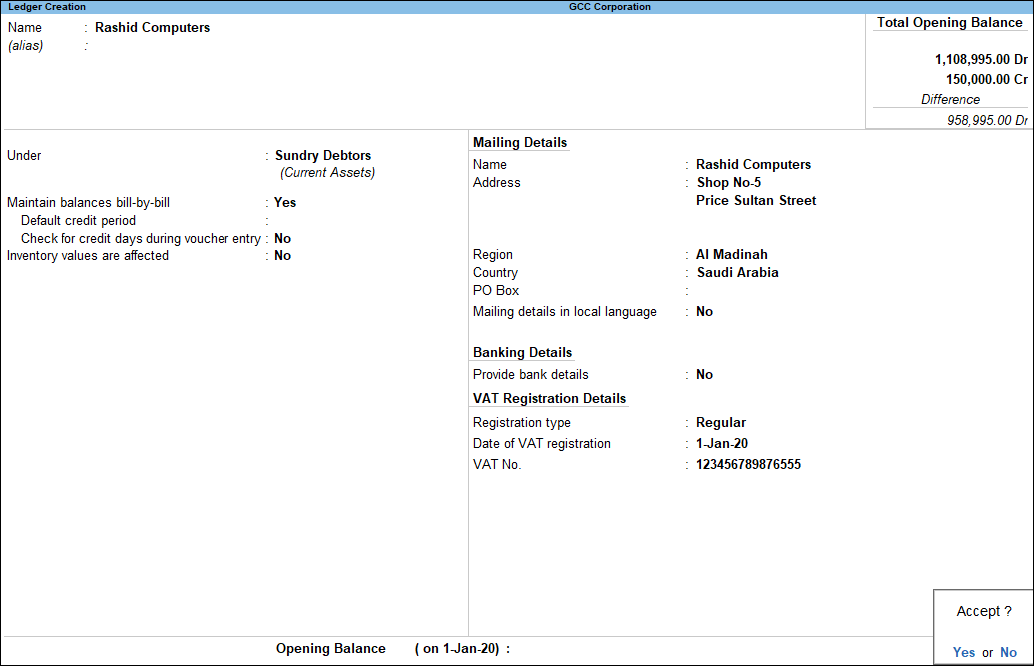
KSA VAT
The party ledger appears as shown below:
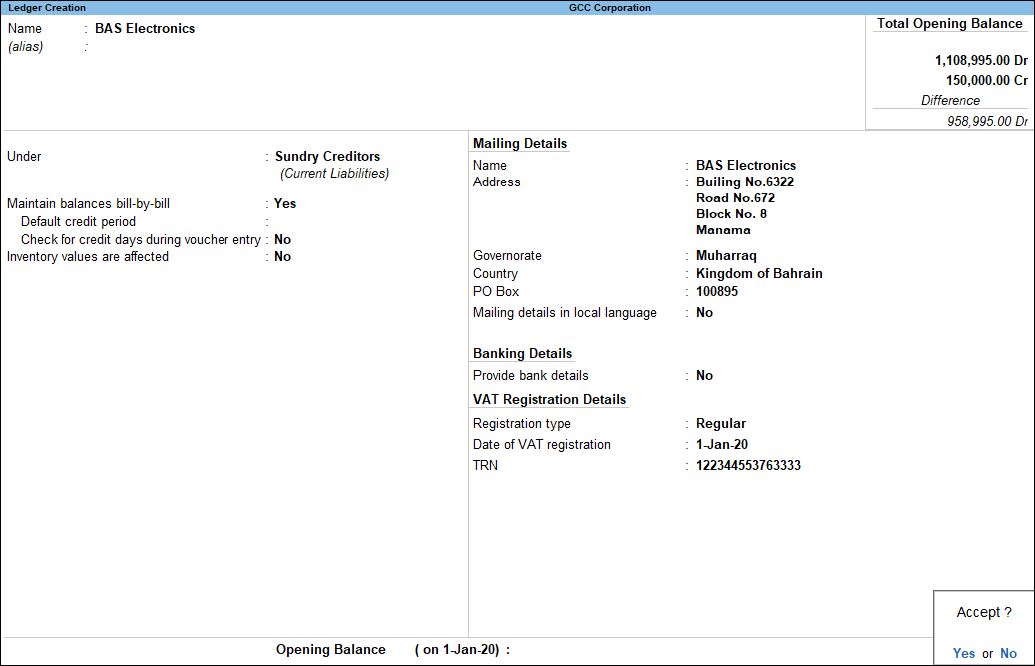
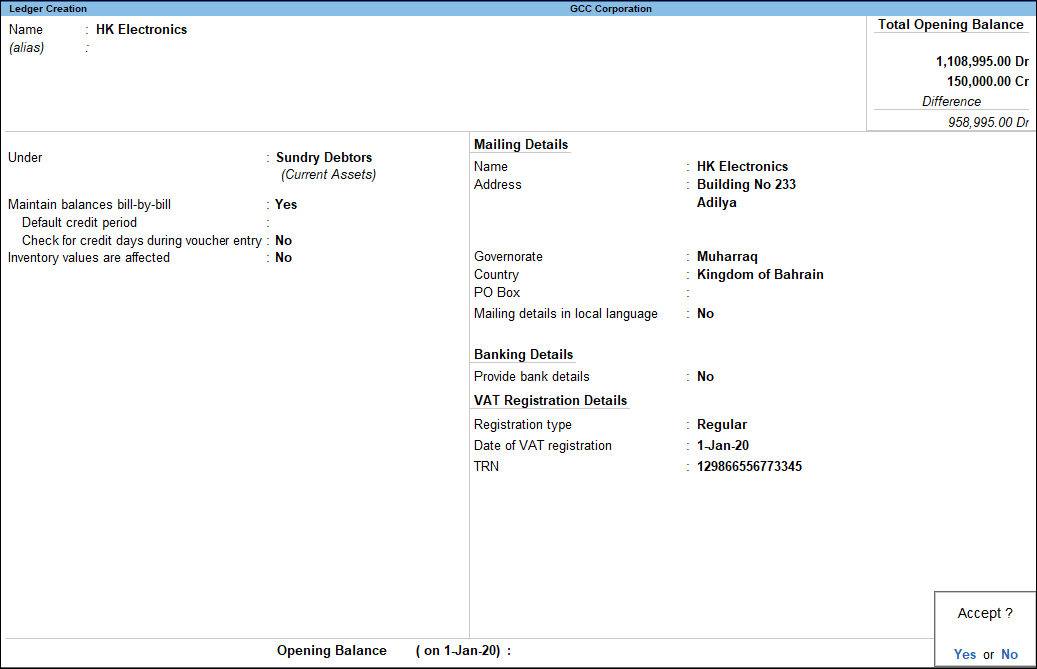
Bahrain VAT
The supplier ledger appears as shown below:
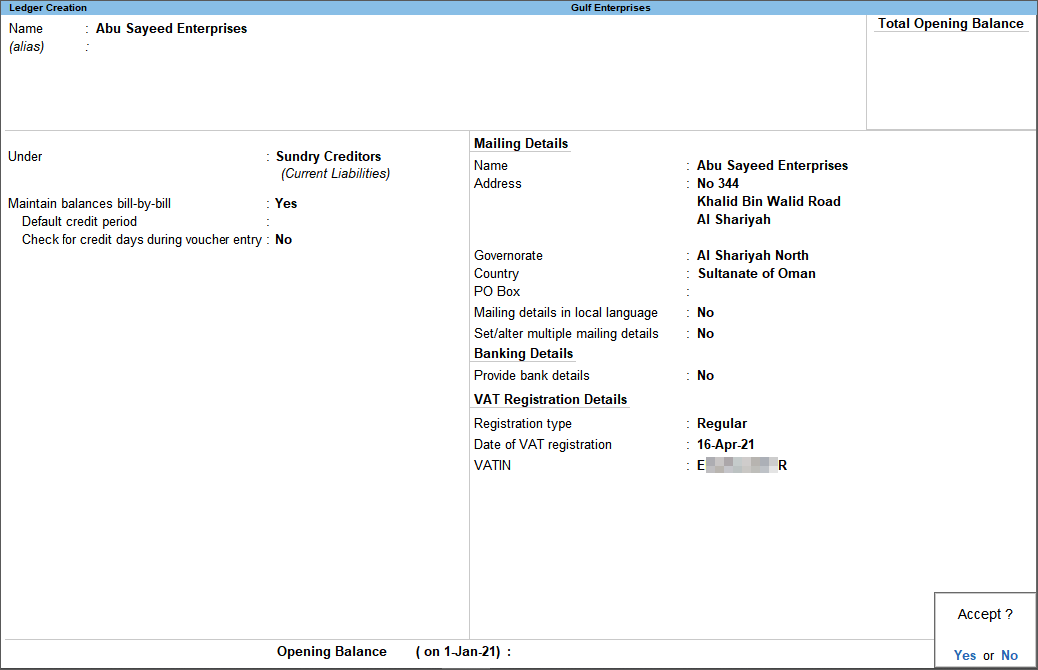
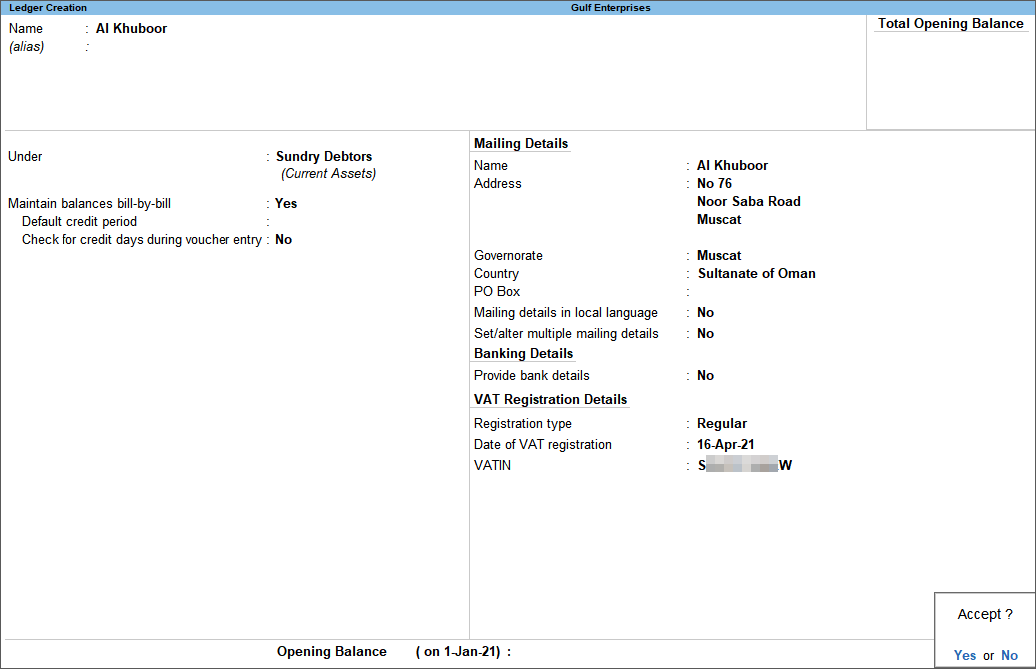
Oman VAT
The supplier ledger appears as shown below:
UAE VAT
- Gateway of Tally > Create > type or select Ledger > and press Enter.
Alternatively, press Alt+G (Go To) > Create Master > Ledger > and press Enter. - Press F12 (Configure), enable the option Select Type of Party and press Ctrl+A to accept. This option is provided only for UAE VAT, as per the return filing requirements.
- Enter the Name of the customer’s ledger.
- Select Sundry Debtors from the List of Groups in the Under field.
- Set the option Maintain balances bill-by-bill to Yes.
- Enter the Default credit period, if any.
- Enter the Address, and select Country and Emirate or Region of the customer.
- Set the option Mailing details in local language to Yes, and enter the relevant details in Arabic, if required.
- Select the relevant Registration Type from the List of registration Types.
- Specify the Date of VAT registration.
- Enter the TIN or TRN.
- Accept the screen. As always, you can press Ctrl+A to save.
KSA VAT
The party ledger appears as shown below:
Bahrain VAT
The buyer ledger appears as shown below:
Oman VAT
The buyer ledger appears as shown below:
Update Party Ledgers
Quickly update the TIN/TRN details for your parties group-wise from the Update Party TRN report. You can also provide this at the individual party ledger level. For Oman, you need to update the party’s VATIN in the Update Party VATIN.
The Import Party TRN tool helps you update TRN details of all parties at once from Microsoft Excel. It is very useful if you have the TRN information of all the parties outside TallyPrime and want to import the information to update the party ledgers in TallyPrime. For Oman, you need to import the party’s VATIN from the Import Party VATIN report.
- Gateway of Tally > Display More Reports > VAT Reports > Update Party TRN.
Alternatively, press Alt+G (Go To) > type or select Update Party TRN > and press Enter. - Select the group and the ledger for which you want to update the TRN.
- In the Update Party TRN screen, enter the TRN for each party.
- Press F8 (All Ledgers) to view all the parties.
Once you have updated the TRN for your parties, you can print the TRN details in your invoices for filing returns.
- Gateway of Tally > Display More Reports > VAT Reports > Update Party VATIN.
Alternatively, press Alt+G (Go To) > type or select Update Party VATIN > and press Enter. - Select the group and the ledger for which you want to update the VATIN.
- In the Update Party VATIN screen, enter the VATIN for each party.
- Press F8 (All Ledgers) to view all the parties.
- Gateway of Tally > Display More Reports > VAT Reports > Update Party TRN.
Alternatively, press Alt+G (Go To) > type or select Update Party TRN > and press Enter. - Select All Items in the Name of Group and Name of Ledger fields in Select Group screen and press Enter. The Update Party TRN screen appears.
- Press Alt+E (Export) and select Current to export the information in the MS Excel format.
- Open the exported file, specify the TRN details for the parties, and save the file.
- In TallyPrime, Gateway of Tally > Display More Reports > VAT Reports > Import Party TRN.
Alternatively, press Alt+G (Go To) > type or select Import Party TRN > and press Enter. - Specify the name of the MS Excel file and the path in the field Name of the file to be imported (Excel).
- Press Enter to import.
- Gateway of Tally > Display More Reports > VAT Reports > Update Party VATIN.
Alternatively, press Alt+G (Go To) > type or select Update Party VATIN > and press Enter. - Select All Items in the Name of Group and Name of Ledger fields in Select Group screen and press Enter. The Update Party VATIN screen appears.
- Press Alt+E (Export) and select Current to export the information in the MS Excel format.
- Open the exported file, specify the VATIN for the parties, and save the file.
- In TallyPrime, Gateway of Tally > Display More Reports > VAT Reports > Import Party VATIN.
Alternatively, press Alt+G (Go To) > type or select Import Party VATIN > and press Enter. - Specify the name of the MS Excel file and the path in the field Name of the file to be imported (Excel).
- Press Enter to import.
When the import is completed for party TRNs or party VATINs, the MS Excel file opens and displays the message Data imported successfully.
Note: Ensure that the party names are not altered in the MS Excel file exported from TallyPrime. Also, the name of Country, Region/Emirate, and Registration Type specified in the MS Excel file must match the spellings given in TallyPrime.
Correct errors in the imported data
- Open the MS Excel file and check for a sheet called Errors. If this sheet is there, it means that some data was incorrect for some parties and has not been imported into TallyPrime.
- Check and make necessary corrections in the Errors sheet. Save the file.
- Import the file again. The corrected information is imported this time.
Expense and Income Ledgers for VAT in GCC
The supply of goods or rendering of services may involve additional expenses, which can either form part of the cost of stock items or value of services, or can be charged separately. When such an expense is recovered from customers, it becomes an income.
While accounting for expenses and incomes, the ledgers have to be grouped under Direct Expenses, Indirect Expenses, Direct Incomes, or Indirect Incomes.
- Gateway of Tally > Create > type or select Ledger > and press Enter.
Alternatively, press Alt+G (Go To) > Create Master > Ledger > and press Enter. - Set Taxability as Not Vatable.
- Select VAT in the Include in assessable value calculation for field.
- In the option Appropriate to select,
- Goods – to include the expense or income value in the stock item cost.
- Services – to include the expense or income value in the service value.
- Both – to include the expense or income value in the stock item cost or service value.
- If the option Appropriate to is set to Services, appropriation is done based on the value. If the option is set to Goods, select the Method of Calculation as:
- Based on Quantity – to distribute the expense or income amount based on the quantity entered for each stock item in the invoice.
- Based on Value – to distribute the expense or income amount based on the value of each stock item or service selected in the invoice.
- Accept the screen. As always, you can press Ctrl+A to save.
You can use the expense ledger in a sales invoice with the sale of your goods or services. Similarly, you can use this ledger for creating purchase invoices as well.
Tax Rate Setup for VAT in GCC
The Tax Rate Setup tool helps to configure the tax rates of all stock groups and items from one screen. The tool also maintains the history of tax rates configured for the company.
The Tax Rate Setup tool helps to configure the tax rates for stock items or stock groups, change the parent group of an item, force set the VAT rate for a group and erase tax details from sub-groups and items under a particular group, and erase VAT rate details for a group or item. However, after setting the tax rates at the group-level, item-level changes are allowed and will be considered for the particular item.
Set VAT rates
- Gateway of Tally > Display More Reports > VAT Reports > Tax Rate Setup.
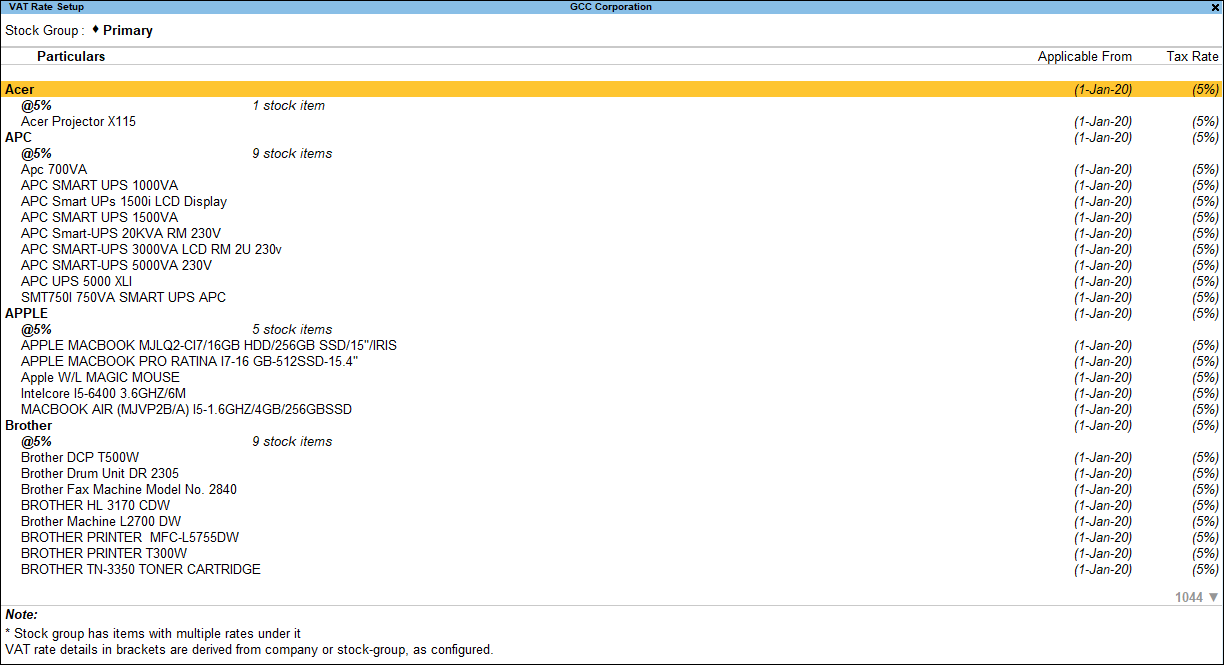
Alternatively, press Alt+G (Go To) > type or select Tax Rate Setup > and press Enter. - Press Alt+F5 (Detailed). The VAT Rate Setup screen appears as shown below:
- Select stock groups or stock items.
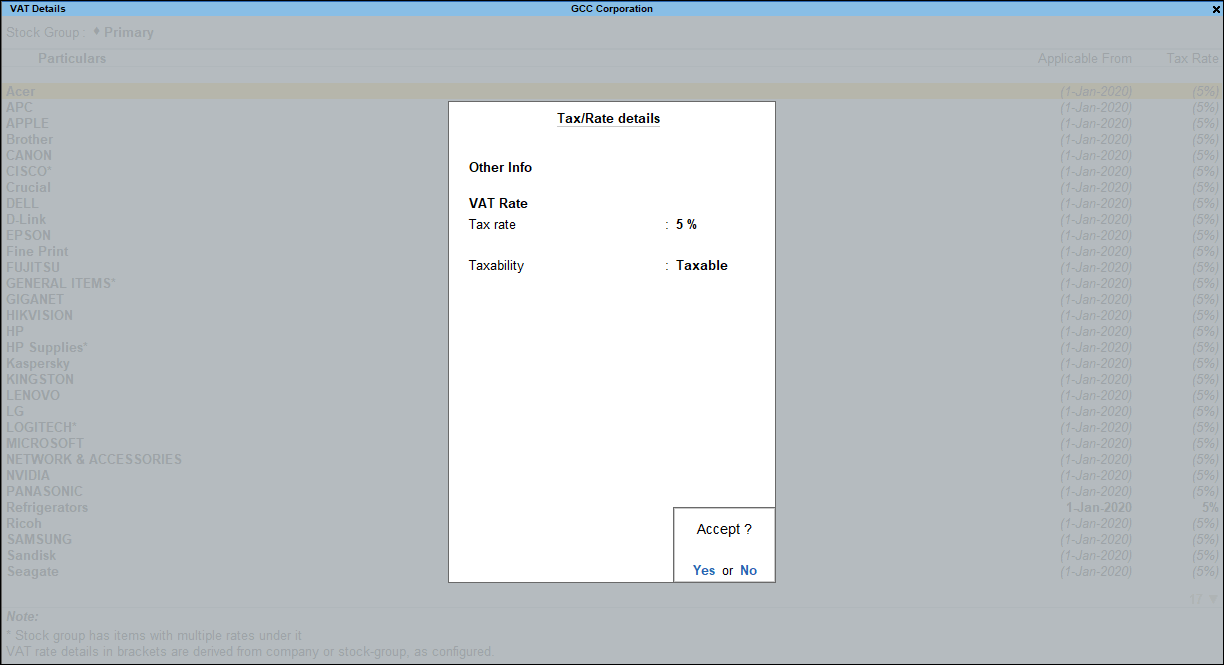
- Press Alt+S (Set Rate) to view the VAT Details screen.
- Enter the VAT rate. A common VAT rate is set for the selected groups or items.
- Accept the screen. As always, you can press Ctrl+A to save.
A sample VAT Rate Setup screen with all rate details set is shown below.
Change the stock group of a stock item
- Press Alt+R (Move to Group) in the VAT Rate Setup screen. The Alter Stock Group for Selected Item(s) screen appears as shown below:
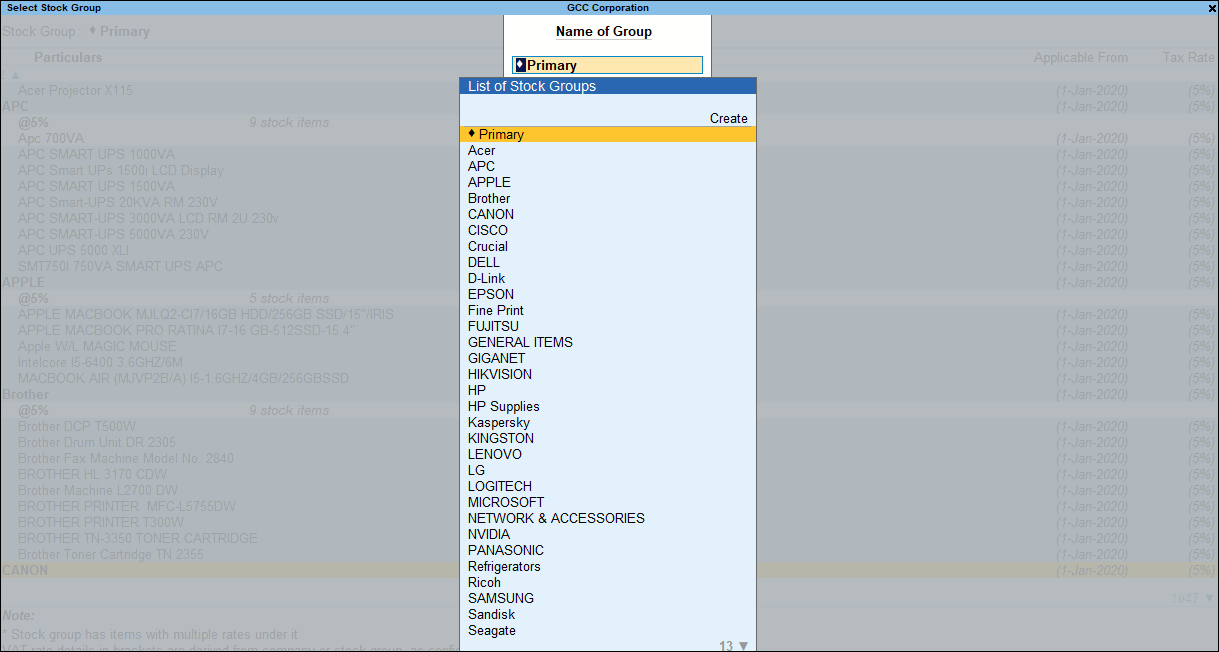
- Select a stock group to move the stock item.
- Accept the screen. As always, you can press Ctrl+A to save.
In a similar manner you can regroup the items as required.
Note: Select a stock group in the VAT Rate Setup screen. Press Alt+C to create a new sub-group under any of the existing groups. Stock items can be moved to the new sub-group as required. This makes it easy to group stock items with the same VAT rates. Any rate changes can be applied to the whole sub-group without having to change them manually for each stock item.
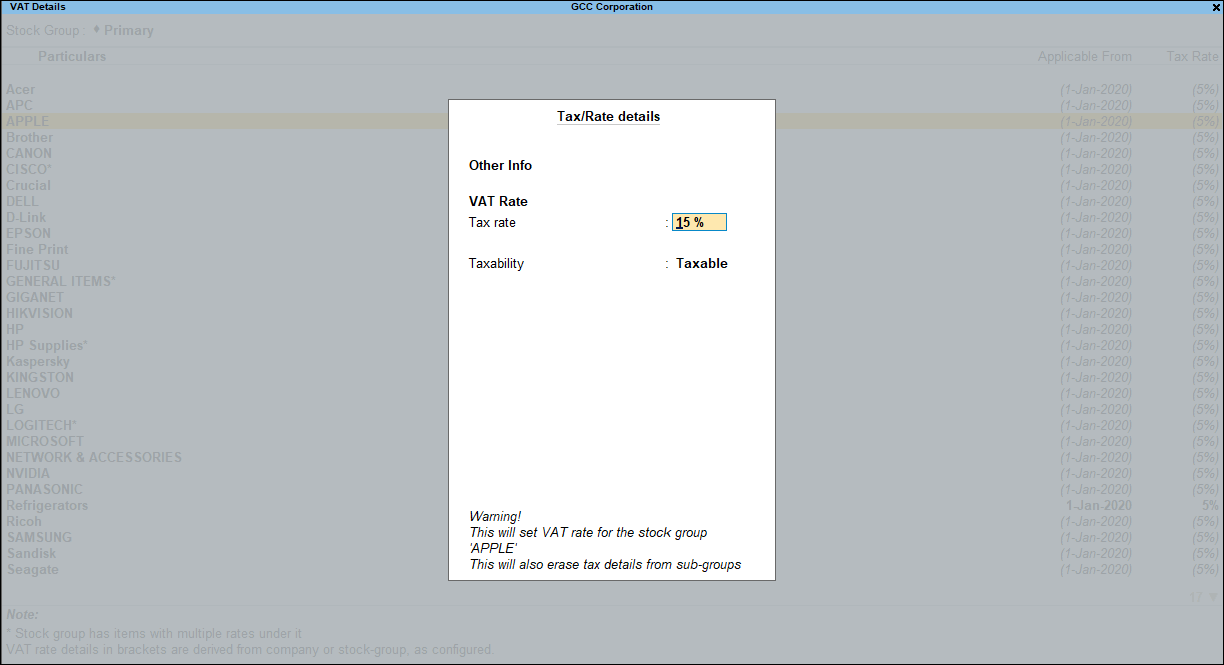
- Press Alt+V (Enforce Rate) in the VAT Rate Setup screen.
- Enter the Tax rate. A warning message appears as shown below:
- Accept the screen. As always, you can press Ctrl+A to save.
A common VAT rate is set for the selected group, and all the items in the group.
Remove rate details for a group or item
- 1.Press Alt+W (Clear Rate). A message appears as shown below:
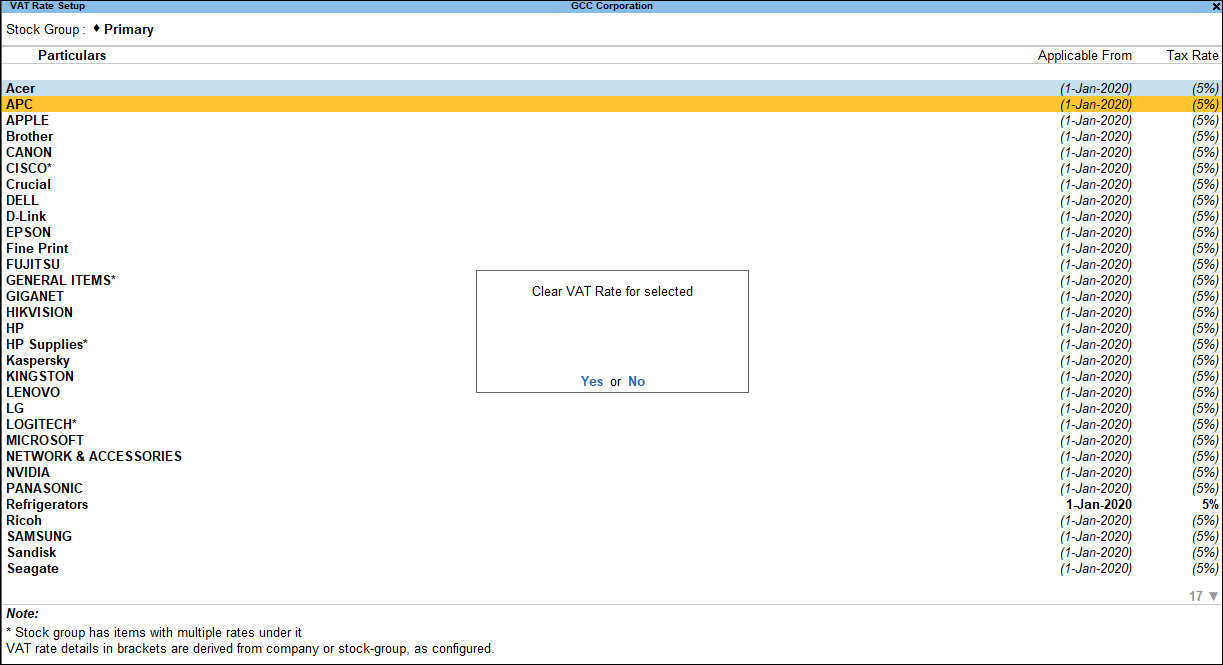
- Click Yes to clear the rate for the item. Multiple items can be selected using Space Bar to clear the tax details.
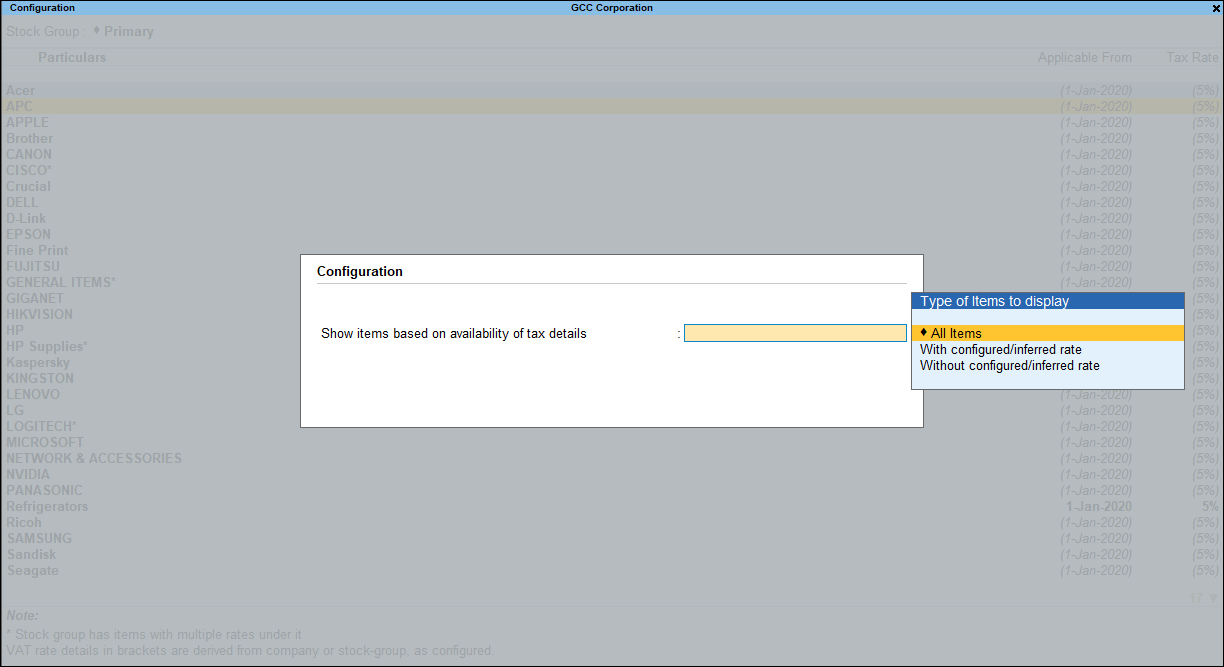
View groups/items without tax rate
