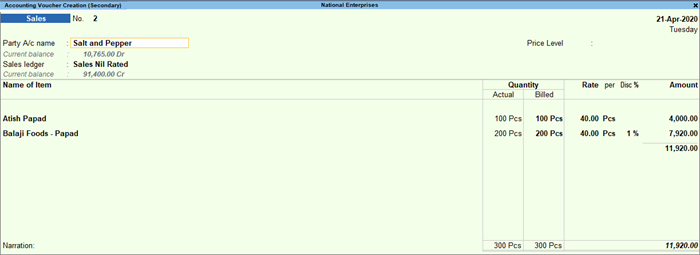
The Day Book is an account book in which a day’s entries or transactions are captured. TallyPrime stays true to the traditional Day Book used by businesses for manual book-keeping, while bringing in a host of powerful features.
You can modify the Day Book in TallyPrime to view only one kind of transaction (for example, the purchases of the day), or search for any transaction irrespective of the date. You can also select multiple transactions at once and cancel, delete, or remove the entries from the Day Book. Similarly, you can verify your transactions, and account for any missing entries by adding, inserting, or duplicating entries.
View Day Book in TallyPrime
Visit the Day Book in TallyPrime to see all your transactions that were recorded on a particular day. By default, this day is set to the Current Date displayed in Gateway of Tally.
- Gateway of Tally > Day Book.
Alternatively, Alt+G (Go To) > type or select Day Book > press Enter.
- Press Alt+F5 (Detailed) for a detailed format of the report. You can see the break-up of the invoice with details such as additional charges, tax components, and so on.

If you want to add more details, such as narration and cost centre, you have to enable these options by pressing F12 (Configure) from the Day Book.
Filter Day Book by Type of Transaction
In the Day Book in TallyPrime, you can see not only the transactions of the day but also a single kind of transaction. For example, you may want to see all the Receipts. You can easily change the view of the Day Book to see all the Receipts recorded for the day.
- Day Book > F4 (Voucher Type), and select the Receipts voucher type.
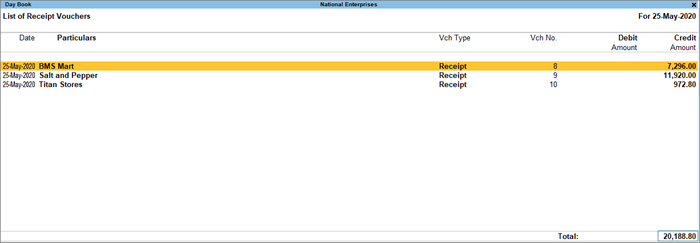
You can also see the Total amount from your receipts.
Search for a Transaction Within Your Books
If your business has hundreds or thousands of transactions, it can get difficult if you are trying to find a particular transaction. Here is how Day Book will help you find it easily.
Let us assume that you had disbursed some money for the maintenance of your office, but you are unable to find more details about this. You feel that you might have added a note in the narration of the transaction.
No problem! You can use the Range feature to locate this transaction.
Note: Before using the Range feature, press Alt+F2 and clear the From and To dates. Now you can see all your transactions till date.
- Day Book > Alt+F12 (Range):
- Select Voucher in the Type of Information field.
- Select Narration in the having field.
- Select containing in the Range of Information field.
- Enter ‘repair’ in the last field, if you think that you might have used this word in the narration.
- Press Enter to continue.

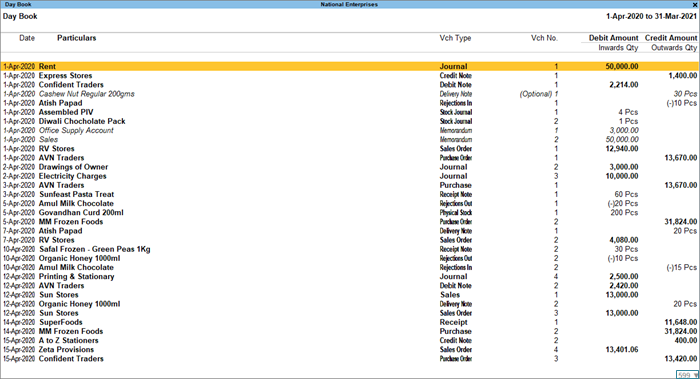
You can see the following transactions in the Day Book.
- Press Enter to open the transaction, and check the details.
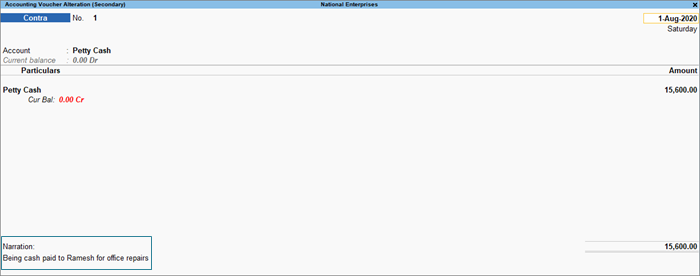
Is this the transaction you were looking for? May be it is!
Add, Insert, or Duplicate a Transaction
In this section
Add a transaction
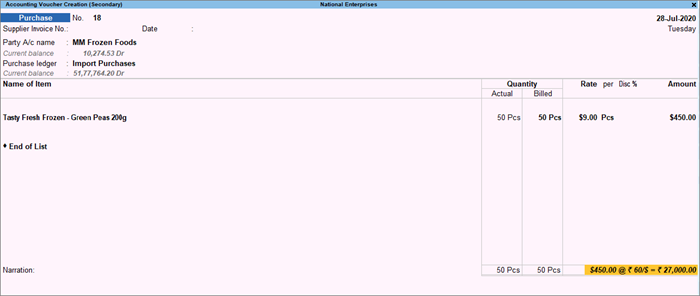
You can add a voucher from the Day Book in TallyPrime to account for a missing entry. For example, let us assume that a representative from one of your parties (MM Frozen Foods) comes to your office and requests for a payment of Rs 27,000.
Using the Range feature, search for transactions involving MM Frozen Foods.
You can see a few related transactions, but cannot find the entry amounting to Rs 27,000.
Now you can add a purchase entry directly and hand over the payment.
Select one of the relevant entries that appeared in the Day Book, and press Alt+A to add a new transaction
Enter the necessary details and save the transaction.
Now you can see the entry for Rs 27,000 against MM Frozen Foods in the Day Book.
Insert a transaction
If you want to add a missing transaction in a particular sequence or position, then you can insert it in the Day Book.
Let us take a scenario where you discover that two entries of the same amount had been passed on the same day. You think that they might be duplicates, so you delete one of the entries.
However, your data entry operator points out that they were unique entries.
Now, how can you retrieve the original entry with the same voucher number and position? Easy. You can insert this entry. The voucher number and position will be restored.
Select the entry above which you want to insert the transaction, and press Alt+I. Enter the relevant details and save the transaction.
Now you can see both the entries on the specified date in the Day Book, with the original voucher numbers and amounts.
You can also choose to add the transaction instead of inserting it, but the sequence or position of the entry might not be the same.
Duplicate a transaction
You can duplicate a voucher in the Day Book to easily account for a recurring transaction.
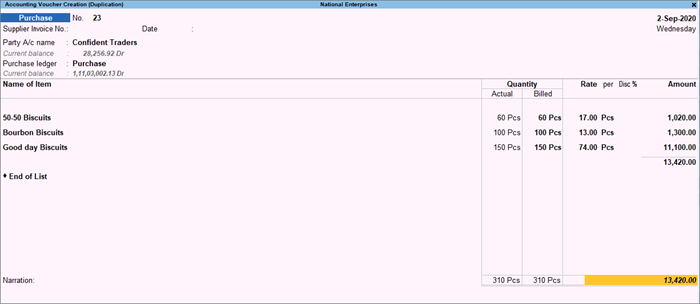
Let us take a scenario where your business has a deal with Confident Traders to purchase for a consignment of biscuits every month.
You have passed a purchase entry for August. Now you can easily repeat this transaction each month. Just select the existing entry and press Alt+2 (Period).
You can see that all the details of the selected voucher are duplicated. You can update the required details, such as Voucher Date, Supplier Invoice No., and Invoice Date, and save the transaction.
Now you can see the latest entry against Confident Traders in the Day Book, for the month of September.
Similarly, you can duplicate the vouchers for the upcoming months.
Delete, Cancel, or Remove a Transaction
In this section
Delete a transaction
In the Day Book, you can easily delete vouchers that are no longer relevant. Let us take a scenario where you discover that the same transaction was recorded twice against Sun Stores, probably by two different data entry operators.
Select either of the entries, and press Alt+D to delete it from your books.
Cancel a transaction
What do you do when an order is cancelled, but an entry has already been passed? Simple! You can just cancel the corresponding voucher, instead of deleting it. The benefit is that voucher numbering will not be affected, as the same voucher number will not be available for reuse. It will be assigned in your books to the cancelled voucher.
Let us take a scenario where S.M. Traders had placed an order, and you had recorded a corresponding sales entry. The goods are packed and ready to be shipped. However, a representative from the purchase department of S.M. Traders calls your office and cancels the purchase at the last minute.
Now how do you cancel the transaction?
Select the relevant entry in the Day Book and press Alt+X to cancel.
You can see that the entry has been cancelled, with the original voucher number intact.
Remove a transaction
Did you know that you can temporarily hide entries from the Day Book, without deleting it from your books?
Let us assume that you want to view the transactions for the day without the entries against Sunday to Monday, which happens to be a sister concern of your business.
Press F4 (Voucher Type) > Sales. You can view all the sales transactions of the day.
Select the entries against Sunday to Monday, and press Ctrl+R to remove the entries.
The entries against Sunday to Monday are now hidden from view. You can see the impact on the Day Book with respect to the Total amount.
Restore entries
- To restore the last entry that was hidden, press Ctrl+U. Similarly, you can keep pressing Ctrl+U to undo the last but one entry. The entries will be restored in the order in which they were hidden.
- To restore all the hidden entries, press Alt+U.
Data Representation in Day Book in TallyPrime
In this section
- Alter Vouchers
- Change period
- Change company
- Change report context
- View profitability
- View Columnar report
- Basis of Value
- Change View
- Exception Reports
Alter vouchers from the report
Press Ctrl+Enter on any selected voucher in the report to alter it.
Change period
Press F2 (Period) to specify the date for which you want to view the report.
Change company
When you have two or more companies open, press F3 (Company) to change from one company to another.
For example, if you are viewing the Day Book for National Enterprises, press F3 (Company) > and select National Tradings & Co. The Day Book report for National Tradings & Co. will be displayed. As always, you can press Esc to go back to the previous screen.
Change report context
Press F4 (Voucher Type) and select a voucher type to view the transactions recorded for the selected voucher.
View profitability
If you are viewing the Day Book for a selected voucher type, press F7 (Show Profit) to see the Gross Profit against the Transaction Value and Cost. You can use F7 (Hide Profit) to hide the profit-related details.
View Columnar report
- In Day Book, you can choose to display details related to each transaction in a columnar view.
Ctrl+B (Basis of Values)
You can configure the values in your report for that instance, based on different business needs.
In Day Book, you can display the values based on the Type of Voucher Entries you select.
- Press Ctrl+B (Basis of Values) >Type of Voucher Entries > select Accounting Entries Only.
- Press Esc to view the default values.
Similarly, you can view the total values related to Forex Transactions only. Press Ctrl+B (Basis of Values) > Show Forex Transactions only > and press Enter.
Ctrl+H (Change View)
You can display the details of a report in different views with additional details or for a specific period. You can also view other reports related to the current report.
- To view the Post-Dated Transactions for Day Book on the specified date, press Ctrl+H (Change View) > type or select Post-Dated Bank Transactions > and press Enter.
- Press Esc to view the default report.
Ctrl+J (Exception Reports)
You can view the exceptions related to the data displayed in the current report by pressing Ctrl+J (Exception Reports), without closing the report.
- To view the List of Optional Vouchers for Day Book, press Ctrl+E (Exception Reports) > type or select Optional Vouchers > and press Enter.
- Press Esc to view the default report.


