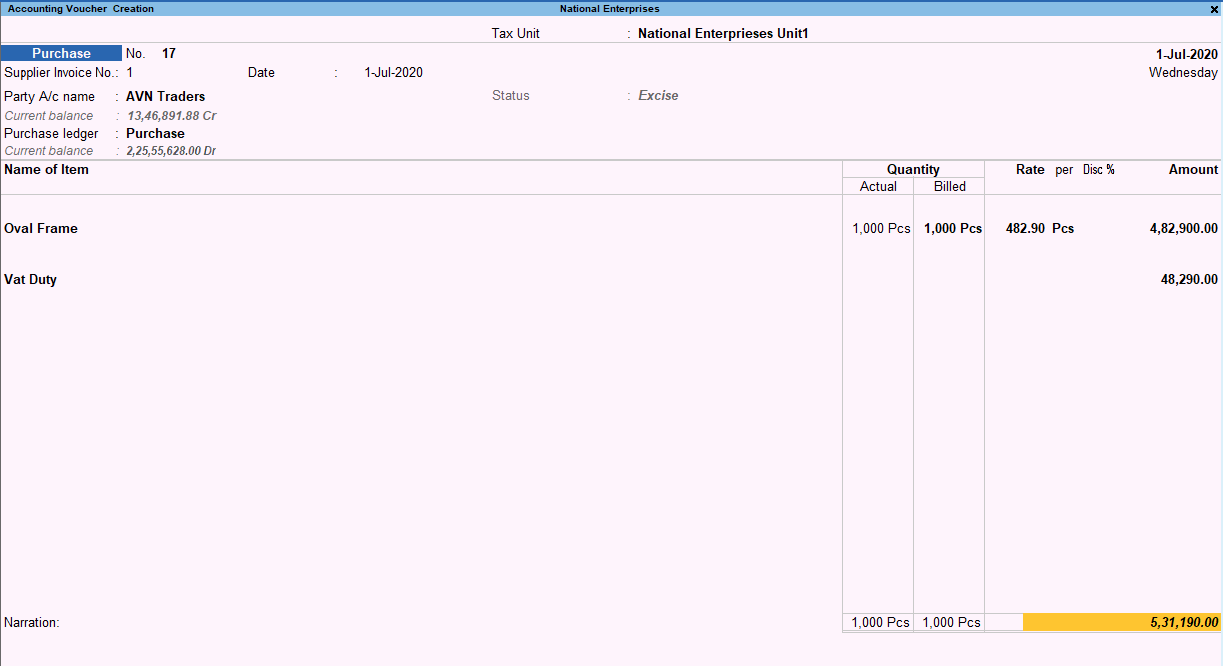
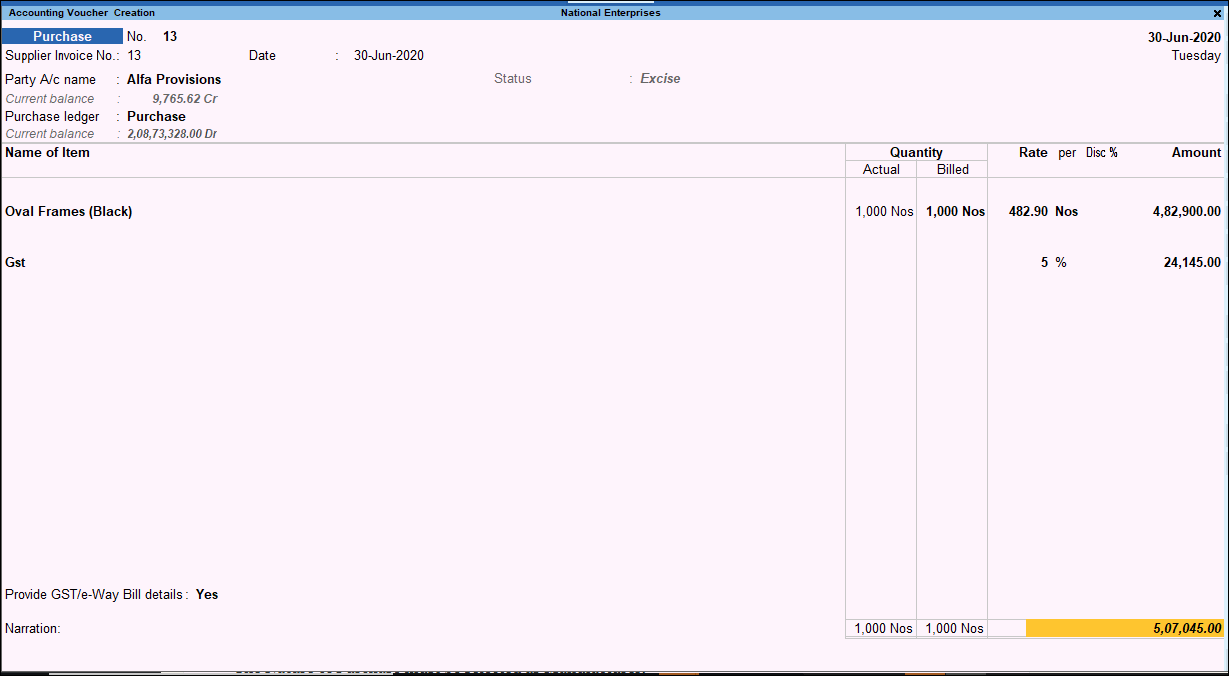
Record Excise Purchase Invoice (Excise for Dealer)
Excise purchases can be recorded in purchase invoice without linking the purchase Voucher Type to tax unit or excise godown. If multiple tax units are created by linking it to godowns, the same can be selected while recording the invoice.
Excise Purchases
- Gateway of Tally > Vouchers > press F9(Purchase).
Alternatively, press Alt+G (Go To) > Create Voucher > press F9 (Purchase). - Press Ctrl+H (Change Mode) > select Excise Invoice.
- Enter Supplier Invoice No. and Date.
- Select the required Tax Unit.
Tax Unit option appears only when one or more user defined Tax Units are created by linking it to godown. - Select the Party’s A/c Name from the List of Ledger Accounts. The Nature of Purchase predefined in the party ledger gets displayed. It can also be selected in the Nature of Purchase option of Party Details screen.
- Select the Nature of Purchase in the Party Details.
This option is provided to identify the supplier’s role in this transaction.- Agent of Manufacturer (Consignment Agent): This is selected when the supplier is a consignment agent of the manufacturer.
- First Stage Dealer: This is selected when the goods are directly purchased from the First Stage Dealer.
- From Agent of Dealer: This is selected when goods are purchased from a supplier who acts as a commission agent of the First Stage Dealer.
- From Agent of Importer: This is selected when the supplier acts as a commission agent of an importer.
- From Agent of Manufacturer: This is selected when the supplier is a commission agent of the manufacturer.
- Importer: This is selected when the goods are self imported.
- Importer Depot: This is selected when the goods are purchased from the importer’s depot.
- Manufacturer: This is selected when the goods are directly purchased from the manufacturer.
- Manufacturer Depot: This is selected when the goods are purchased from the manufacturer’s depot.
- Purchase from Importer: This is selected when the goods are purchased from the importer.
- Second Stage Dealer: This is selected when the goods are purchased from the Second Stage Dealer.
- The Supplier’s Details appears as defined in the party ledger. Enter the Manufacturer/Importer Details if the supplier is not a manufacturer or importer.
- Select the Purchase Ledger grouped under Purchase Accounts. In the purchase ledger, ensure the options Is VAT/CST Applicable and Is Excise Applicable are set to Applicable.
- Select the required Nature of Transaction in the VAT Classification Details screen. For example, Purchase Taxable.
To view the VAT Classification Details screen, press F12 (Configure) in the purchase invoice and set the option, Allow modification of Tax Details for VAT to Yes. - Select the required stock item.
If the tariff details are not defined in the stock item master, it will be picked from:- Stock group, if user-defined stock group in which tariff details are defined, is linked to the item.
- Tariff details defined at the company level.
- Select the Godown, enter the Quantity and Rate to display the amount in Stock Item Allocations screen.
- Enter the Manufacturer/Importer Details and Duty Details in Excise Details.
The Manufacturer/Importer Details and Duty Details have to be provided if the Nature of Purchase is selected as:- Agent of Importer.
- Agent of Manufacturer.
- First Stage Dealer.
- From Agent of Dealer.
- From Agent of Importer.
- From Agent of Manufacturer.
- Manufacturer Depot.
- Purchase From Importer.
- Importer Depot.
- Second Stage Dealer.
- In Manufacturer/Importer Details section, the options are displayed to enter the invoice number, invoice date, billed quantity and assessable value.
In Duty Details section, based on the valuation type, the Rate of Duty and/or Rate per Unit appears as predefined in the stock item master. The Duty Amount appears automatically. To change rate of duty or rate per unit, press F12 (Configure) in the purchase invoice and set the option Allow modification of Tax Details for Excise to Yes.
Note: The Duty Details can be modified only if the same is predefined either in the stock group linked to stock item or in the stock item master.
To provide additional details, press F12 (Configure) of Excise Details screen and enable the required options. The options provided in the configuration and its usage is given below:- Allow RG 23D Entry Number: On enabling it, the option RG 23D Entry No. appears in Excise Details screen.
- Allow Supplier Invoice Details: On enabling it, the section Supplier Invoice Details appears in Excise Details screen with provision to enter the invoice number, invoice date and assessable value as specified in the invoice received from supplier.
- Allow Supplier PLA/RG 23 Numbering: On enabling it, the option Supplier RG 23D Entry No. appears in Excise Details screen.
- Allow manufacturer Details: On enabling it, additional fields to enter name, address, excise registration number, importer exporter code, range, division and commissionerate of the manufacturer gets displayed in Excise Details screen.
- Allow Manufacturer/Importer PLA/RG 23 Number: On enabling it, the option PLA/RG 23 Entry No. field appears in Excise Details screen.
- Show Multiple Duty Details: On enabling this option, a section appears in Excise Details screen with columns to select duty heads, enter the rate of duty, rate per unit and duty amount.
- Show duty amount based on supplier’s bill: On enabling this option, the column Supplier Duty Amount appears to enter the duty amount for the selected duty head.
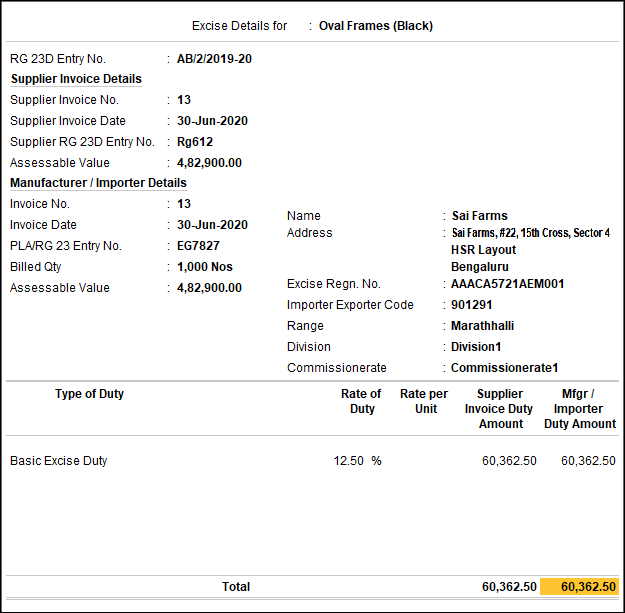
- Let us assume that all the options of F12 (Configure) provided for Excise Details screen are enabled. Provide the purchase details as given below:
- RG 23D Entry No.: This represents the entry number of the transaction in the relevant page of RG 23D Register. Based on the numbering format defined at the company level or Tax Unit, the number appears here.
- Supplier Invoice Details
- Supplier Invoice No.: The purchase invoice number appears here. It can be changed if required.
- Supplier Invoice Date: The purchase invoice date appears here. It can be changed if required.
- Supplier RG 23D Entry No.: Enter the RG 23D entry number specified in the supplier’s invoice.
- Assessable Value: The assessable value of stock items selected in the purchase invoice appears here.
- Manufacturer/Importer Details
- Invoice No.: Enter the invoice number of the manufacturer/importer.
- Invoice Date: Enter the invoice date of the manufacturer/importer.
- PLA/RG 23 Entry No.: Enter the PLA/RG 23 entry number specified in the manufacturer’s/importer’s invoice.
- Billed Quantity: The quantity entered in the purchase invoice appears here. It can be changed if required.
- Assessable Value: The assessable value of stock items selected in the purchase invoice appears here. It can be changed if required.
- Name and Address: The Name and Address entered in Manufacturer/Importer Details section, in Party Details screen of purchase invoice appears here.
- Excise Regn. No.: The Excise Regn. No. entered in Manufacturer/Importer Details section, in Party Details screen of purchase invoice appears here.
- Importer Exporter Code: The Importer Exporter Code entered in Manufacturer/Importer Details section, in Party Details screen of purchase invoice appears here.
- Range, Division and Commissionerate: The Range, Division and Commissionerate entered in Manufacturer/Importer Details section, in Party Details screen of purchase invoice appears here.
- Duty Details
- The Type of Duty appears as Basic Excise Duty. Additional Excise Duty Classifications can be selected here if required.
Note: Click here for procedure on creating Excise Duty Classification.
- The Rate of Duty and Rate per Unit appear as predefined for the stock item selected in the invoice.
- The Type of Duty appears as Basic Excise Duty. Additional Excise Duty Classifications can be selected here if required.
- Select the VAT ledger. Click here for detailed procedure on creating VAT ledger.
- Set Provide VAT Details to Yes/No as per requirement.

- Press Enter to save.
Purchases from Manufacturer
For recording purchases made from manufacturer:
- The Nature of Purchase must be selected as Manufacturer.
- Basic excise duty ledger must be selected in the invoice.
To record an excise purchase invoice
- Gateway of Tally > Vouchers > press F9 (Purchase).
Alternatively, press Alt+G (Go To) > Create Voucher > press F9 (Purchase). - Enter Supplier Invoice No. and Date.
- Select the required Tax Unit.
- Select the Party’s A/c Name from the List of Ledger Accounts.
- Select the Nature of Purchase as Manufacturer in the Party Details screen.
- Select the Purchase Ledger grouped under Purchase Accounts. In the purchase ledger, ensure the options Is VAT/CST Applicable and Is Excise Applicable are set to Applicable.
- Select the required Nature of Transaction in the VAT Classification Details screen. For example, Purchase Taxable.
- Select the required stock item.
- Select the Godown, enter the Quantity and Rate to display the amount in Stock Item Allocations screen.
Note: To change the Rate of Duty or Supplier Duty Amount which is internally calculated, press F12 (Configure) and enable the option Allow modification of Excise Details for Manufacturer. On pressing Enter on Amount field of the invoice, the Excise Details screen gets displayed to update the duty details and configure the required information.
- Select the Basic Excise Duty ledger. Click here for procedure on creating the basic excise duty ledger.
- Select the VAT ledger.
- Set Provide VAT Details to Yes/No as per requirement.

- Press Enter to save.
