TallyPrime gives you great flexibility in setting up your chart of accounts. It allows you to group your ledger accounts right at the time of creating your accounts chart. Your reports and statements reflect the desired classification at all times.
List of accounts displays the existing chart of accounts, listed as groups, in alphabetical order.
View Charts of accounts in TallyPrime
- Gateway of Tally > Chart of Accounts > select master type you want to see in Chart of Accounts.
Alternatively, press Alt+G (Go To) > type or select Chart of Accounts > select master type you want to see in Chart of Accounts and press Enter.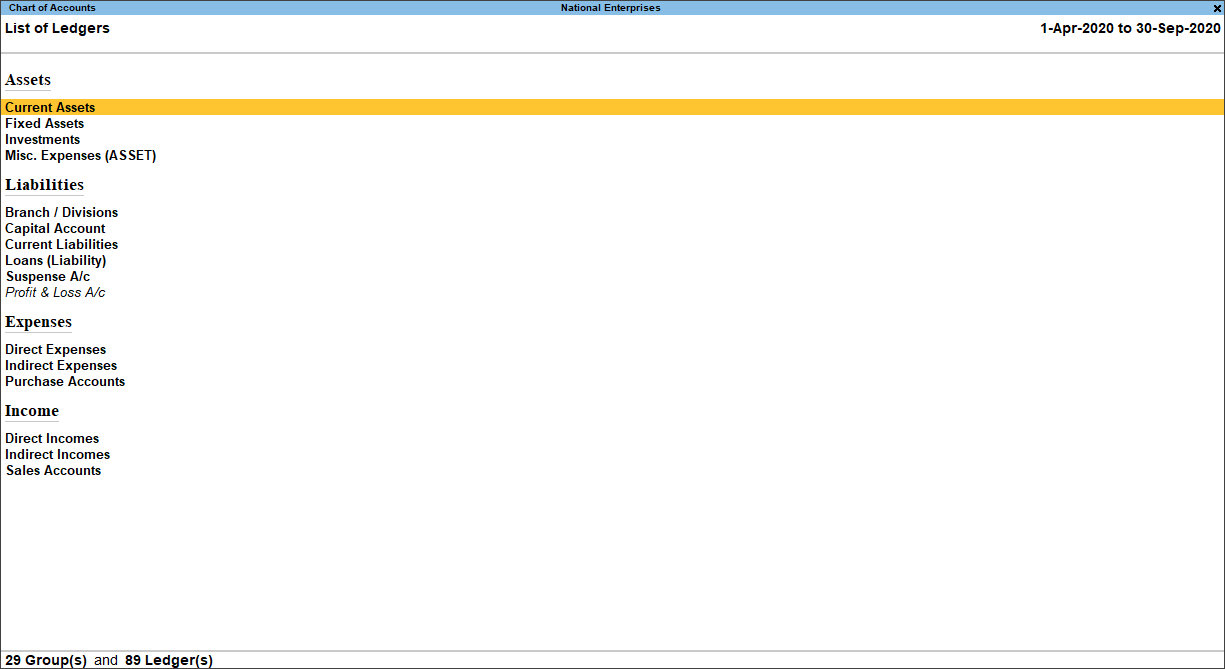
You can Drill down to a ledger name to alter its details by pressing enter. - At the highest level, accounts are classified into Capital or Revenue – and more specifically into Assets, Liabilities, Income and Expenditure. Alternatively use the keys Shift+Enter from the group head to reduce the details.
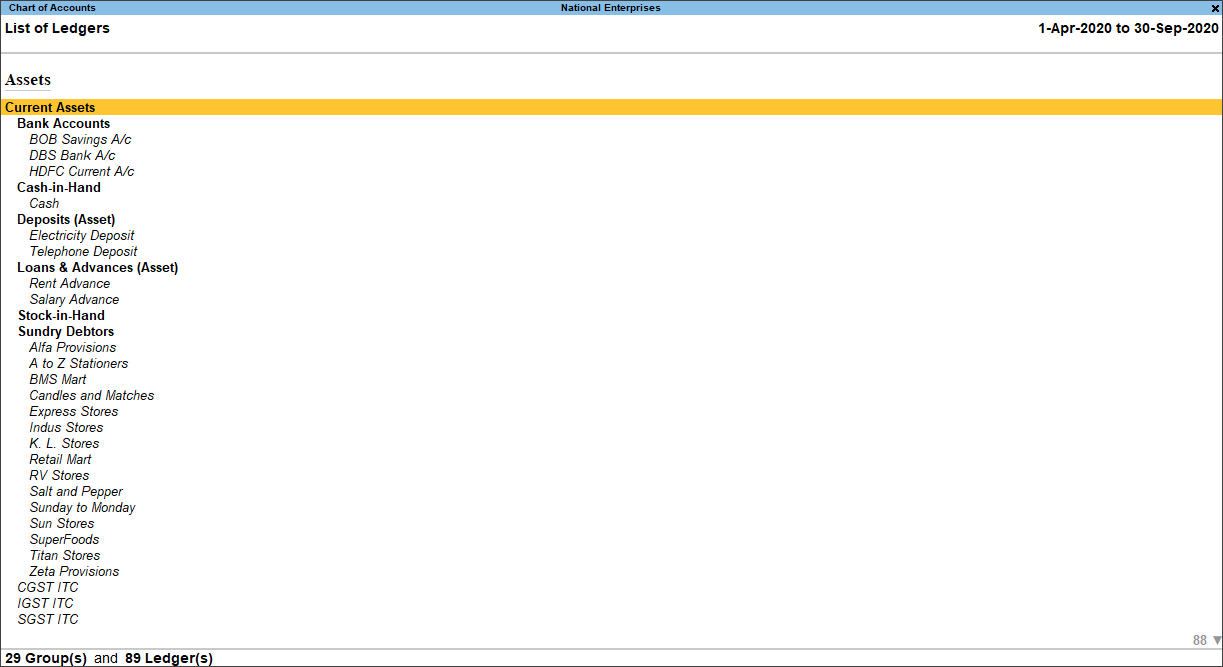
- To record detailed transactions, you have to add further ledgers, groups and sub-groups of your choice.
The ledgers in the Books of Accounts affect assets, liabilities, income or expenses. TallyPrime can generate a Profit & Loss account and a Balance Sheet immediately after a transaction has been entered. It can also generate a range of comprehensive financial statements and reports.
Ledger
The ledgers in the Books of Accounts affect assets, liabilities, income or expenses. TallyPrime can generate a Profit & Loss account and a Balance Sheet immediately after a transaction has been entered. It can also generate a range of comprehensive financial statements and reports.
Predefined Ledgers
All ledgers have to be classified into groups. These groups and ledgers are classified into profit and loss or balance sheet.
There are two pre-defined ledgers in TallyPrime:
- Cash ledger
- Profit and loss account
|
Cash Ledger |
Profit and Loss Ledger |
|
The cash ledger is grouped under cash-in-hand. |
The profit and loss account ledger is grouped under primary. |
|
You can enter the opening balance as on the day the books begin. |
The previous year’s profit or loss is entered as opening balance of the ledger. The balance entered is the opening profit/loss. It is shown in the balance sheet as opening of the profit and loss account in the liabilities. |
|
This ledger can be altered and deleted. |
This ledger can not be deleted but it can be modified. |
Display Unused Masters
Any unused masters in the list of accounts can be identified and removed in one go.
To list the list of unused masters
- Gateway of Tally > Chart of Accounts > Ledger > and press Enter.
Alternatively, press Alt+G (Go To) > type or select Chart of Accounts > Ledger and press Enter. - You can view the exceptions related to the data displayed in the current report by pressing Ctrl+J (Exception Reports), without closing the report.
- To view the Show Unused, press Ctrl+J (Exception Reports) > type or select Show Unused > and press Enter. Press Esc to view the default report.
The List of Ledgers (Unused) appears as shown below: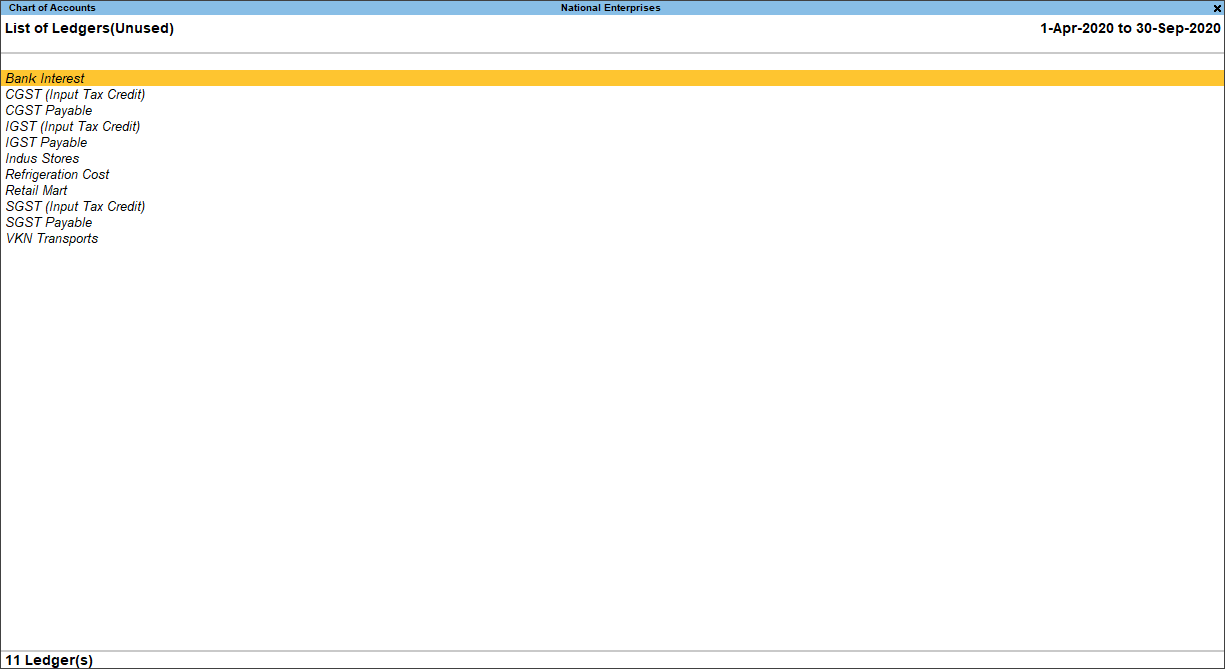
Unused groups, cost categories, cost centres, budgets and scenarios, currencies, units of measure, godowns, and so on can be filtered, similarly.
Create Ledger
Ledger can be created from different ways such as Master, Transactions and reporting as per the user choice.
In this section
- Single Ledger Creation
- Ledger Creation from Transaction or reporting
- Current Liabilities and Current Assets Ledgers
- Tax Ledger
- Rounding Method
- Expenses and Income Ledgers
Single Ledger Creation
- Gateway of Tally > Create > type or select Ledger and press Enter.
Alternatively, press Alt+G (Go To) > Create Master > type or select Ledger and press Enter.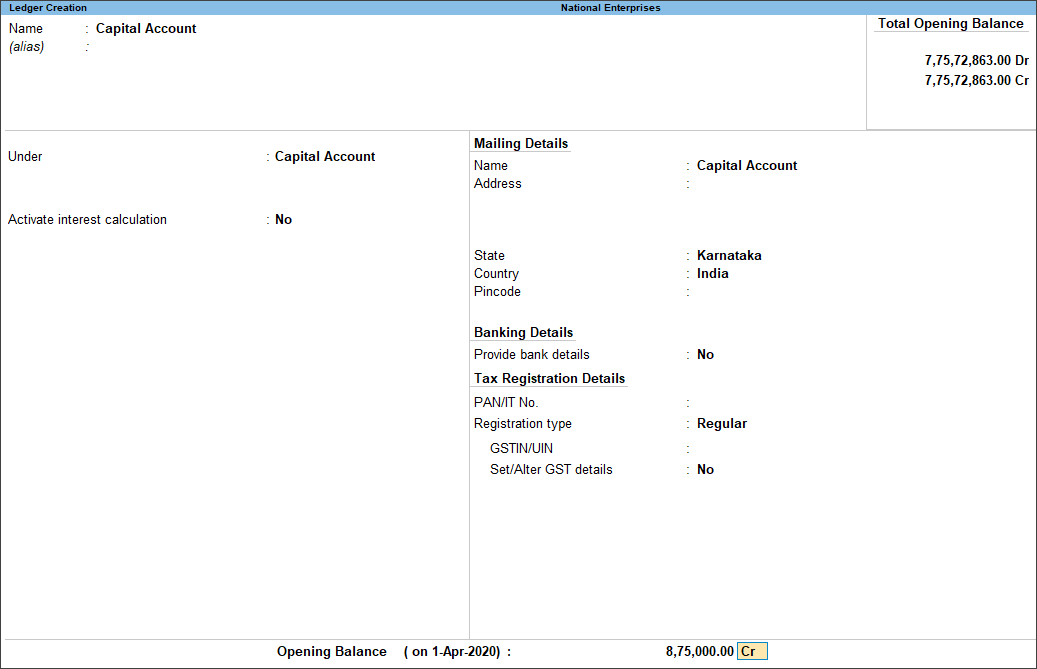
- Enter the Name of the ledger account. Duplicate names are not allowed.
- Enter the alias of the ledger account, if required. You can access the ledgers using the original name or the alias name.
- Select a group category from the List of Groups.
Note: To create a new group from this field, press Alt+C.
You can alter a ledger account to change its group classification at any time. - Enter the Opening Balance. The opening balance is applicable when the ledger is an asset or a liability, and also if it has a balance in the account as on the date of beginning of books.
- Accept the screen. As always, you can press Ctrl+A to save.
Note: For an existing company, debit balances for assets and credit balances for liabilities are applicable. You can enter balances for accounts that have obverse balances such as revenue accounts. For example, you may have transferred your books to TallyPrime in the middle of the year and may not have closed them in your earlier system. Hence, you must specify debit or credit for the balance.
Ledger Creation from Transaction or reporting
User can create ledger during Voucher entry from all the voucher types available in TallyPrime.
- From Voucher Creation/Alteration screen, press Alt+C. from ledger field.
- Ledger Creation will display and create the ledger and save the screen.
Current Liabilities and Current Assets Ledgers
Accounts like Outstanding Liabilities, Statutory Liabilities and other minor liabilities can be created directly under Current Liabilities and Assets can be classified as Current assets and Fixed assets. To create Fixed Assets ledger:
- Gateway of Tally > Create > type or select Ledger and press Enter.
Alternatively, press Alt+G (Go To) > Create Master > type or select Ledger and press Enter.
The Ledger Creation screen appears as shown below: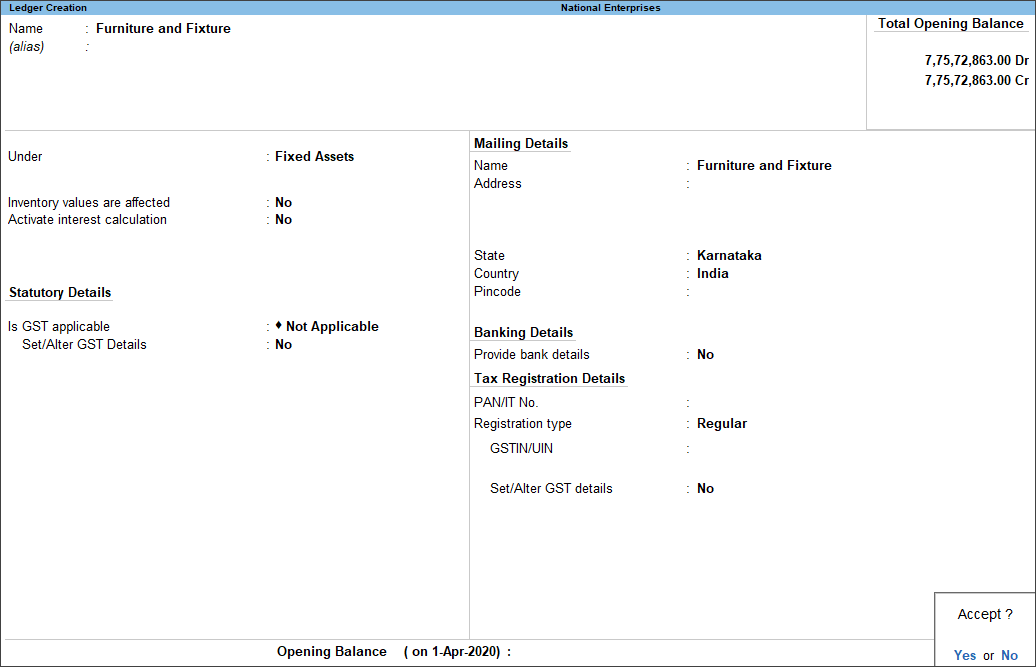
- Name: In this field mention the Ledger name. For example, Furniture and Fixture
- Under: In this field select the group under which the ledger to be grouped. For example, Current Liabilities, Current Assets or Fixed Assets.
- Enable Inventory values are affected option if you maintain accounts with inventory. However, you can use this option for accounts like customs duty, direct expenses related to purchases such as freight inwards and so on.
- In the Ledger Creation, press F12 (Configure) > set Use Inventory Allocations for Ledgers to Yes.
- If you do not see this option:
- Set Show more configurations to Yes.
- Set Show all configurations to Yes.
- Accept the screen. As always, you can press Ctrl+A to save.
Tax Ledger
Tax Ledgers should be created under Duties and Taxes group which contains all tax accounts like GST, VAT, CENVAT, Excise, Sales and other trade taxes and total liability.
- Gateway of Tally > Create > type or select Ledger and press Enter.
Alternatively, press Alt+G (Go To) > Create Master > type or select Ledger and press Enter.
The Ledger Creation screen appears as shown below: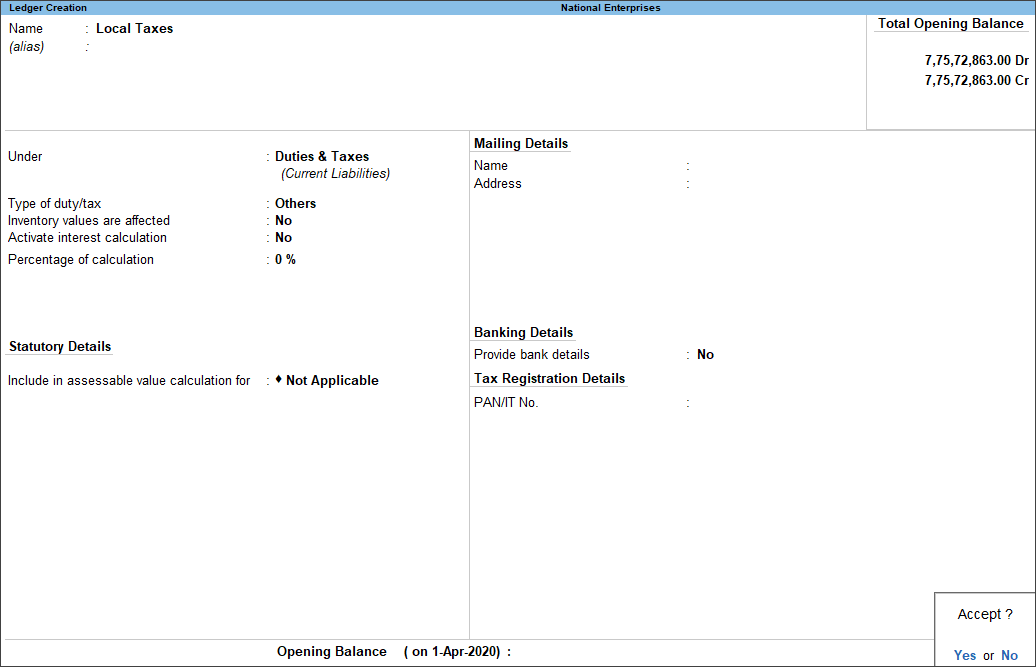
- Name: In this field mention the Ledger name. For example, Central Tax
- Under: In this field select the group under which the Job Worker ledger to be grouped. For example, Duties & Taxes
- The option Type of Duty/Tax is based on statutory compliance of the company. For Indian statutory, by default, Others is displayed. Depending on features in F11 (Company Features Alteration), more options can be included in the Type of Duty/Tax.
- Enable Inventory values affected option if you maintain accounts with inventory. However, you can use this option for accounts like Customs Duty, direct expenses related to purchases such as Freight Inwards and so on.
- Select the Percentage of Calculation the rate of tax e.g. 5%, 10%, 12.5% etc. You can use an automatic discount calculation facility by specifying a negative percentage in this field. The Group Duties and Taxes is used for automatic tax calculation.
- On entering a percentage, a new field Method of Calculation is displayed. From the Method of Calculation, select appropriate options to calculate the Tax/Duty.
- Accept the screen. As always, you can press Ctrl+A to save.
Rounding Method
This is used to round off the duty value. By default rounding method is set blank. Once you select rounding method, rounding limit option is displayed.
For example:
For duty value 123.33 and rounding Limit is 1,
- Downward rounding will show as 123.
- Normal rounding will show as 123.
- Upward rounding will show as 124.
For Duty value 125.55 and rounding Limit is 1,
- Downward rounding will show as 125.
- Normal rounding will show as 126.
- Upward rounding will show as 126.
Expenses and Income Ledgers
You can select the income or expenses account group to create ledgers.
- Gateway of Tally > Create > type or select Ledger and press Enter.
Alternatively, press Alt+G (Go To) > Create Master > type or select Ledger and press Enter. - Enter the name of the ledger in the Name field.
- Select Indirect Expenses from the List of Groups in the Under field.
Note: Select Indirect Income from the List of Groups if you want to create an income ledger.
- Set the option Inventory values are affected? to Yes if your company maintains accounts with inventory. And want to allocate the ledger value to stock items.
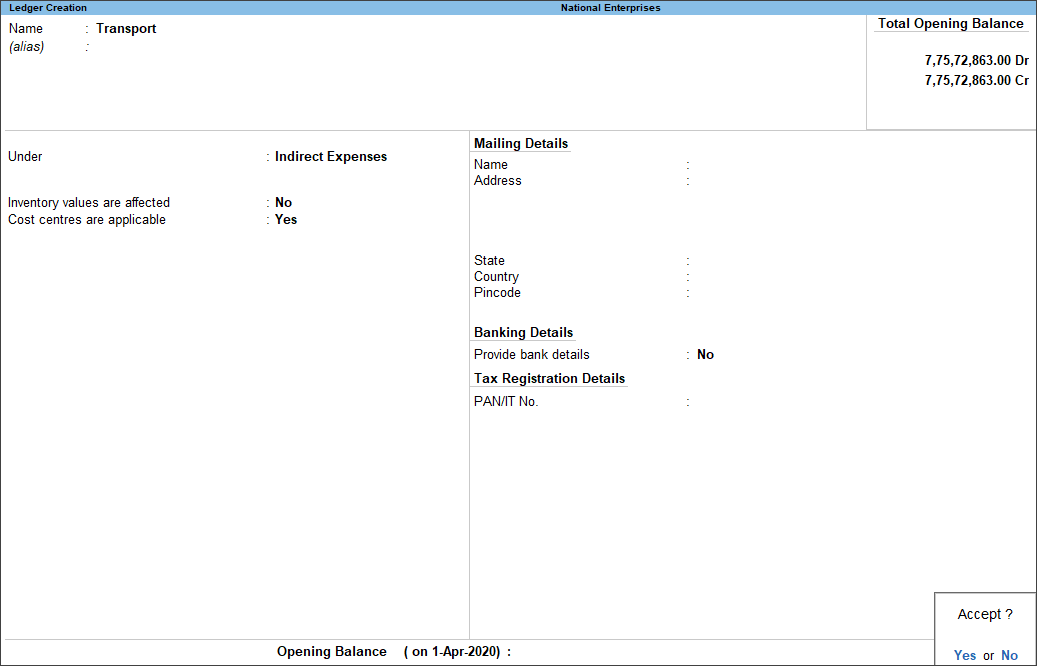
You can also enable cost centre options in expenses or income ledger.
- Enable Cost centres are applicable to Yes, if the transactions have to be allocated to a particular cost centre
- In the Ledger Creation, press F12 (Configure) > set Apply Cost Centres for Ledgers to Yes.
If you do not see this option, ensure that Enable Cost Centres is set to Yes in F11 for your company. - Accept the screen. As always, you can press Ctrl+A to save.
Alter and Delete Ledgers
You can alter any information of the ledger master with the except for the closing balance under the group stock-in-hand.
Display/alter a ledger
- Gateway of Tally > Alter > type or select Ledger and press Enter.
Alternatively, press Alt+G (Go To) > Alter Master > type or select Ledger and press Enter.
Modification of account ledgers is possible for single ledgers as well as multiple ledgers. However for multiple ledgers, all the fields are not available for alteration.
Delete a ledger
- Gateway of Tally > Alter > type or select Ledger and press Enter.
Alternatively, press Alt+G (Go To) > Alter Master > type or select Ledger and press Enter. - Select the ledger from the List of Ledgers.
- Press Alt+D.
Note: You can delete the ledger if no vouchers have been created under it. If you want to delete a ledger for which vouchers have been created, you have to first delete all the vouchers from that ledger and then delete the ledger account.
View Contact Details for Ledger Accounts
From the Ledger Vouchers report, it is possible to view the contact details of the ledger for reference. This is useful for bank ledgers. When more than one account number exists in the same bank, quick reference of the account details is possible.
- Gateway of Tally > Display More Reports > Accounts Books > Ledger and press Enter. > select the ledger for which you want to see the contact details
Alternatively, press Alt+G (Go To) > type or select Ledger Vouchers and press Enter. - Select the required Ledger from Select Item screen appears.
- Press Alt+S: Contact. The Ledger Contact Details screen appears as shown below:
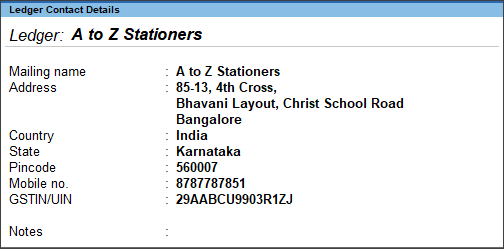
Mailing details and the account details are displayed in this screen.
Enter Mailing Details for Ledger Accounts
You can record address details against ledger accounts in TallyPrime.
- Gateway of Tally > Create > type or select Ledger and press Enter.
Alternatively, press Alt+G (Go To) > Create Master > type or select Ledger and press Enter. - Enter the name of the ledger in the Name field.
- Select a group category from the List of Groups.
- Enter Required details in Mailing Details.
In case you are unable to find Mailing Details in ledger creation screen.
In the Ledger Creation, press F12 (Configure) > set Provide Mailing Details to Yes.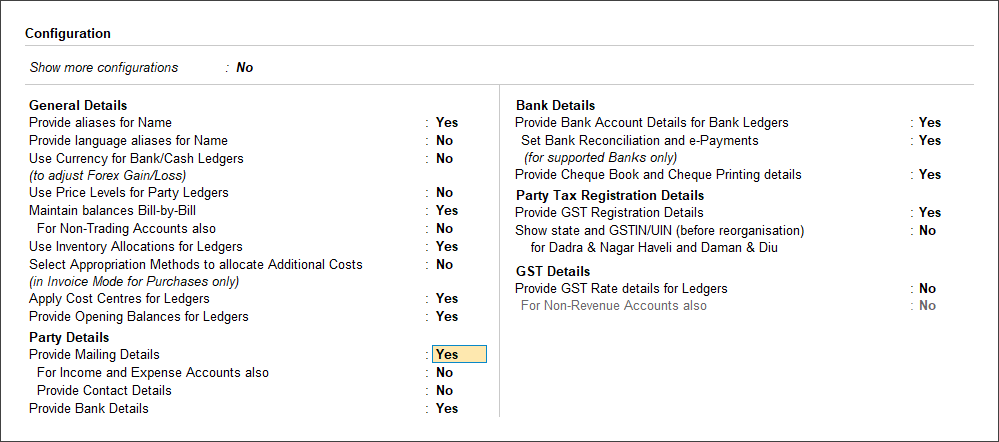
- Accept the screen. As always, you can press Ctrl+A to save.
Now you can enter the mailing details during ledger creation or alteration.
Ledger Vouchers Report
You can view a ledger account with the corresponding voucher details. You can view this report in browser.
- Gateway of Tally > Display More Reports > Accounts Books > Ledger and press Enter.
Alternatively, press Alt+G (Go To) > type or select Ledger Vouchers and press Enter. - Select the required Ledger.
- Press F2 to change the period as required. The Ledger Vouchers report appears as shown below:

- Press F8 (Columnar) to view details of vouchers in separate columns.
- For purchase, payments, journals, debit notes and credit notes, you can view the voucher reference number and date.
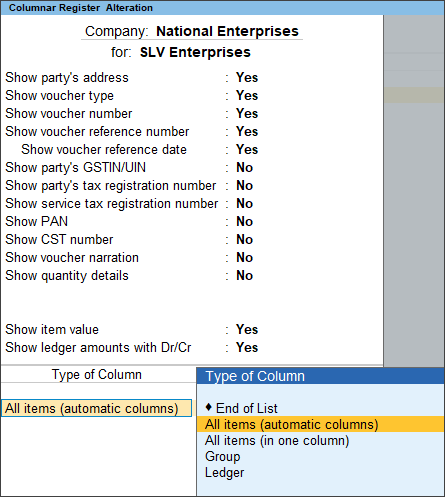
The Ledger Vouchers columnar report appears as shown: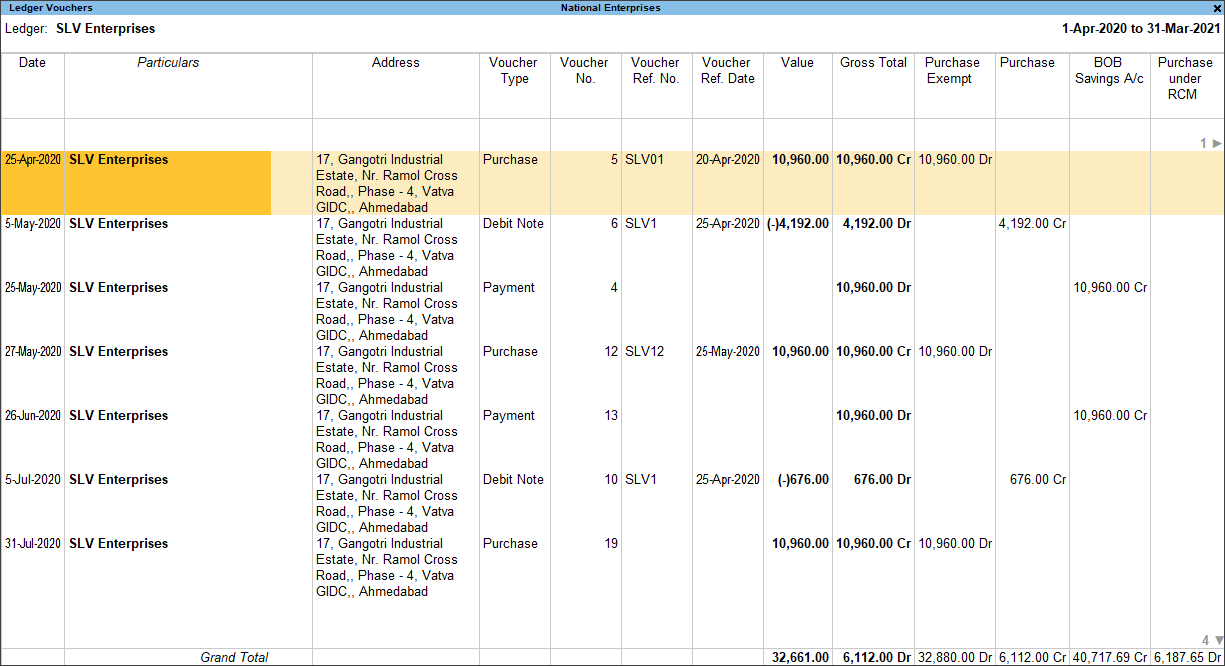
Cumulative balances or running balance for Ledger Voucher reports
- In the Ledger Vouchers screen., press F12: Configure > set the option Show Running Balance to Yes to see the running balances for Ledger Voucher report.
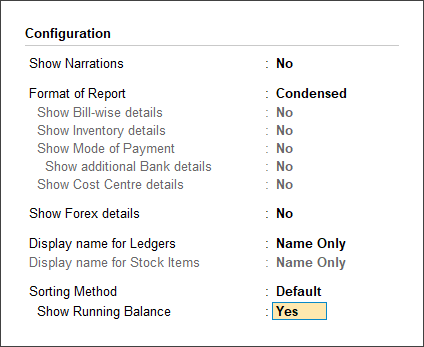
- Press Enter to save the changes. The Ledger Vouchers report with running balance column appears as shown below:
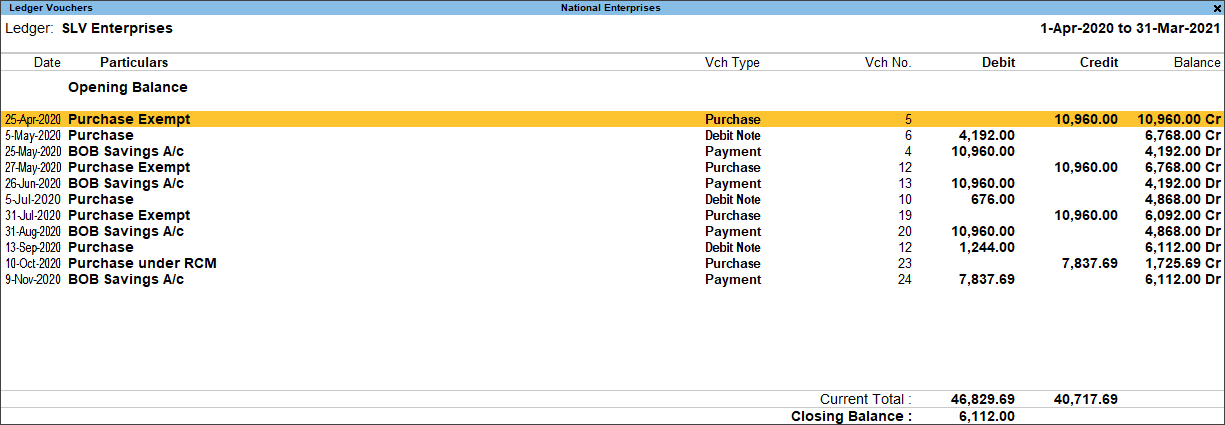
You can also access Ledger Vouchers by drilling down from different statements, such as Group Summary and Monthly Summary.
View, Print, Export Opening Balances of all the Ledgers
You can view the opening balances of all the ledgers in a single screen, and print or export the details.
In this section
- View opening balance of all ledgers
- Print opening balances of all ledgers
- Export opening balances of all ledgers
View Opening Balances of all Ledgers in a Single Screen
- Gateway of Tally > Chart of Accounts > Ledger > and press Enter.
Alternatively, press Alt+G (Go To) > type or select Chart of Accounts > Ledger > and press Enter.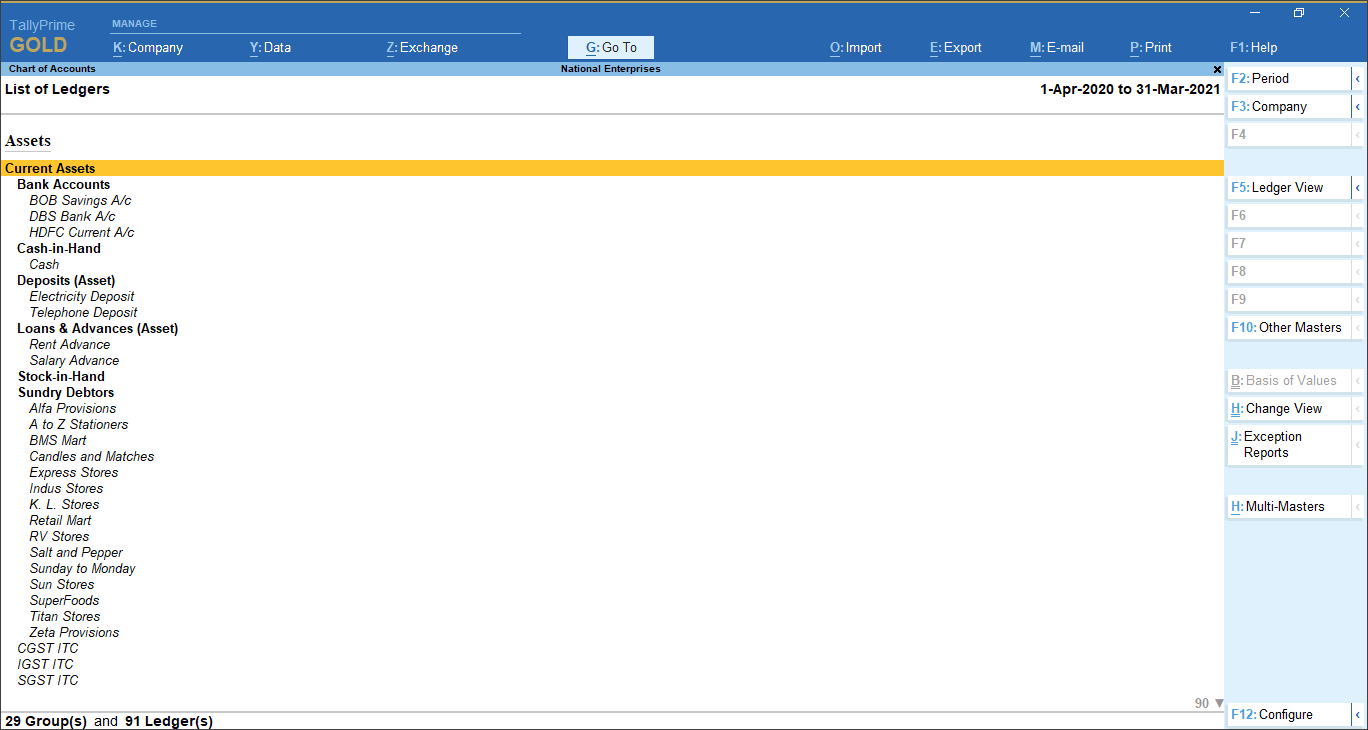
- Press Alt+H (Multi-Masters) > select Multi Alter > and press Enter.
- Select All Items from the List of Groups.
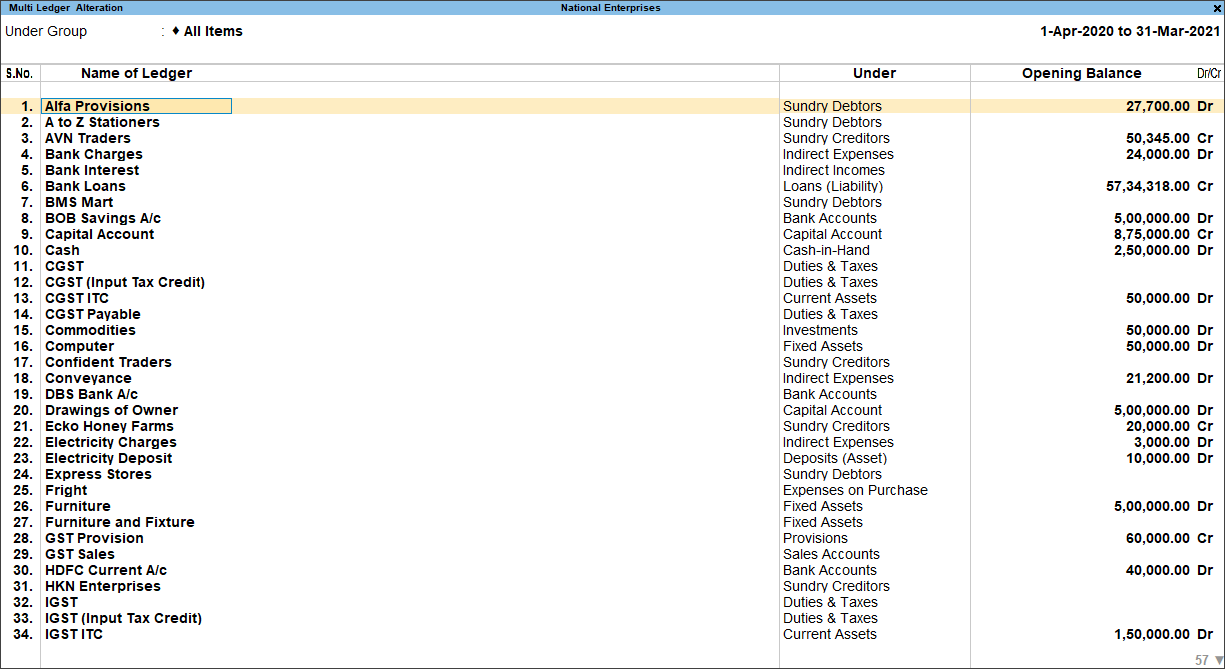
Print Opening Balances of all Ledgers from a Single Screen
- Gateway of Tally > Display More Reports > Trial Balance.
Alternatively, press Alt+G (Go To) > type or select Trial Balance > and press Enter. - Press F5 (Ledger-wise) and press Crlt+P to print.
- Press C: Configure to set options for printing
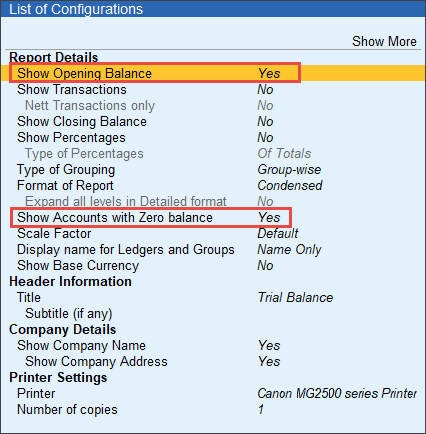
- Enable the option Show Opening Balances by pressing Enter on it.
- Disable the options Show transactions and Show Closing Balances by pressing Enter on it
- Enable the option Show Accounts with Zero balance by pressing Enter on it.
- Press Ctrl+A to accept the configuration screen
- Press I:Preview to see the preview before print. Preview can be seen as shown below:
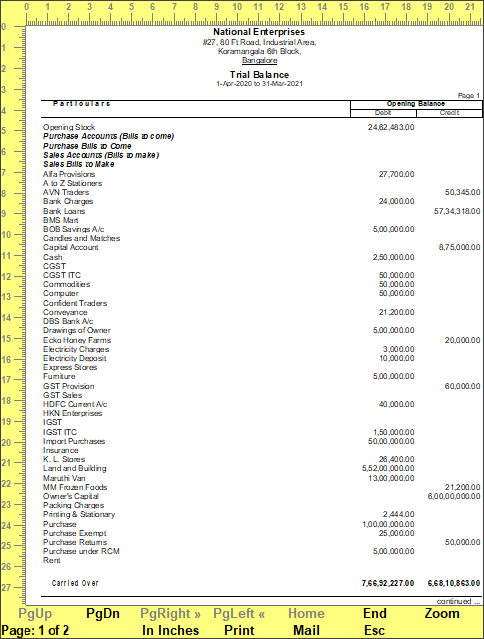
- Once confirm with preview press Print to print the report.
Export Opening Balance of all Ledgers from a Single Screen
- Gateway of Tally > Display More Reports > Trial Balance
Alternatively, press Alt+G (Go To) > type or select Trial Balance > and press Enter. - Press F5 (Ledger-wise) and press Alt+E.
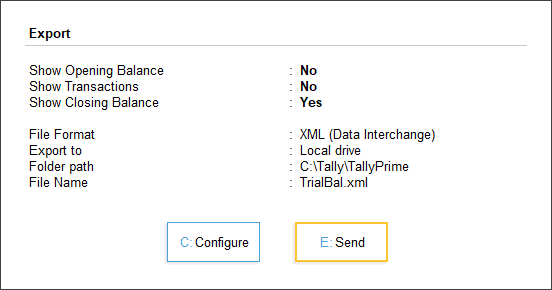
- Press C: Configure to set Export Configuration.
- Enable the option Show Opening Balances by pressing Enter on it.
- Disable the options Show transactions and Show Closing Balances by pressing Enter on it
- Enable the option Show Accounts with Zero balance by pressing Enter on it.
- Select file format as Excel (Spreadsheet) and other details as required under Export Settings.
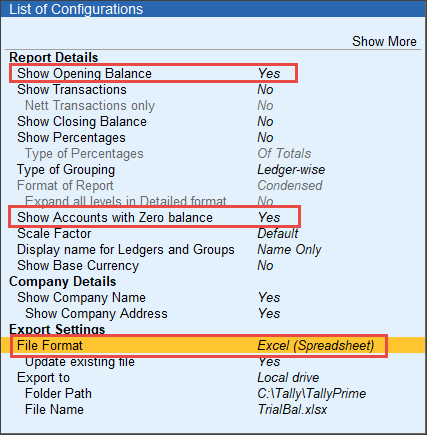
- Press Ctrl+A to accept the configuration screen
- Pres E: Send to export.
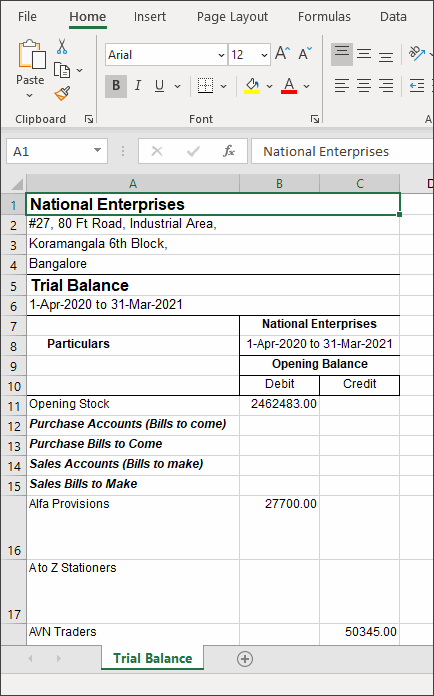
Using ODBC, you can extract Ledger Opening balances and other details of Ledger masters.
Groups
Groups are collection of ledgers of the same nature. Account groups are maintained to determine the hierarchy of Ledger Accounts, which is helpful in determining and presenting meaningful and compliant reports. Using this you can generate reports, which are meaningful as well as compliant with laws.
At the highest level, accounts are classified into Capital or Revenue – and more specifically into Assets, Liabilities, Income and Expenditure.
TallyPrime provides you with 28 pre-defined Groups. Of these 15 are Primary Groups and 13 are Sub-Groups. You can also create your own groups, either as Sub-groups or Primary groups. Groups can be sub-classified to an unlimited level to give a virtual accounting tree. The lowest level would be the Ledger Account. All Voucher entries are passed using ledgers. You can create the required chart of accounts. You can group the Ledger accounts under the required Groups at the time of creating the chart of accounts or you can alter them at any time.
Pre-Defined Groups
There are twenty eight pre-defined groups in Tally.ERP 9. These groups are a part of the chart of accounts for most organizations. For example, Sales Accounts is a pre-defined group. All sales ledgers can be classified under this group.
Out of the twenty eight pre-defined groups, fifteen are primary groups and thirteen are sub-groups. The user can create any number of primary groups and sub-groups.
|
Primary Groups |
Subgroups |
|
Branch / Divisions |
Bank Accounts |
|
Capital Account |
Bank OD A/c |
|
Current Assets |
Cash-in-hand |
|
Current Liabilities |
Deposits (Asset) |
|
Direct Expenses |
Duties & Taxes |
|
Direct Incomes |
Loans & Advances (Asset) |
|
Fixed Assets |
Provisions |
|
Indirect Expenses |
Reserves & Surplus |
|
Indirect Incomes |
Secured Loans |
|
Investments |
Stock-in-hand |
|
Loans (Liability) |
Sundry Creditors |
|
Misc. Expenses (ASSET) |
Sundry Debtors |
|
Purchase Accounts |
Unsecured Loans |
|
Sales Accounts |
|
|
Suspense A/c |
|
Out of the fifteen primary groups, nine primary groups appear in the balance sheets that are capital in nature and six primary groups appear under Profit & Loss account which are revenue in nature.
The sub-groups that form a part of the balance sheet are:
|
Pre-defined Subgroups |
Under |
|
Bank Accounts |
Current Assets |
|
Bank OD A/c |
Loans (Liability) |
|
Cash-in-hand |
Current Assets |
|
Deposits (Asset) |
Current Assets |
|
Duties & Taxes |
Current Liabilities |
|
Loans & Advances (Asset) |
Current Assets |
|
Provisions |
Current Liabilities |
|
Reserves & Surplus |
Capital Account |
|
Secured Loans |
Loans (Liability) |
|
Stock-in-hand |
Current Assets |
|
Sundry Creditors |
Current Liabilities |
|
Sundry Debtors |
Current Assets |
|
Unsecured Loans |
Loans (Liability) |
Note: Primary groups cannot be deleted.
Default Groups
There are a number of default Groups that can be used for various accounts.
The details information of Groups accounts are given below:
Capital Account
This records the Capital and Reserves of the company. The ledgers that belong to Capital Accounts are Share Capital, Partners’ Capital A/c, Proprietor’s Capital Account and so on.
Reserves and Surplus [Retained Earnings]
This contains ledgers like Capital Reserve, General Reserve, Reserve for Depreciation and so on.
Current Assets
Current Assets record the assets that do not belong either to Bank Accounts or to Cash-in-Hand sub-groups.
- Bank Accounts: Current account, savings account, short term deposit accounts and so on.
- Cash-in hand: TallyPrime automatically creates Cash A/c in this group. You can open more than one cash account, if necessary.
Note: An account under Cash-in-hand group or Bank Accounts/Bank OCC A/c group is printed as a separate Cash Book in the traditional Cash Book format and does not form part of the Ledger.
- Deposits (Asset): Deposits contain Fixed Deposits, Security Deposits or any deposit made by the company (not received by the company, which is a liability).
- Loans & Advances (Asset): This records all loans given by the company and advances of a non-trading nature (example: advance against salaries) or even for purchase of Fixed Assets. We do not recommend you to open Advances to Suppliers’ account under this Group. For further details, please refer to the section on Common Errors.
- Stock-in-hand: This group contains accounts like Raw Materials, Work-in-Progress and Finished Goods. The balance control depends on whether you have selected Integrated Account-cum-Inventory option while creating the company. (refer to Company creation section for more details) Let us consider these options:
- Integrated Accounts with Inventory: This option has a significant effect on the Balance Sheet and Profit & Loss Account. If set to Yes, it brings the stock/inventory balance figures from the inventory records and provides a drill down to the Stock registers from the Balance Sheet. You are not allowed to directly change the closing balance of an account under this group. You are allowed to pass transactions in Inventory records and the account balances are automatically reflected in the Balance Sheet as Closing Stock.
- Non-integrated Accounts with Inventory: If Integrated Account with Inventory option is set to No, it ignores the inventory books figures and picks up manually entered closing stock balances from the ledger account created. This provides the facility to maintain accounts separately and inventory separately.
You are not allowed to pass transactions if your accounts that come under this Group. It allows you to hold opening and closing balances only. Since no vouchers can be passed for these accounts, they are the only accounts for which the closing balances can be directly altered (by an authorised user only).
- Sundry Debtors: For customer accounts refer to common and possible errors in grouping of accounts section.
Current Liabilities
Accounts like Outstanding Liabilities, Statutory Liabilities and other minor liabilities can be created directly under this group. Sub-groups under Current Liabilities are Duties and Taxes, Provisions and Sundry Creditors
- Duties and Taxes: Duties and Taxes contain all tax accounts like GST, VAT, CENVAT, Excise, Sales and other trade taxes and the total liability (or asset in case of advances paid) and the break-up of individual items.
- Provisions: Accounts like Provision for Taxation, Provision for Depreciation and so on are recorded under Provisions.
- Sundry Creditors: For trade creditors, refer to common and possible errors in grouping of accounts section.
Investments
Group your investment accounts like Investment in Shares, Bonds, Govt. securities, long term Bank deposit accounts and so on. This allows you to view the total investments made by the company.
Loans (Liability)
Loans that a company has borrowed, typically long-terms loans.
- Bank OD Accounts [Bank OCC Accounts]: TallyPrime provides you with distinct types of Bank Accounts,
- Bank OCC A/c: To record the company’s overdraft accounts with banks. For example, Bill Discounted A/c’s and Hypothecation A/c’s etc.
Note: An account under Bank OCC A/c group is printed as a separate Cash Book in the traditional Cash Book format and does not form part of the Ledger.
- Secured Loans: Term loans or other long/medium term loans, which are obtained against security of some asset. does not verify the existence of the security. Typical accounts are Debentures, Term Loans, and so on.
- Unsecured Loans: Loans obtained without any security. Example: Loans from Directors/partners or outside parties.
Suspense Account
In modern accounting, many large corporations use a Suspense Ledger to track the money paid or recovered, the nature of which is not yet known. The most common example is money paid for Traveling Advance whose details will be known only upon submission of the Travelling Allowance bill. Some companies may prefer to open such accounts under Suspense Account.
- Loans and Advances (Asset) group: The Suspense Account is a Balance Sheet item. Any expense account even if it has ‘suspense’ in its name, it should be opened under Revenue group like Indirect Expenses and not under Suspense Account group.
Miscellaneous Expenses (Asset)
This group is typically used for legal disclosure requirements such as Schedule VI of the Indian Companies Act. It should hold incorporation and pre-operative expenses. Companies would write off a permissible portion of the account every year. A balance remains to an extent that cannot be written off in Profit & Loss Account. TallyPrime does not show loss, carried forward in the Profit & Loss Account, under this group. The Profit & Loss Account balance is displayed separately in the Balance Sheet.
Branch/Divisions
This maintains ledger accounts of all your company’s branches, divisions, affiliates, sister concerns, subsidiaries and so on. TallyPrime permits Sales and Purchase transactions to take place with accounts opened here. Remember, these are their accounts in your books and not their books of accounts. Just treat them as any other party account. If you wish to maintain the books of a branch/division on your computer, you must open a separate company. (TallyPrime allows maintenance of multiple company accounts).
Sales Account
You can classify your sales accounts based on Tax slabs or type of sales. This also becomes a simple mechanism for preparation of Tax returns.
For example,
- Domestic Sales
- Export Sales
Now under Domestic Sales open the following ledgers:
- Sales (10%)
- Sales (5%)
- Sales (exempt)
You can even open an account as Sales Returns under the group Domestic Sales to view your net sales after returns (or the returns may be directly passed through Journal against the specific Sales account).
Note: Do not create customer accounts under this group. For more details, refer to common and possible errors in grouping of accounts section.
Purchase Account
This is similar to sales accounts, except for the type of transactions.
Direct Income [Income Direct]
These are Non-trade income accounts that affect Gross Profit. All trade income accounts fall under Sales Accounts. You may also use this group for accounts like Servicing, Contract Charges that follow sales of equipment.
For a professional services company, you may not use Sales Account group at all. Instead, open accounts like Professional Fees under this group.
Indirect Income [Income Indirect]
These are miscellaneous non-sale income accounts. Example: Rent Received and Interest Received.
Direct Expenses [Expenses Direct]
These are Manufacturing or direct trading expense s. These accounts determine the Gross Profit of the company.
Indirect Expenses [Expenses Indirect]
All administrative, selling or non-direct expenses.
Profit & Loss Account is a reserved primary account in TallyPrime. You can use this account to pass adjustment entries through journal vouchers. For example, transfer of profit or loss account to Capital or Reserve account.
Common and Possible Errors in Grouping and Account Classification
Debtor/Creditor classification
Accounts of parties with whom your company is trading should be opened under any of the following groups (or sub-groups under them):
- Sundry Debtors
- Sundry Creditors
- Branch/Divisions
Sales and Purchase account groups are meant for revenue accounts and are reflected in the Profit & Loss Account. If you open party accounts under these groups, it becomes difficult to pass sales or purchase voucher transactions.
For example, in a sales voucher transaction entry, you must debit an account, which can be sundry debtor, branch/division or even a sundry creditor. Moreover, other facilities like bill-wise allocation and tracking will not be available unless the accounts belong to one of these groups.
Opening two accounts of the same party
TallyPrime classifies debtors, creditors and branch/divisions for convenience. This helps you in the process of keeping the accounts of a particular group together during display and analysis. Thus you can pass both sales and purchase entries for a party account placed under Sundry Debtors. Use the classification depending on the most natural group for the party.
For example, parties from whom you buy frequently can be placed under Sundry Creditors, as that is the natural place to look for their account. TallyPrime does not restrict the accounts from having obverse balances. Thus, a Sundry Debtor can have a credit balance depending on the state of his account.
Therefore, you need not open two accounts for the same party – one under Sundry Debtors and another under Sundry Creditors. TallyPrime restricts opening of two identical ledger accounts. In such cases, you may decide to circumvent by marking one account as “A & Co – S/Dr” and another “A & Co – S/Cr”. This will allow you to have two accounts of the same party under two groups, but you will lose the advantage of analyzing net position at a single instance. It is always better to maintain a single account to obtain best benefits.
Expenditure items are entered under Liabilities group. For example, the expenditure item Rates & Taxes under the group Duties and Taxes.
The group Duties and Taxes is specifically meant to handle taxation liabilities of your company. Rates & Taxes and other statutory expenses should be placed under Indirect Expenses.
Simply adhering to the reserved groups may be sufficient for many organizations. For greater diversity, TallyPrime allows you to create your own groups, either as sub-groups or primary groups. Groups can be sub-classified to practically an unlimited level, giving you a virtual accounting tree. At the lowest level, of course, would be the ledger account.
Note: While it is necessary to assign every ledger to a group/sub-group, it is not essential to have your own sub-classification of accounts; you may simply use the reserved groups for grouping your ledger accounts.
Create, Alter, Delete Account Groups
You can create a single group or multiple groups in TallyPrime and configure the details as per your requirement. You can also view, alter or delete these groups.
In this section
- Create account groups one-by-one
- View account groups one-by-one
- Alter a Group
- Create Multiple Groups in one-go
- Alter Multiple Groups
- Delete a Group
Create account groups one-by-one
- Gateway of Tally > Create > type or select Group and press Enter.
Alternatively, press Alt+G (Go To) > Create Master > type or select Group and press Enter. - Enter the Name of the group.
- Enter the Alias name, if required.
- In the field Under, from the List of Groups displayed, select the parent group under which the group has to be classified. For example, Indirect Expenses.
Note: Groups can be created under the group Primary, if required.
The Group Creation screen appears as shown below: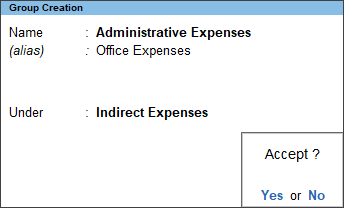
- Accept the screen. As always, you can press Ctrl+A to save.
Note: A new group created under primary will not be reflected in reports until you pass masters/transactions for that group.
View account groups one-by-one
- Gateway of Tally > Chart of Accounts > Group > and press Enter.
Alternatively, press Alt+G (Go To) > type or select Chart of Accounts > Group > and press Enter. - Select the name of the group required from the List of Groups displayed.
The Group Alteration (Secondary) screen appears as shown below: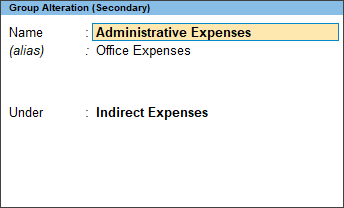
Alter a Group
The details entered in a group can be modified when required.
- Gateway of Tally > Alter > type or select Group and press Enter.
Alternatively, press Alt+G (Go To) > Alter Master > type or select Group and press Enter. - Select the name of the group required from the List of Groups displayed.
- Make the necessary changes in the Group Alteration screen.
- Accept the screen. As always, you can press Ctrl+A to save.
Create Multiple Groups in one-go
You can create, edit or delete multiple groups in TallyPrime.
- Gateway of Tally > Chart of Accounts > Group > and press Enter.
Alternatively, press Alt+G (Go To) > type or select Chart of Accounts > Group > and press Enter. - Press Alt+H (Multi-Masters) > select Multi Create.
- Select the group category in the field Under Group.
- Enter the Name of Group. The screen appears as shown below:

- Select All Items in the field Under Group to create multiple groups of different categories.
Note: You can add any number of sub-groups to an already created or selected group. The sub-groups inherits the characteristics of the parent groups.
A new group created under primary will not be reflected in reports until you pass masters/transactions for that group.
Alter Multiple Groups
- Gateway of Tally > Chart of Accounts > Group > and press Enter.
Alternatively, press Alt+G (Go To) > type or select Chart of Accounts > Group > and press Enter. - Press Alt+H (Multi-Masters) > select Multi Alter screen appears as shown below:

- Change the details as required and press Ctrl+A to save changes.
Delete a Group
Groups can be deleted from the alteration screen. You cannot delete groups from the Multiple group Alteration mode.
- Gateway of Tally > Alter > type or select Group and press Enter.
Alternatively, press Alt+G (Go To) > Alter Master > type or select Group and press Enter. - Select the group from the List of Groups.
- Press Alt+D.
- Click Yes to confirm deletion.
Note: A grou