As per the accounting practice of journaling, you can record all transactions using Journal Vouchers in TallyPrime. However, there are specialised accounting voucher types for different types of transactions like payments, receipts, sales, purchase, contra, debit note, credit note and so on to ease data entry. Once you know how to enter a transaction in TallyPrime, you can enter any transaction in a similar way. Voucher types in TallyPrime can be categorised as Journal, Purchase, Sales, Payment, Receipt, Contra, Inventory Vouchers, Order Vouchers and Non-Accounting Vouchers. In this topic, we will understand how to record a transaction in TallyPrime or say, accounting entry in TallyPrime and learn more about the voucher types provided for accounting in TallyPrime.
Apart from these 24 voucher types, you can also create your own under these for easy identification. For example, you can create Cash Sales under Sales voucher type so that you can identify and sequentially number all your cash sales.
For faster data entry operation you can also use voucher class in TallyPrime.
Record Transactions
Recording transactions in TallyPrime follow a simple pattern. You can record a transaction with the following steps. A payment transaction for expenses is used for illustration.
- Gateway of Tally > Vouchers > press F5 (Payment).
Alternatively, Alt+G (Go to) > Create Voucher > press F5 (Payment). - If you want to change the voucher date, press F2 (Date).
When you press F2 to change the date, the date shown is for the subsequent day of the current date. This done to avoid manual entry of date for the next day as the immediately next day is the most common business day. You can however enter any date, even backward dates. - Select the mode of payment.
- In Account field, select Cash ledger, which is already available or the Bank ledger. To learn more about Bank payment refer to Banking Utilities in TallyPrime.
When you create a Company in TallyPrime, the system creates two ledgers by default – Cash and Profit & Loss A/c. - Select the ledger for which you are making the payment and specify the amount. For example, Rent.
- Under Particulars, you need to select expense ledger for which you are making this payment.
- If expense ledger is not available, press Alt+C to create Ledger on fly. In Ledger Creation (Secondary) screen, give ledger name as per your expense head and select Indirect Expense group in the Under field.
In TallyPrime, you will find patterns to do certain tasks, and these patterns are consistent across the product. For example, when recording a transaction, you press Alt+C to create a ledger, without leaving the voucher. This pattern works across the product. Anywhere in the product, on a field for ledger selection, press Alt+C to create it. - In Amount, specify the expense amount.
- Provide Narration, if any, and accept the voucher. As always, you can use Ctrl+A to accept.
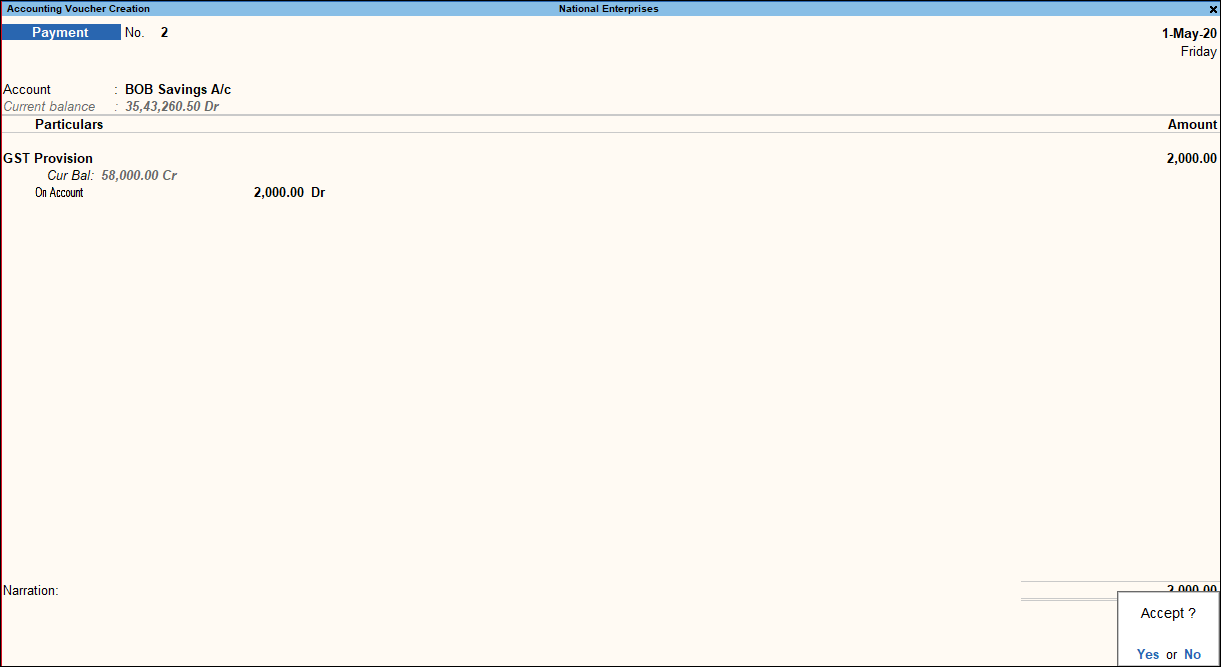
This is the process to record payment transactions in TallyPrime.
Accounting with Journal Voucher
If you are accounts savvy, you can record the same payment transaction using a journal voucher in TallyPrime. Use the following steps for the same.
- Gateway of Tally > Vouchers > press F7 (Journal).
Alternatively, Alt+G (Go to) > Create Voucher > press F7 (Journal). - If you want to change the voucher date, press F2 (Date).
- Select By/Dr (Debit) side of the transaction.
- In By, select the expense ledger. For example, Rent.
As in other transactions, you can create the ledger on the fly by pressing Alt+C. Alternatively, press Alt+G (Go To) >Create Master type or select Ledger > and press Enter.
By default, in a journal voucher, you need to first specify the By (debit side). - In Debit, specify the rent amount.
- In By, select the expense ledger. For example, Rent.
- Select the To/Cr (Credit) side of the transaction.
- In To, select the payment mode. For example, Cash.
To select Cash, an F12 setting for JV is needed.
As in other transactions, you can create the ledger on the fly by pressing Alt+C. Alternatively, press Alt+G(Go To) >Create Master > type or select Ledger > and press Enter. - In Credit, specify the amount.
If the amount is not equivalent to the debit amount, you need to select another Credit ledger.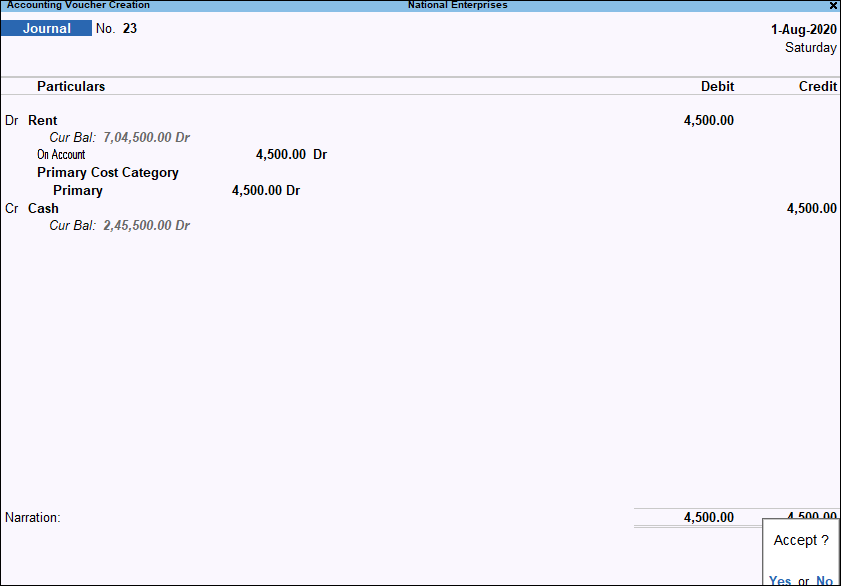
- In To, select the payment mode. For example, Cash.
- Provide Narration, if any, and accept the voucher. As always, you can use Ctrl+A to accept.
Though you can use a journal voucher in TallyPrime to record a payment transaction, the specialised voucher type Payment helps ease the data entry.
In a similar manner, you can use a journal voucher to record any type of accounting transaction. However, TallyPrime has specialised voucher types for specific business transactions like purchase, debit note, sales, credit note, payment, receipt, contra for error-free and easy data entry.
Adjustment Entries Using Journal Vouchers
Though JV can be used for any kind of accounting transaction, it needs good knowledge about accounting principals. JVs are mostly used for adjustment entries. Adjustment entries for finalisation of books.
Adjusting Forex Gain or Loss Appearing in the Balance Sheet
The unadjusted Forex gain or loss balance will arise due to the exchange rate fluctuations. As per the Accounting Standard 11: The effects of changes in Foreign Exchange Rates, the company has to account the Forex gain/loss which consists of both Realised and Unrealised forex gain/loss into their Final Reports.
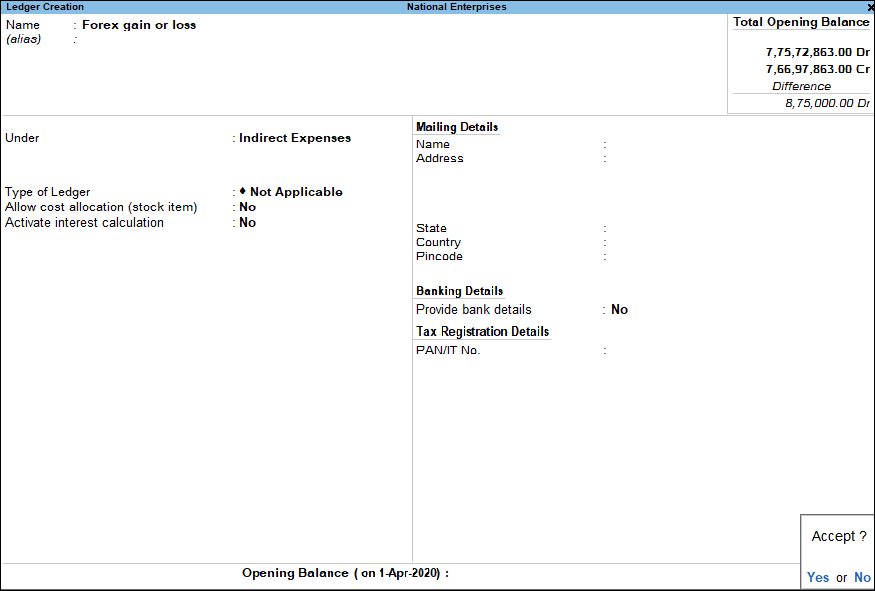
- Create a ledger as Forex gain or loss under Indirect Expenses or Indirect Income to transfer the amount from Balance Sheet to Profit and Loss Account by using Voucher Class.
- Create a Voucher Class.
- Press Alt+G (Go To) > Alter Master > type or select Voucher Type> select Journal and press Enter.
- Specify a Voucher Class name. For example, Forex Class.
- Set the option Use Class for Forex Gain/Loss Adjustments to Yes.
- Select Forex gain or loss ledger, as shown below.

- Accept the screen. As always, you can press Ctrl+Ato save
Record a journal voucher
- Gateway of Tally > Vouchers > press F7 (Journal).
Alternatively, press Alt+G (Go To) > type or select Create Voucher > press F7 (Journal). - Select the Voucher Class (Forex Class), Tally will display all the ledgers for which you need to adjust the Forex Gain or Loss.

- Select the required ledger and accept the voucher. As always, you can press Ctrl+A to save.
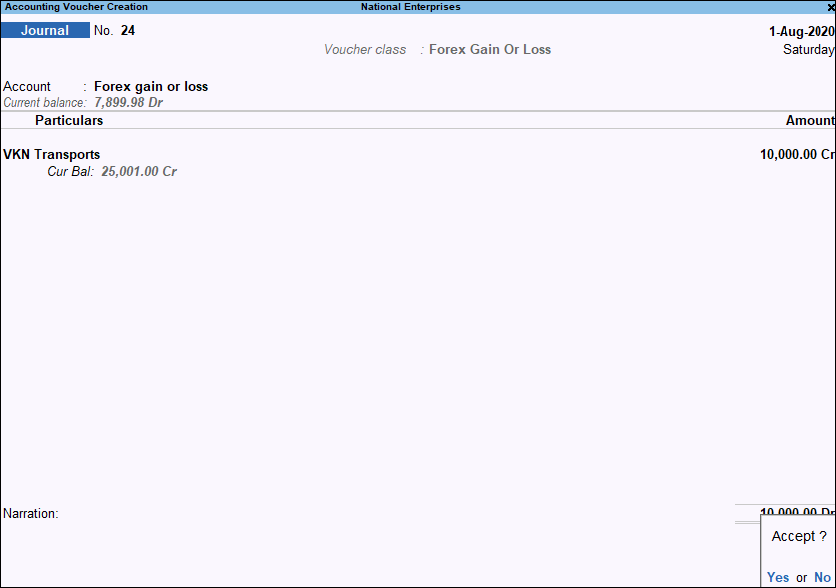
The adjusted amount will not be displayed in the Balance sheet as it gets transferred to Profit and Loss Account.
Note: If the currency of the ledger and the base currency is the same, bill wise details will appear only for those masters while adjusting the Forex Gain or Loss.
Journal Vouchers in Day Book
To view entered Journal vouchers, you can go to Day Book. Day Book is a report to view transactions recorded in the Day.
- Gateway of Tally > Display More Reports > Day Book.
Alternatively, Alt+G (Go To) > type or select Day Book > and press Enter. - If you want to change the date, press F2 (Period).
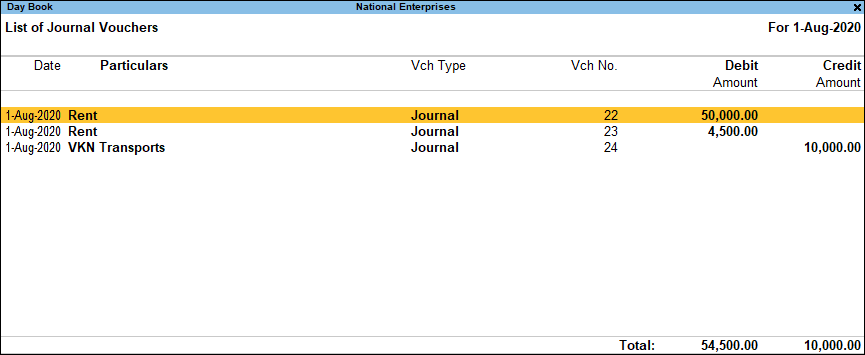
- You can see Journal vouchers along with all other vouchers recorded in the day here.
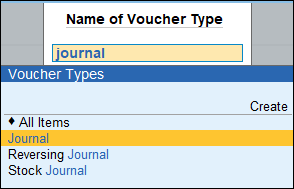
- If you want to see only particular voucher types press F4 (Voucher Type) and select Journal voucher type to view.
Note: In Day Book you can also see transactions for a date range by pressing Alt+F2 (Period) and mention From and To date to view transactions of that period.
- Ctrl+B (Basis of Values): You can configure the values in your report for that instance, based on different business needs.
In Day Book, you can display the Forex transactions only. Press Ctrl+B (Basis of Values) > set Show Forex transactions only as Yes. Press Esc to view the default values.
Similarly, you can select different Type of Voucher entries. Press Ctrl+B (Basis of Values) > Type of Voucher entries > select Accounting Entries Only. Press Esc to view the default values. - Ctrl+H (Change View): You can display the details of a report in different views with additional details or for a specific period. You can also view other reports related to the current report.
To view the Post-Dated Bank Transactions for Day Book, press Ctrl+H (Change View) > type or select Post-Dated Bank Transactions > press Enter. Press Esc to view the default report. - Ctrl+J (Exception Reports): You can view the exceptions related to the data displayed in the current report by pressing Ctrl+J (Exception Reports), without closing the report.
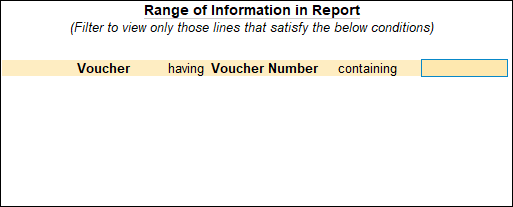
To view the Post-Dated Voucher for Day Book, press Ctrl+J (Exception Reports) > type or select Post-Dated Voucher > and press Enter. Press Esc to view the default report. - You can also use Alt+F12 (Range) function to filter for journal vouchers in Day Book. The range filters selected to view only journal vouchers appears as shown.
Journal Register
Journal register displays all the Journal vouchers recorded for each month. You can view this report in browser.
- Gateway of Tally > Display More Reports > Account Books > Journal Register.
Alternatively, press Alt+G(Go To) > type or select Journal Register > and press Enter.
The Journal Register appears as shown below: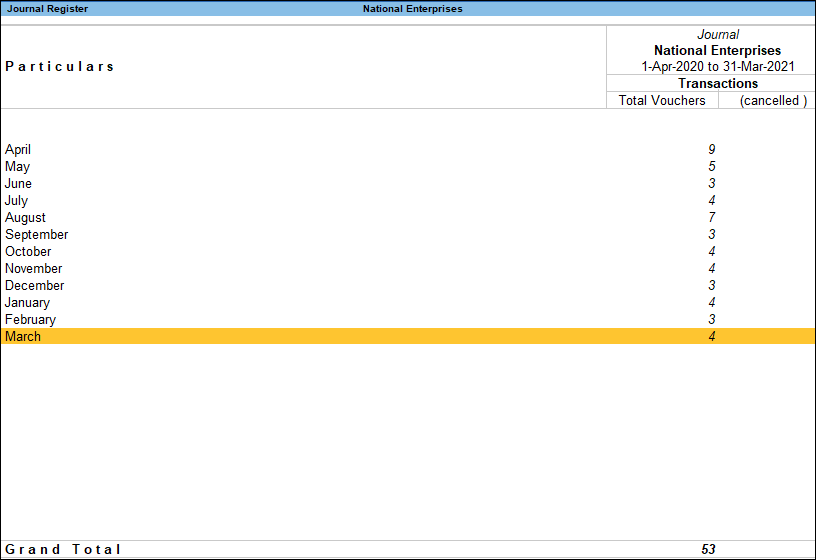
- Select the required month and press Enter.
- Press F8 (Columnar) and set the options as required, to view the journal columnar register. Set the options Show voucher reference number and Show voucher reference date as Yes to view these details in separate columns.
Accept the screen. As always, you can press Ctrl+A to save.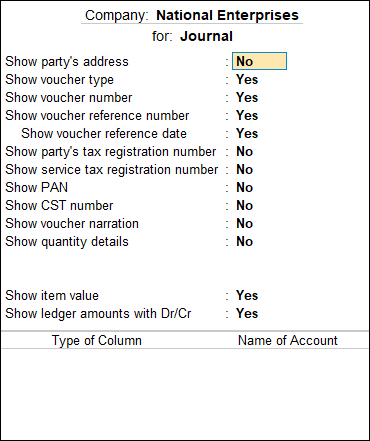
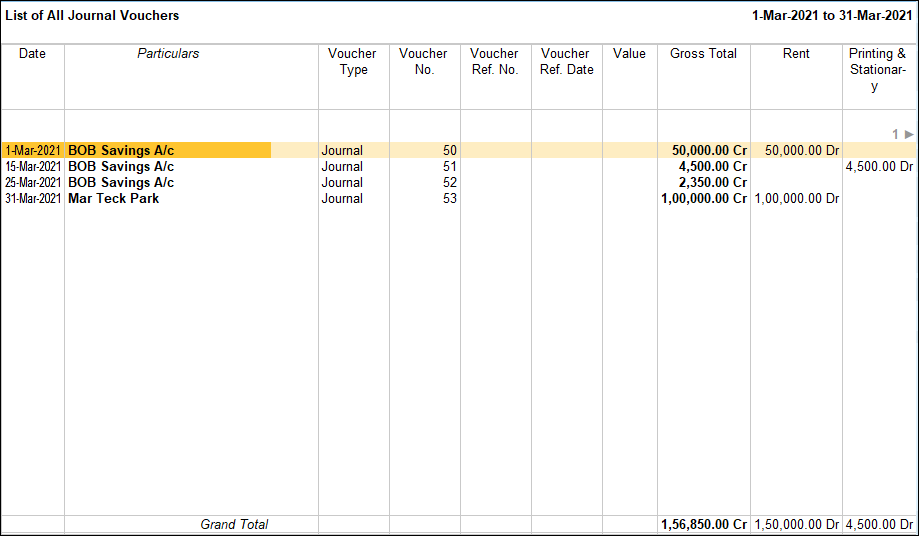
- The columnar Voucher Register of journal vouchers appears as shown:
- To change voucher type press F4 (Voucher Type) at the voucher register screen and select the required voucher type.
Purchase
TallyPrime provides specialised accounting voucher types for purchase-related transactions:
Apart from these, there are specialised voucher types for the inventory transactions – Receipt Note and Rejection Out to record the inventory changes that are part of the purchase cycle. One more voucher type is involved in purchase cycle – Purchase orders.
To know more about complete purchase cycle click Purchase Process
Sales
TallyPrime provides specialised accounting voucher types for sales-related transactions:
Apart from these, there are specialised voucher types for the inventory transactions – Delivery Note and Rejection In to record the inventory changes that are part of the sales cycle. One more voucher type is involved in the sales cycle – Sales order
Payments
Recording Payment transactions in TallyPrime follow a simple pattern. You can record a transaction with the following steps. A payment transaction for Rent expenses is used for illustration.
- Gateway of Tally > Vouchers > press F5 (Payment).
Alternatively, Alt+G (Go to) > Create Voucher > press F5 (Payment). - If you want to change the voucher date, press F2 (Date).
- Select the mode of payment.
- In Account, select Cash, which is already available.
When you create a Company in TallyPrime, the system creates two ledgers by default – Cash and Profit & Loss A/c. - Select the ledger for which you are making the payment and specify the amount. For example, Rent.
- Under Particulars, you need to select expense ledger for which you are making this payment.
In case the ledger is not available, press Alt+C to create Ledger on the fly. In Ledger Creation (Secondary) screen, give ledger name Rent and select the group Indirect Expense in the Under field.
In TallyPrime, you will find patterns to do certain tasks, and these patterns are consistent across the product. For example, when recording a transaction, you can press Alt+C to create a ledger, without leaving the voucher. This pattern works across the product. Anywhere in the product, in a ledger selection field, press Alt+C to create it. - Under Amount, specify the expense amount.

- Provide Narration, if any, and accept the voucher. As always, you can use Ctrl+A to accept.
Payment for purchases can also be recorded similarly. For detail explanation on how to record payment for purchases please refer to Payment for Purchase <hyperlink>
For more details, refer to Payments and Receipts.
Receipts
Recording Payment transactions in TallyPrime follow a simple pattern. You can record a transaction with the following steps. A receipt transaction for Commission Received income is used for illustration.
- Gateway of Tally > Vouchers > press F6 (Receipt).
Alternatively, Alt+G (Go to) > Create Voucher > press F6 (Receipt). - If you want to change the voucher date, press F2 (Date).
- Select the mode of receipt.
- In Account field, select Cash, which is already available.
When you create a Company in TallyPrime, the system creates two ledgers by default – Cash and Profit & Loss A/c. - Select the ledger for which you are making the receipt and specify the amount. For example, Commission Received.
- Under Particulars, select income ledger for which you are making this receipt.
In case the ledger is not available, press Alt+C to create Ledger on fly. In Ledger Creation (Secondary) screen, give ledger name Commission Received and select Indirect Income in the Under field.
In TallyPrime, you will find patterns to do certain tasks, and these patterns are consistent across the product. For example, when recording a transaction, press Alt+C to create a ledger, without leaving the voucher. This pattern works across the product. Anywhere in the product, in ledger selection field, press Alt+C to create it. - Under Amount, specify the commission amount.
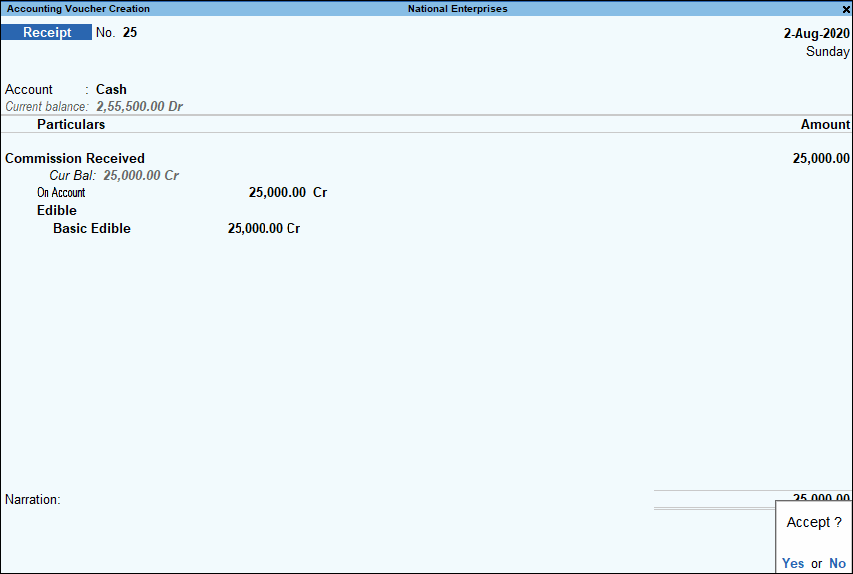
- Provide Narration, if any, and accept the voucher. As always, you can use Ctrl+A to accept.
Receipt against sales can also be recorded similarly. For detail explanation on how to record receipts against sales please refer to Receipt of Money.
As in the case of other voucher types, you can mark a receipt voucher as optional and post-dated.
For more details, refer to Payments and Receipts.
Contra
Fund transfers within different accounts of your company, such as transfer from one bank account to another, deposit of cash to bank account, cash withdrawals from ATMs or, withdrawals from banks using Cheque or DD, can be recorded using Contra Voucher in TallyPrime. Such fund transfers from one account to the other – say Cash A/c to Bank A/c or vice versa – appear on the same side of the company’s balance sheet, and do not impact your company books. This does not include transferring money to any third-party account as part of a payment. Keeping a record of the contra entries helps to track internal fund transfers done month-wise or voucher-wise, for different business needs. You can get a periodic view of the contra entries to have a better understanding of the fund transfers from one account to the other using Contra Register in TallyPrime.
In this section
- Record Transfer of Funds Within Your Accounts
- Contra Voucher in Single-Entry Mode
- Contra Voucher in Double-Entry Mode
Record Transfer of Funds Within Your Accounts
When you record transfer of money to the bank account, TallyPrime internally keeps a record of such deposits. You can print these deposit slips, as needed.
- Gateway of Tally > Vouchers > press F4 (Contra).
Alternatively, press Alt+G(Go To) > Create Voucher > press F4 (Contra).
You can use single entry or double entry mode of data entry to record contra vouchers. Single entry mode helps you in faster data entry and allows multiple credits against a single debit. The double entry mode gives you the flexibility of multiple debits and multiple credits in a single transaction.
Record Contra Voucher in Single-Entry Mode
- Debit the destination account and credit the source account. For example, if you are withdrawing cash from your bank’s ATM, the Cash ledger should be debited and bank ledger should be credited.
- Select the ledger account that you want to debit in the Account field.
- Under Particulars, select the account that you want to credit and enter the amount. You can deposit money from more than one account to a single destination account.
As in other transactions, you can create the ledger on the fly by pressing Alt+C. Alternatively, press Alt+G (Go To) > Create Master> type or select Ledger> and press Enter. - Specify the bank, cheque, or cash details, as required.
- For banks and cheques, you can specify the details in the Bank Allocations screen.
- For cash, you can specify the denomination details in the Bank Allocations > Cash Denominations screen.
A sample image is shown below: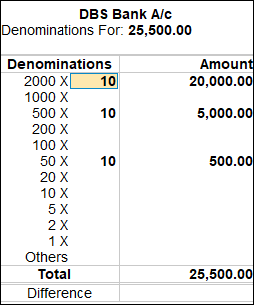
What you see on the screen can vary based on your choices. Press F12 (Configure) to change the options and F11 (Features) to enable or disable features.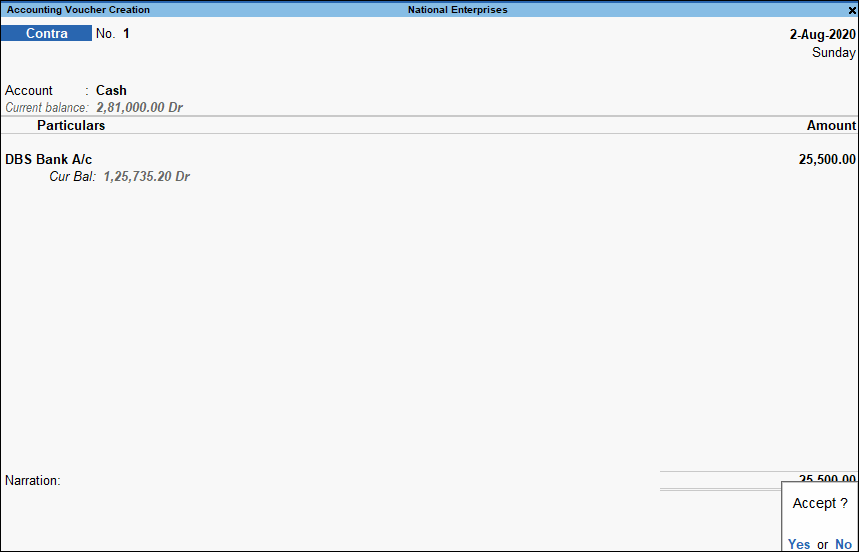
- Provide Narration, if any, and accept the voucher. As always, you can use Ctrl+A to accept.
Record Contra Voucher in Double-Entry Mode
- Press Ctrl+H (Change Mode) to select the Double Entry mode.
- Debit the destination account and credit the source account. For example, if you are withdrawing cash from your bank’s ATM, the cash ledger should be debited and bank ledger should be credited.
- Under Particulars in the To field, select the source ledger account that you want to Credit.
- In the By field, select the destination ledger account that you want to Debit.
As in other transactions, you can create the ledger on the fly by pressing Alt+C. Alternatively, press Alt+G (Go To) > Create Master> type or select Ledger> and press Enter.
A sample image is shown below: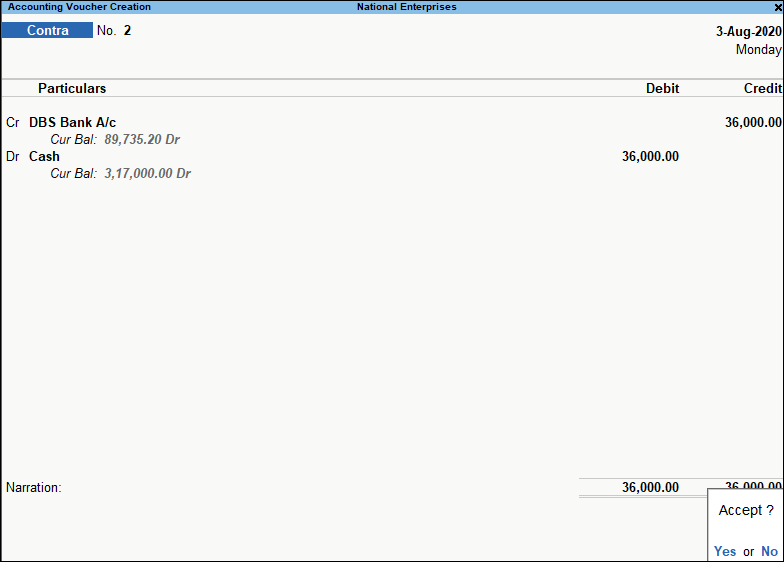
What you see on the screen can vary based on your choices. Press F12 (Configure) to change the options and F11 (Features) to enable or disable features. - Provide Narration, if any, and accept the voucher. As always, you can use Ctrl+A to accept.
In case you have received payment in a different currency, say in Dollars, and now you want to deposit this amount to your company’s bank account. You can create currency master and record the foreign currency amount by prefixing the currency symbol in the Amount field.
As in other vouchers, you can define the current rates of exchange if needed while recording the Contra voucher.
As in any other vouchers, you can create the number series for the contra vouchers, as you need for your reference.
Note: If you deposit cheques in the bank for internal money transfer and collect the deposit slip, you can track such deposit slips in TallyPrime and print them when needed.
As in the case of other voucher types, you can mark a contra voucher as optional and post-dated. - Print Cheque after saving voucher.
Contra Vouchers in Day Book
To view entered Journal vouchers, you can go to Day Book. Day Book is a report to view transactions recorded in the Day.
- Gateway of Tally > Day Book.
Alternatively, press Alt+G (Go To) > type or select Day Book > and press Enter. - If you want to change the date, press F2 (Period).
- You can see Contra vouchers along with all other vouchers recorded in the day here.
- If you want to see only particular voucher types press F4 (Voucher Type) and select Contra voucher type to view.
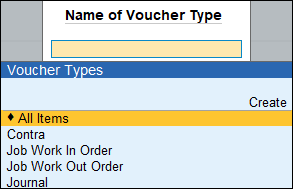
Note: In Day Book you can also see transactions for a date range by pressing Alt+F2 (Period) and mention From and To date to view transactions of that period.
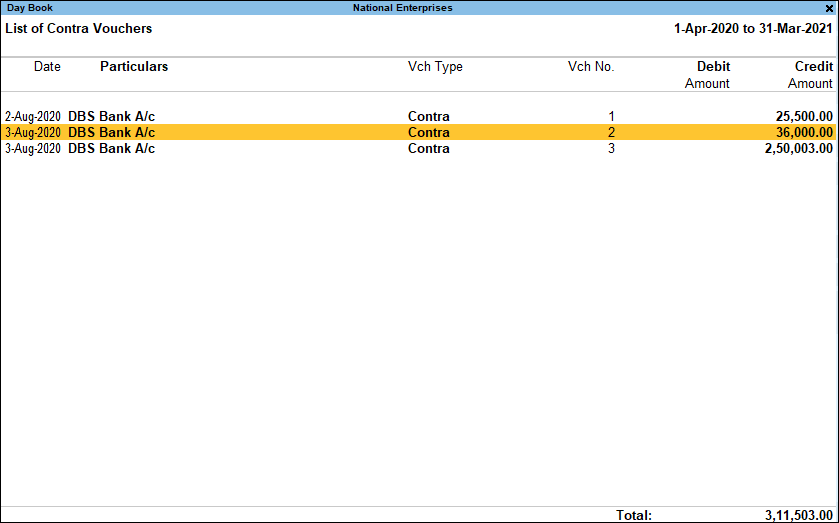
- Ctrl+B (Basis of Values): You can configure the values in your report for that instance, based on different business needs.
In Day Book, you can display the Forex transactions only. Press Ctrl+B (Basis of Values) > set Show Forex transactions only as Yes. Press Esc to view the default values.
Similarly, you can select different Type of Voucher entries. Press Ctrl+B (Basis of Values) > Type of Voucher entries > select Accounting Entries Only. Press Esc to view the default values. - Ctrl+H (Change View): You can display the details of a report in different views with additional details or for a specific period. You can also view other reports related to the current report.
To view the Post-Dated Bank Transactions for Day Book, press Ctrl+H (Change View) > type or select Post-Dated Bank Transactions > press Enter. Press Esc to view the default report. - Ctrl+J (Exception Reports): You can view the exceptions related to the data displayed in the current report by pressing Ctrl+J (Exception Reports), without closing the report.
To view the Post-Dated Voucher for Day Book, press Ctrl+J (Exception Reports) > type or select Post-Dated Voucher > and press Enter. Press Esc to view the default report. - You can also use Alt+F12 (Range) function to filter for Contra vouchers in Day Book. The range filters selected to view only Contra vouchers appears as shown.

Contra Register
If you record the transfer of funds between your company accounts, you will need to keep a track of all such transfers periodically. By default, Contra Register shows the number of contra vouchers recorded month-wise.
You can alter details.
- Gateway of Tally > Display More Reports > Account Books > Contra Register.
Alternatively, press Alt+G (Go To) > type or select Contra Register > and press Enter. - Press F6 (Quarterly) to get a quarterly view of the contra vouchers.
- Press Enter on the selected period to view the Voucher Register report. All the contra vouchers recorded in that period are displayed in this report.

What you see on the screen can vary based on your choices. Press F12 (Configure) to change the options and F11 (Features) to enable or disable features. Alternatively, press Ctrl+I (More Details) to enter any of the values without activating the options in F12 (Configure). - Ctrl+H (Change View): You can display the details of a report in different views with additional details or for a specific period. You can also view other reports related to the current report.
To view the Monthly basis, press Ctrl+H (Change View) > type or select Monthly > press Enter. Press Esc to view the default report.
Similarly, you can select Daily, Weekly wise view of report. - Ctrl+J (Exception Reports): You can view the exceptions related to the data displayed in the current report by pressing Ctrl+J (Exception Reports), without closing the report.
To view the Memorandum Register, press Ctrl+J (Exception Reports) > type or select Memorandum Register> and press Enter. Press Esc to view the default report. - You can also use Alt+F12 (Range) function to filter for Contra register. The range filters selected to view only contra register vouchers appears as shown.
Other Reports Showing Contra Entries
Data Representation in Reports
As in the case of any other voucher, you can do the following from any voucher report (Day Book, Ledger Vouchers, Sales Register, and so on).
- Press Enter on a voucher for alteration.
- Press Alt+Enter to open a voucher in display mode.
- Select a voucher and press Alt+2 to duplicate.
- Select a voucher and press Alt+A to add a voucher on the same date as the last entered voucher for the day.
- Select a voucher and press Alt+I to insert a voucher above the selected voucher.
- Select a voucher and press Alt+D to delete a voucher. You can select multiple vouchers by using arrow keys to navigate and pressing Space Bar for selection.
- Select a voucher and press Alt+X to cancel.
Memorandum Vouchers
Memorandum Vouchers are those vouchers which do not impact your books of accounts.
Used when the actual purpose of an expense is not sure and can be converted to any voucher type. Will not impact the accounts unless converted to a normal voucher type. The impact of a memorandum voucher can be seen by creating scenarios.
In this section
- Making suspense payments
- Vouchers not verified at the time of entry
- Items given for approval
- Memorandum Voucher Register
Making suspense payments
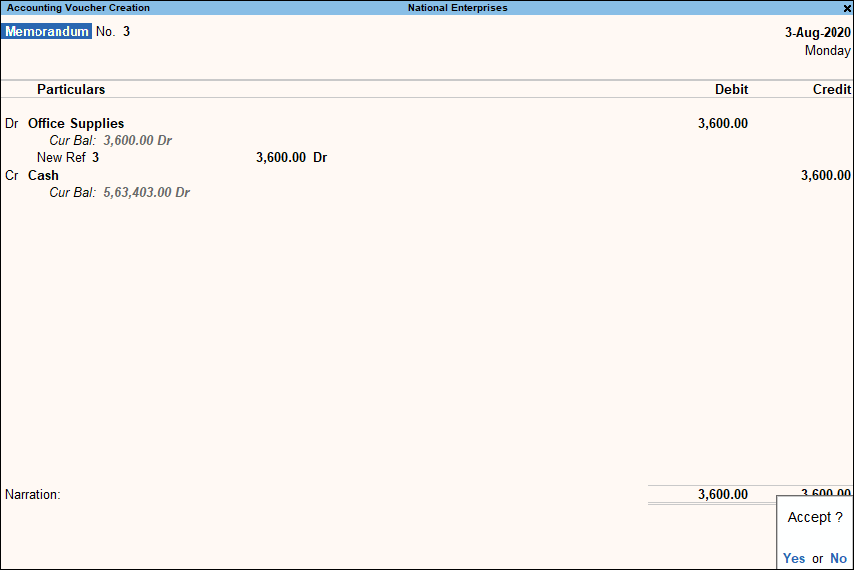
Consider that a company gives its employees cash to buy office supplies, the exact nature and cost of which are unknown. For this transaction you can enter a voucher for the petty cash advance, a voucher to record the actual expenditure details when they are known, and another voucher to record the return of surplus cash.
However, a simpler way of doing it is to enter a Memo voucher when the cash is advanced, and then turn it into a Payment voucher for the actual amount spent, when the details are known.
For example, the Company pays its employee Rs. 1000 as petty cash advance for Office Expenses.
- Gateway of Tally > Vouchers > press F10 (Other vouchers) > type or select Memorandum Voucher.
Alternatively Alt+G (Go to) > Create Vouchers > press F10 (Other vouchers) > type or select Memorandum Voucher.
In case the voucher is inactive, you will be prompted to activate the Memorandum voucher type. Select Yes or press Yes to proceed. - If you want to change the voucher date, press F2 (Date).
- Select the mode of payment.
- Accept the screen. As always, you can press Ctrl+A to save.
In TallyPrime, you will find patterns to do certain tasks, and these patterns are consistent across the product. For example, when recording a transaction, press Alt+C to create a ledger, without leaving the voucher. This pattern works across the product. Anywhere in the product, in ledger selection field, press Alt+C to create it.
Vouchers not verified at the time of entry
If there is no clarity with the details of a voucher you are entering, you can enter it as a Memo voucher and amend it later when the details are available.
Items given for approval
Generally completed sales are entered into books. In case items are given on approval, use a Memo voucher to track and convert it into a proper Sales voucher. You can cancel/delete the memo voucher if the sale is not made.
Memorandum Voucher Register
- Gateway of Tally > Display More Reports > Exception Reports > Memorandum Register.
Alternatively, press Alt+G (Go To) > type or select Memorandum Register > and press Enter.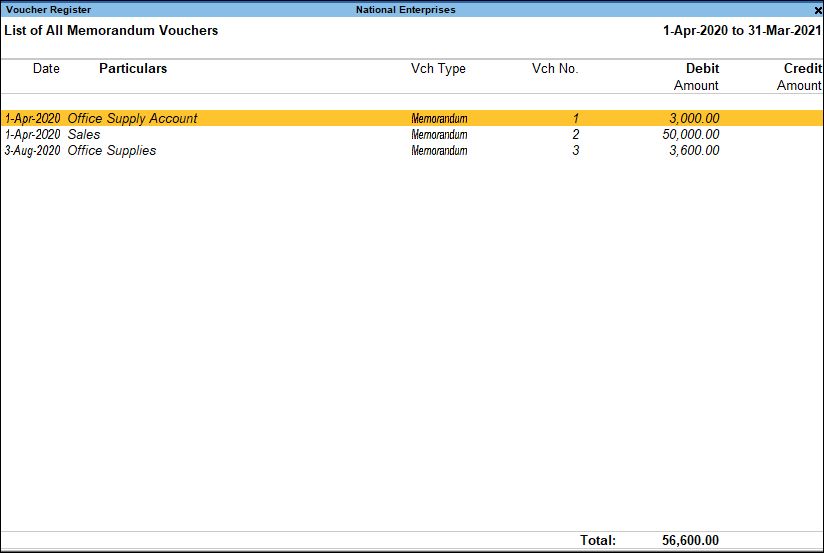
Note: You can also view memorandum vouchers from the Day Book.
You can alter and convert a Memo voucher into a regular voucher when you decide to consider the entry into your books. Use Scenarios to see the effect of Memo entries on reports and statements.
Memorandum Vouchers in Day Book
To view entered Memorandum vouchers, you can go to Day Book. Day Book is a report to view transactions recorded in the Day.
- Gateway of Tally > Day Book.
Alternatively, press Alt+G (Go To) > type or select Day Book> and press Enter. - If you want to change the date, press F2 (Period).
You can see Memorandum vouchers along with all other vouchers recorded in the day here. - If you want to see only particular voucher types press F4 (Voucher Type) and select Memorandum voucher type to view.
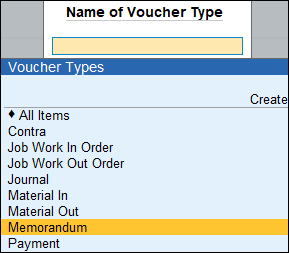
Note: In Day Book you can also see transactions for a date range by pressing Alt+F2 (Period) and mention From and To date to view transactions of that period.
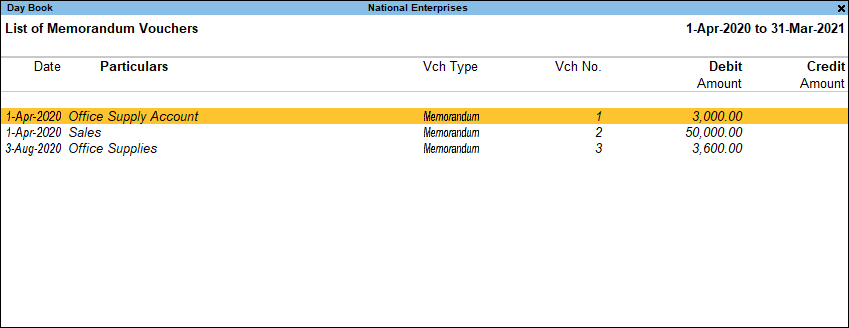
- Ctrl+B (Basis of Values): You can configure the values in your report for that instance, based on different business needs.
- In Day Book, you can display the Forex transactions only. Press Ctrl+B (Basis of Values) > set Show Forex transactions only as Yes. Press Esc to view the default values.
- Ctrl+H (Change View): You can display the details of a report in different views with additional details or for a specific period. You can also view other reports related to the current report.
- To view the Post-Dated Bank Transactions for Day Book, press Ctrl+H (Change View) > type or select Post-Dated Bank Transactions > press Enter. Press Esc to view the default report.
- Ctrl+J (Exception Reports): You can view the exceptions related to the data displayed in the current report by pressing Ctrl+J (Exception Reports), without closing the report.
- To view the Post-Dated Voucher for Day Book, press Ctrl+J (Exception Reports) > type or select Post-Dated Voucher > and press Enter. Press Esc to view the default report.
- You can also use Alt+F12 (Range) function to filter for Memorandum vouchers in Day Book. The range filters selected to view only Memorandum vouchers appears as shown.

Exception Reports for Memorandum Vouchers
- Gateway of Tally > Display More Reports > Exception Reports > Memorandum Register.
Alternatively, press Alt+G (Go To) > type or select Memorandum Register > and press Enter.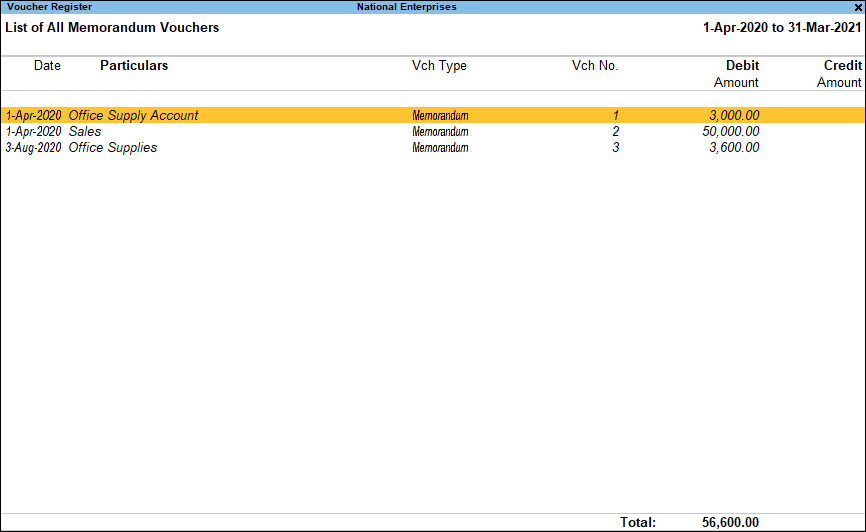
You can also view memorandum vouchers from the Day Book. You can alter and convert a Memo voucher into a regular voucher when you decide to consider the entry into your books.
Note: Use Scenarios to see the effect of Memorandum entries on reports and statements.
Creation of Scenarios for Memorandum Vouchers
Scenario management is a management tool that enables projecting accounts and inventory related information by including certain types of Vouchers without affecting the source data. It is also a useful forecasting tool i.e. you can forecast the expenses using provisional vouchers such as Memorandum Voucher.
In this section
Create a Scenario
- Gateway of Tally > Create> Scenario.
Alternatively, press Alt+G (Go To) > Create Master > type or select Scenario> and press Enter. - Enter a suitable scenario Name.
- Enable the option Include actuals.
- Set Exclude Forex Gains/Losses Calculations to Yes if you do not want the Unadjusted Forex Gain/Loss element to reflect in the scenario.
- Set Exclude Inventory Tracking Calculations to Yes if you do not want the Sales/Purchase Bills Pending element to reflect in the scenario.
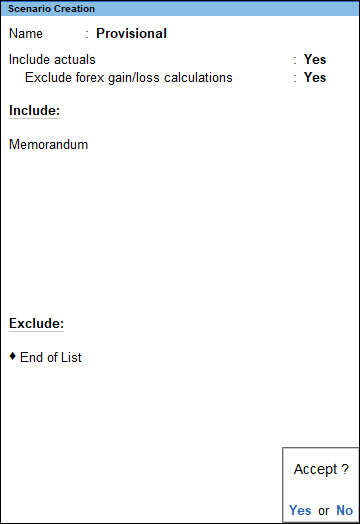
- Select the vouchers to Include. These vouchers will affect the scenario created.
- Select the vouchers to Exclude. These vouchers will not affect the scenario created.
- Accept the screen. As always, you can press Ctrl+A to save.
Use Memorandum Voucher in Scenarios
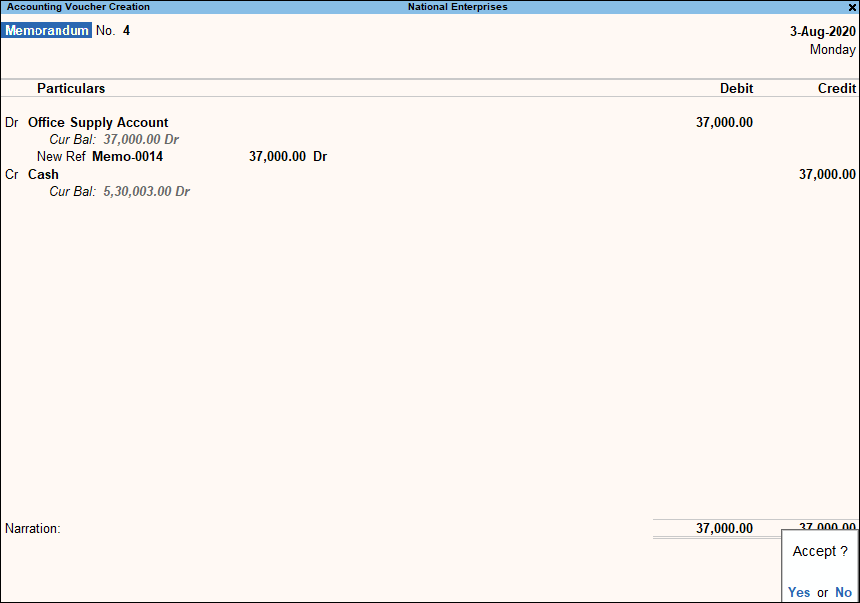
Recording transactions in TallyPrime follow a simple pattern. You can record a transaction with the following steps. A Company pays its employee Rs. 37000 as cash advance for Office Expenses is used for illustration.
- Gateway of Tally > Vouchers > press F10 (Other vouchers) > type or select Memorandum Voucher.
Alternatively Alt+G (Go to) > Create Voucher> press F10 (Other vouchers) > type or select Memorandum Voucher.
In case the voucher is inactive, you will be prompted to activate the Memorandum voucher type. Select Yes or press Y to proceed. - If you want to change the voucher date, press F2 (Date).
- Select By/Dr (Debit) side of the transaction.
- In By, select the office supplies Account.
As in other transactions, you can create the ledger on the fly by pressing Alt+C. Alternatively, press Alt+G(Go To) >Create Master> type or select Ledger> and press Enter. - In Debit, specify the amount.
- In By, select the office supplies Account.
- Select the To/Cr (Credit) side of the transaction.
Use Scenarios in Reports
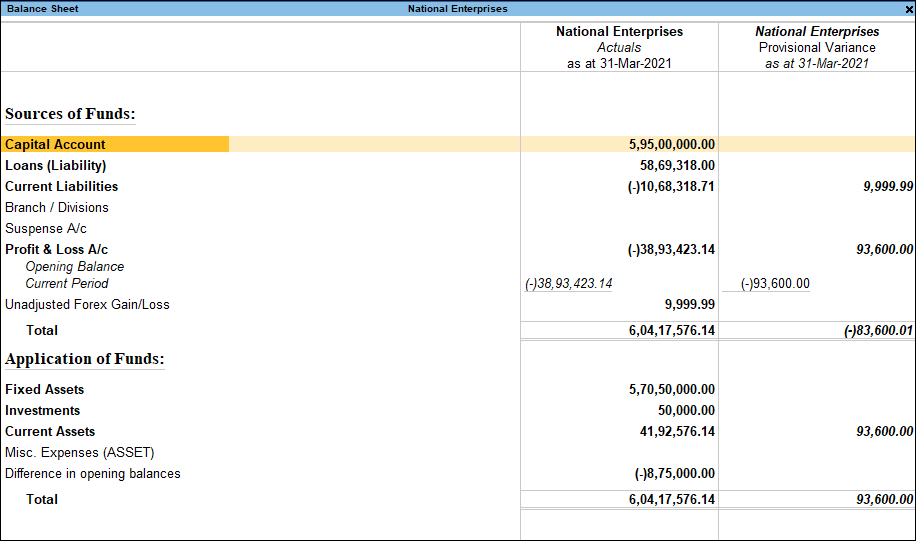
You can use scenarios in statements (not registers) to compare the actuals with the provisional details by using the Alt+C (New Column) button.
- Gateway of Tally > Balance Sheet.
Alternatively, press Alt+G (Go To) > type or select Balance Sheet > and press Enter. - Press Alt+C (New Column).
- Select the scenario required. The Balance Sheet with the scenario appears as shown below:
Reversing Journals
Reversing Journals are those vouchers which do not impact your books of accounts.
Similar to the optional voucher. Has an “up to” date. To check the impact on account for certain expenses until the actual voucher is passed. The impact of a Reversing Journal can be seen by creating scenarios.
TallyPrime follow a simple pattern to record the transactions. You can record a transaction with the following steps.
Illustration, On 30th June you want to view the Balance Sheet as of today but June salaries are not paid until the first week of July. Thus, there is a large liability, which would not be reflected in the Balance Sheet. To overcome this, you enter a Reversing Journal Voucher dated 30th June, which would look like this:
- Gateway of Tally > Vouchers > press F10 (Other vouchers) > type or select Reversing Journals.
Alternatively, Alt+G (Go to) > Create Voucher > press F10 (Other vouchers) > type or select Reversing Journal.
In case the voucher is inactive, you will be prompted to activate the Reversing Journal voucher type. Select Yes or press Y to proceed. - If you want to change the voucher date, press F2 (Date).
- Select By/Dr (Debit) side of the transaction.
- In By, select the Salary Account.
As in other transactions, you can create the ledger on the fly by pressing Alt+C. Alternatively, press Alt+G(Go To) >Create Master > type or select Ledger> and press Enter. - In Debit, specify the amount.
- In By, select the Salary Account.
- Select the To/Cr (Credit) side of the transaction.
- In To, select the Provision for Salary Account.
As in other transactions, you can create th
- In To, select the Provision for Salary Account.
